Section Topics
Using Lists
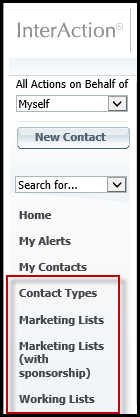
InterAction provides three types of lists for organizing contacts in different ways:
- Contact types identify the relationship between your organization and the contact, the purpose of the contact in the Firm List, or the status of the contact.
- Working lists are temporary collections of contacts associated with a particular task, such as a list of people that someone in a particular department needs to call in a week, a list of recruiting candidates, or a departmental event. You can create working lists in the Web Client for these purposes and to manage personal projects.
- Marketing lists are used for mailings and events. Marketing lists can be ones with or without sponsorship.
Tip: You can create activities regarding working lists and marketing lists. These activities are essentially list-specific activities. For details, see Create an Activity Regarding a List.
Your organization may change the term used for each of these types of lists.
The lists are available from the Web Client left-hand menu. Choosing one of these options opens a “Home page” for the type of list you chose. This page displays the available lists and includes common actions you can perform. The figure below illustrates this page for Contact Types home page; the Working Lists and Marketing Lists pages are similar.
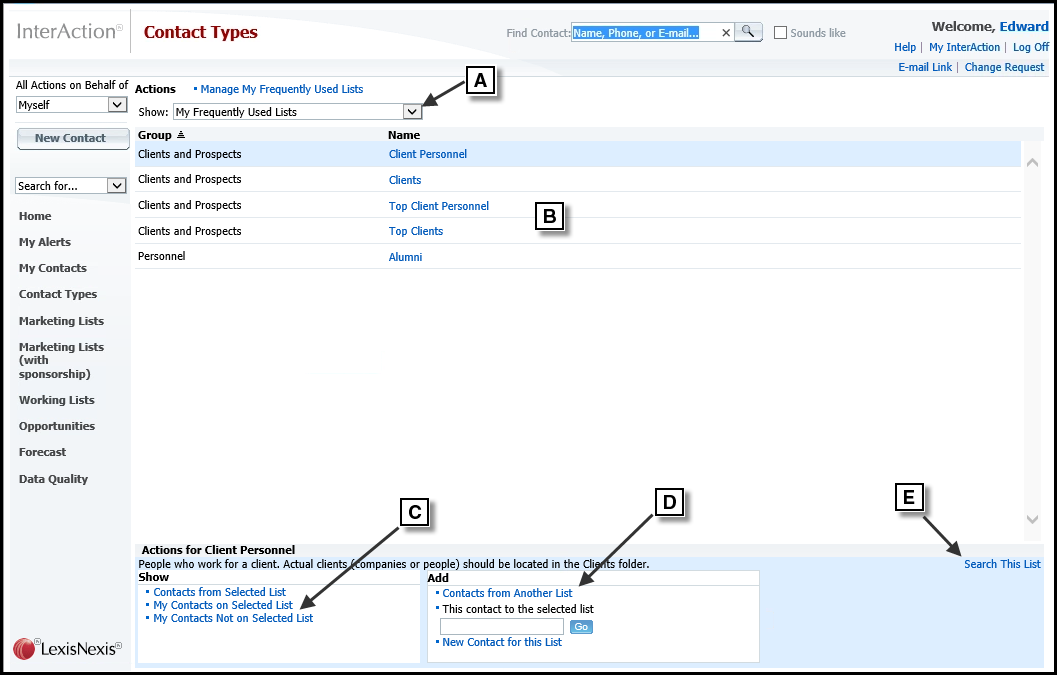
Home Page for Contact Type Lists
[A] This filters the set of lists displayed.
[B] The lists appear in this area. Choose the link to display a list; alternatively, select the list and choose one of the Actions at the bottom of the page.
[C] Choose these links to see the contacts that are or are not on the list.
[D] Use these links to add new contacts to the list.
[E] Choose this to search the list for a specific contact.
Although contact types, working lists, and marketing lists have different purposes, they work in a similar way. Performing the following actions is basically the same for all three of these lists:
- Viewing the contacts on a list. See View a List.
- Adding contacts to a list. See Add Contacts to a List.
- Searching a list. See Search a List.
- Removing contacts from a list. See Remove Contacts from a List.
- Viewing the lists on which a contact is included. See View the Lists that Include a Contact.
- Creating list-specific phone numbers and addresses. See Creating List-Specific Phones and Addresses.
- Setting and clearing flags on contacts for lists that are configured to use flags. See Flagging Contacts.
For details about the three different types of lists, see the following:
View a List
-
From the left-hand menu, choose the type of list you want to view—Contact Types, Marketing Lists, Marketing Lists (with sponsorship) or Working Lists.
-
If necessary, filter the set of lists displayed by selecting an option from the Show list.
-
By default, the page displays My Frequently Used Lists. The lists you use most of the time should be in this set. For more about frequently used lists, see My Frequently Used Lists.
-
To see all available lists, choose All Lists.
-
To see all lists types within a specific group or type, select the group.
-
-
Select the list. To view the list, choose the link for the list name. Alternatively, select the list and choose one of the Actions from the bottom of the page.
-
The Show actions provide options for displaying contacts that are and are not on the list. This is useful for finding contacts in your own list that should be added.
-
The Add actions provide options for adding contacts to the list.
-
For some working lists, you may also see a Manage section. This provides options for changing the properties of the list. See Managing a Working List for details.
-
When viewing the contacts on any list, you can print reports for all of the contacts or just a selected set of contacts. For details, see Viewing and Printing Reports for Contacts.
Add Contacts to a List
You can add contacts to working lists, marketing lists, and contact type lists from several different locations in the Web Client:
- You can navigate to the home page for a list and choose the options at the bottom of the page to add contacts.
- You can navigate to the page for an individual list and choose the Add Contact to List link in the upper-right corner.
-
You can select a contact in any contact list or search result and choose Actions > Add to Marketing Lists, or Actions > Add to Working Lists, then choose the list. For contact types, you can choose Edit > Contact Types.
For more about contact types, see Applying and Removing Contact Types.
- When creating a new contact, you can choose to add it to contact types, working lists and/or marketing lists immediately. See Creating Contacts.
When adding user contacts to a list, the user contacts must be added to the firm list. Depending on how InterAction is configured at your organization, you may have the option to review possible duplicate as the contacts are added. See Checking for Duplicate Contacts When Adding User Contacts to a List for details.
Add Contacts to a List from the List Home Page
-
From the left-hand menu, choose the type of list you want to work with—Contact Types, Marketing Lists, Marketing Lists (with sponsorship), or Working Lists.
-
Select the list to which you want to add contacts.
-
In the Actions section select the method you want to use to add the contacts.
To Do This Search the firm list for the contacts to add Under the Add section, enter the name of the contact to find and choose Go. Add contacts from your own contact list Under the Show section, choose the My Contacts Not on Selected List link.
Note – if the list is a marketing list that uses sponsorship, the options are different. See Adding Contacts and Setting Sponsorship Information for a Marketing List.
Create a new contact for the list Under the Add section, choose New Contact for this List. Select the contact from a different list Under the Add section, choose Contacts from Another List. -
Select the check boxes next to each contact to add to the list.
-
When finished selecting the contacts, choose Save.

Choosing an Option for Adding Contacts to a List
[A] Enter the name of the contact to add and choose Go.
[B] Select this to find contacts in your list that are not already on the list.
[C] Select this to add a new contact to the list.
[D] Select this to search a different list for the contacts to add.
Add Contacts to a List from the List Page
-
Navigate to the page for the list you want to work with.
-
From the left-hand menu, choose the type of list you want to work with [Contact Types, Marketing Lists, Marketing Lists (with sponsorship), or Working Lists].
-
Double-click the list. Alternatively, select the list and choose Contacts from Selected List.
-
-
In the upper-right corner of the page, choose Add Contact to List.
-
Select the method you want to use to add the contacts.
To Do This Search the firm list for the contacts to add Choose Find Contact. Add contacts from your own contact list Choose Select from My Contacts. Create a new contact for the list Choose Create New Contact. Select the contact from a different list Choose Copy Contact From Another List. -
Select the check boxes next to each contact to add to the list.
-
When finished selecting the contacts, choose Save.
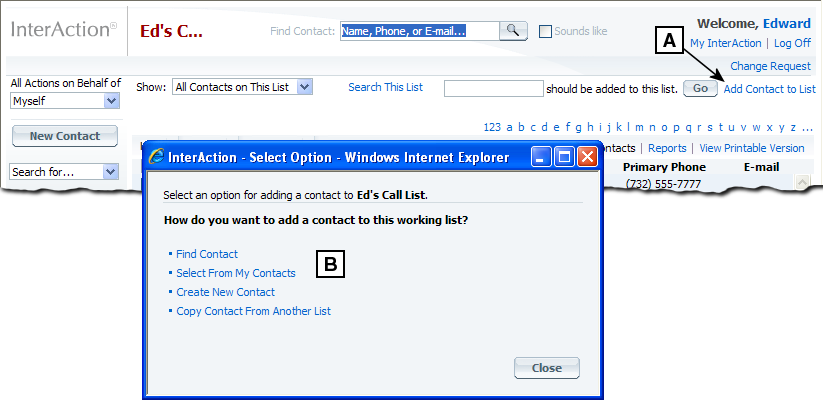
Adding Contacts to a List
[A] Select the Add Contact to List link.
[B] Select the link for the method you want to use to add contacts to the list.
Checking for Duplicate Contacts When Adding User Contacts to a List
When you choose to add a user contact to a marketing list or working list, InterAction automatically adds the contact to the firm list. This is necessary because a contact that is in your list only cannot be added to marketing or working lists.
When adding the contact to the firm list, InterAction checks for any possible duplicates of the contact. Depending on how InterAction has been configured at your environment, you may have the option to review these possible duplicates and decide whether your contact matches the existing firm contact.
Note: Your organization may configure InterAction to not use this feature. In this case, you won’t see these messages. Your contacts are added to the firm list and any possible duplicates are sent to the appropriate data stewards to review.
In this case, InterAction displays a message indicating that there are possible duplicates. Select one of these options:
| To | Select this Option |
|---|---|
| Review the possible duplicates | Review possible duplicates and add the contacts to the list. |
|
Skip the review. In this case, the contacts are not added to the firm list OR the marketing or working list. |
Do not add these contacts to the list. |
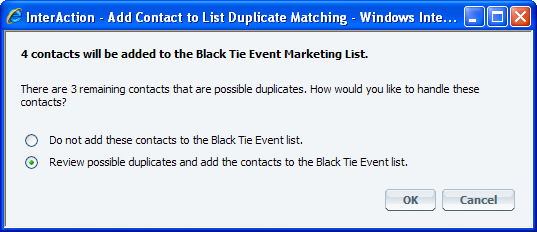
Option to Review Possible Duplicates
If you select to review the duplicates, InterAction displays a dialog box for each one that shows the possible matches. If one of the matches is the same contact, select it and choose OK. If none of the contacts match, select None of these and choose OK.
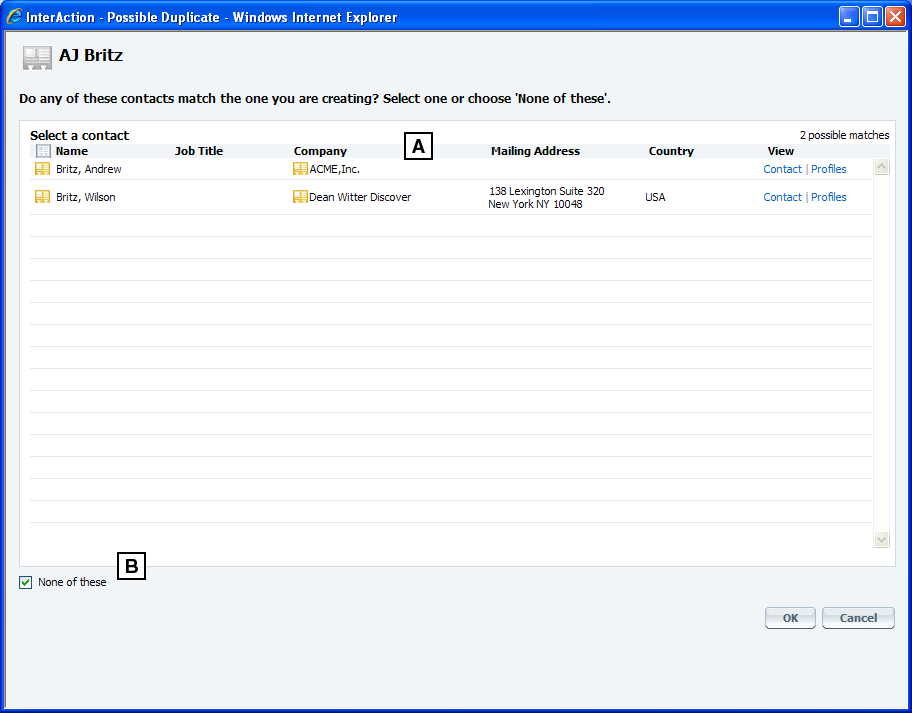
Reviewing the Possible Duplicates
[A] Possible duplicate contacts are displayed here. If one of these matches your contact, select it and choose OK. Your contact is merged with the selected contact.
[B] If none of the contacts match, select the None of these check box and choose OK. Your contact is added to the firm list as a completely new contact.
Search a List
-
From the left-hand menu, choose the type of list you want to search: Contact Types, Marketing Lists, Marketing Lists (with sponsorship), or Working Lists).
-
Select the list to search.
-
Choose Search this List.
-
Enter criteria for searching the list.
-
You can search on name and address information.
-
You can also search on any list-specific additional fields for the list. These appear at the bottom of the search form.
-
-
Choose Search to see the contacts in the list that meet the specified criteria.
For more about using the list searches, see List Searches and Searching Tips.
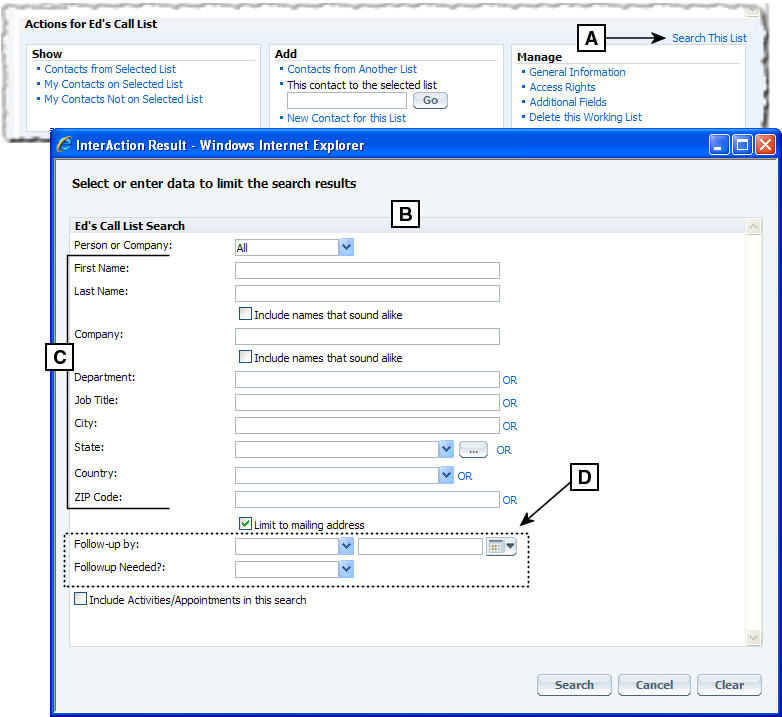
Searching a List
[A] Choose this link.
[B] Enter criteria in the Contact Search dialog box.
[C] You can search all lists by name and address information.
[D] If applicable, additional fields for the list appear here. Enter the values to use as criteria.
Remove Contacts from a List
If you have sufficient access rights, you can remove contacts from a list.
Working lists can contain list-specific contacts. These contacts exist only within the working list, not the firm list. Deleting one of these contacts from the list completely removes it from InterAction. For more about working list-specific contacts, see Working List-Specific Contacts.
-
Navigate to the page for the list you want to work with.
-
From the left-hand menu, choose the type of list you want to work with: Contact Types, Marketing Lists, Marketing Lists (with sponsorship), or Working Lists.
-
Double-click the list. Alternatively, select the list and choose Contacts from Selected List.
-
-
Select the contact to remove. To remove multiple contacts at once, select the check box for each contact.
-
Choose Actions > Delete from this List.
If the Delete from this List option on the Actions menu is disabled, this means you do not have the necessary access rights to delete contacts from the list. These access rights are specific to the particular list. Contact the user who manages the list or your system administrator.
-
When prompted to confirm the delete, choose Yes.
-
InterAction removes the firm contacts from the list. The contacts remain in the firm list.
-
InterAction completely deletes any working list-specific contacts.
-
View the Lists that Include a Contact
Sometimes it is useful to view a list from the context of an individual contact. For example, you might want to see which mailings a given contact is receiving. Rather than checking each marketing list your organization maintains, you can view this information directly from the contact.
View the Lists That Contain a Contact
-
Find the contact and open the contact’s Overview page.
-
Expand the Profiles and Lists section of the page.
For more about the Overview page, see Using the Contact Overview Pages.
-
Choose either Marketing Lists or Working Lists.
The lists that contain the contact are displayed on the left side of the area. You can view any fields or notes associated with the list by choosing the list.
Note that this procedure is not necessary for contact types, since the contact types that apply to a contact always appear next to the contact’s name.
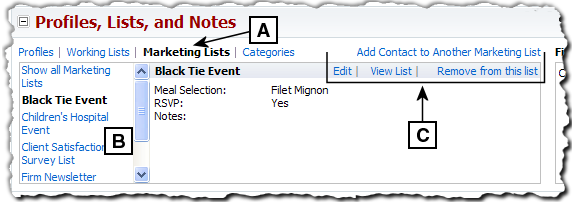
Lists that Contain a Contact
[A] Choose the type of list you want to view. Marketing Lists has been chosen in this example.
[B] This area displays the lists that contain the contact.
[C] Choose these links to edit the list-specific information, view the entire list, or remove the contact from the list.
Creating List-Specific Phones and Addresses
You can create list-specific phones and addresses for working lists, marketing lists, and contact type lists.
This is useful if you have information that is only relevant to the contact within the context of the list. For example, the working list for a temporary project might include people who are working at a temporary location. You can use list-specific phones or addresses to record these temporary items.
List-specific phones and addresses work the same way for all three types of lists.
You can add and view list-specific phones and addresses only from the context of the list. This means that you must open the View Contact page from the list itself, not from the Overview page or any other location.
Perform the following steps:
-
Within a working list, marketing list, or contact type list, choose the icon for the contact or select the contact and choose View > Contact.
-
Choose the appropriate link to add the phone or address (Add Location, Add Phone, or Add E-mail or Web Site.)
-
Select the check box This <item> is only visible to users with access to <list name> .
-
Enter the phone or address information into the appropriate fields and choose Save.
The list-specific information is displayed in the View Contact page with a folder icon (
 ).
).
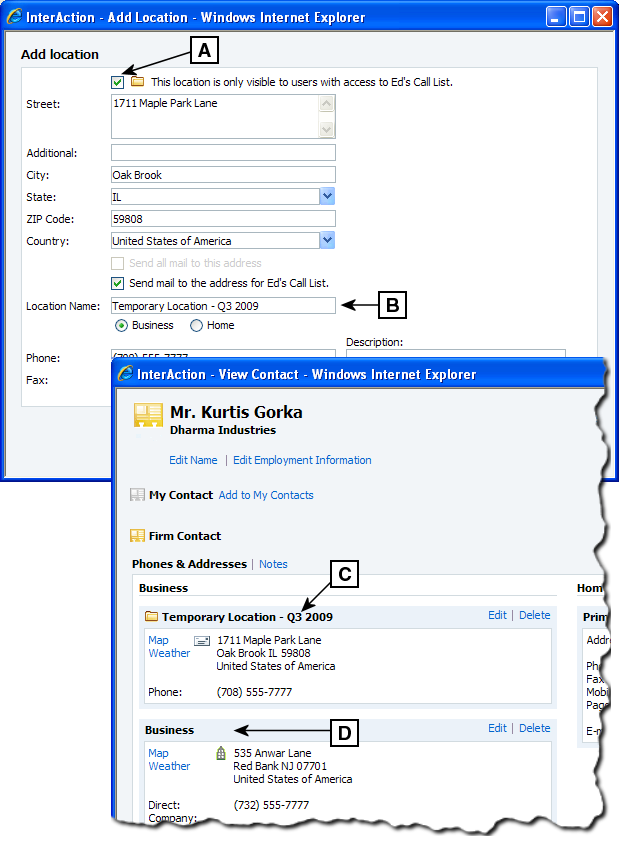
Adding List-Specific Phones and Addresses
This shows creating a list-specific location for a working list. The process is the same for contact type lists and marketing lists.
[A] Select this check box to make the phone or address information specific to the list.
[B] Enter a name or description. This is useful for distinguishing why the item is specific to the list.
[C] The list-specific information appears like other phones and addresses. The folder icon ( ) indicates that it is specific to the list.
[D] This is a normal address for this contact. Note that it does not have the folder icon.
Flagging Contacts
A list can be configured to use flags. This lets you flag individual contacts on the list with different colors. This can be useful as a reminder to follow up with a contact. The meaning of each color can be configured for the list.
When you create your own working lists, you can choose to turn on flagging for the list and set the meaning of each flag color. For example, in a list of people to call, the red flag might mean “Not yet called,” while the blue flag might mean that you left a message and need to call back. In a list for a personal event such as a party, you could define one flag color as “Invitation not yet sent” and a different flag color as “not attending.”
For details about setting options for a working list, see Managing a Working List.
When working with a list created by someone else, you may be able to set and clear the flags, depending on your access rights to the list. If the list has been configured to use flags, it has a flag column you can see in the grid. If the flag column is not visible, then the list has not been configured to use flags.
When viewing a list that uses flags, you can sort by the flag column. In this case, the flags are sorted the set order. This is the same order you can see when assigning flags to contacts. For example, contacts marked with the Red flag would be sorted before those marked with Orange. This order is not configurable.
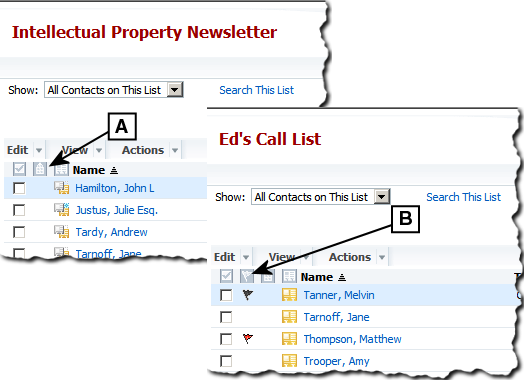
Flag Column for a List
[A] This list is not configured to use flags, so there is no flag column shown in the grid.
[B] This list uses flags, so the second column in the grid is the flag column.
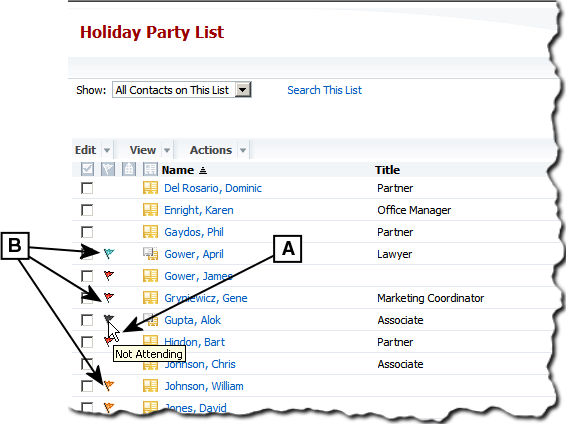
Flagged Contacts on a Working List
[A] This contact is flagged with the black-colored flag. This has been configured to mean “not attending,” as shown in the tool tip for the flag.
[B] Examples of marking contacts with different colored flags (black, red, and orange in this example)
The meaning assigned to each color depends on how the list has been configured.
Flagging a Contact or Set of Contacts
Note: Note that a contact can only have a single flag in for a particular list. For example, you can’t mark a contact with both the red and blue flags. If a contact is already flagged and you select a new color, the old flag is removed and the contact is updated to the new color.
-
Within a working list, marketing list, or contact type list, either select a single contact or select the check boxes for multiple contacts.
-
Choose Actions > Set Flag.
If this option is not available, this means that the list is not configured to use flags.
-
In the list of available flags, select the color you want to use for the selected contacts, then choose Save.
The contact or contacts are updated with the selected flag color.
Note that you must have sufficient access rights to the list to set or clear flags on the contacts. If you don’t have access, InterAction displays an error message instead of the Set Flag dialog box.
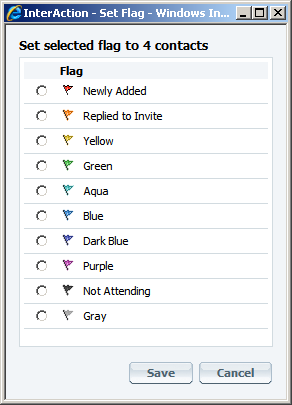
Selecting the Flag to Use
Clearing the Flag for a Contact or Set of Contacts
-
Within a working list, marketing list, or contact type list, either select a single contact or select the check boxes for multiple contacts.
You can clear multiple colors at once.
-
Choose Actions > Clear Flag.
Note that you must have sufficient access rights to the list to set or clear flags on the contacts. If you don’t have access, InterAction displays an error message.