Section Topics
My InterAction Settings
Certain features in the InterAction Web Client allow for additional user configuration options. You can set these options by choosing the My InterAction link. You can configure the following settings:
- My Frequently Used Lists
- Start Page and Text Size
- New Contact Defaults
- Contact Update Settings
- Proxies
- Contact List
- Change Password
- Regional Settings
- Reminder Settings
By setting these options, you can personalize and configure InterAction based on your needs, preferences, and work habits.
View and Change the My InterAction Settings
Select the My InterAction link in the upper right-hand corner. The My InterAction dialog box opens in a separate window. By default the first page displayed is My Frequently Used Lists.
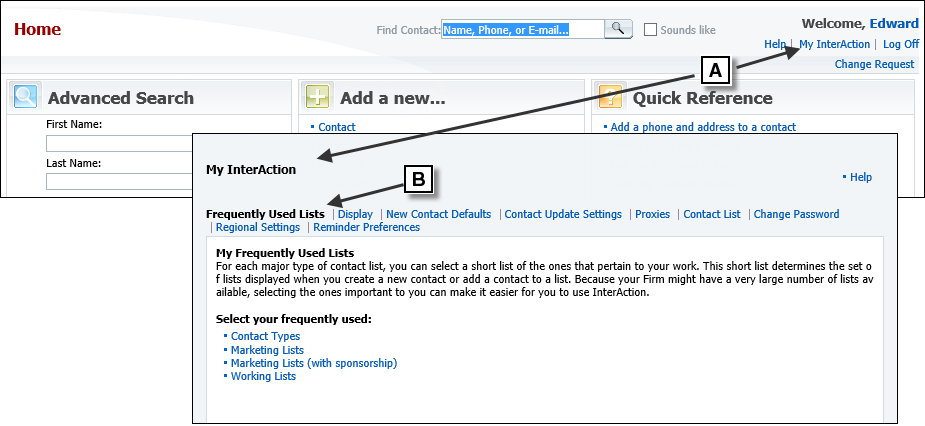
[A] Choose the My InterAction link to customize the look and behavior of InterAction. This opens the My InterAction page.
[B] By default, the first section displayed is Frequently Used Lists.
My Frequently Used Lists
The Frequently Used Lists feature allows you to indicate your frequently used contact type lists, marketing lists, and working lists. These should be the lists that are most relevant to you based on your department, practice group, area of expertise, etc.
Set Your Frequently Used Lists
-
Open the Frequently Used Lists dialog box.
Do one of the following:
-
From the Contact Types, Marketing Lists, or Working Lists page, choose the Manage My Frequently Used Lists link, then skip to step 3.
-
Choose the My InterAction link and select the Frequently Used Lists option.
-
-
In the My InterAction dialog box, choose the type of list you want to customize.
-
Contact Types
-
Marketing Lists
- Marketing Lists (with sponsorship)
-
Working Lists
This opens a page enabling you to add or remove from your list of frequently used lists.
-
-
To add a list to your set of frequently used lists, select the check box. To remove a list, clear the check box.
Note: The lists are grouped into logical categories. You can select or clear all lists within a category by selecting the bold category. Alternatively, select the arrow next to a category to expand it and select an individual list.
-
Choose Save. InterAction displays the My InterAction main dialog box.
Your selections are added to your frequently used lists and can be accessed by selecting the button for the list in the left-hand menu.

Setting Your Frequently Used Lists
[A] Select the type of frequently used lists you want to set.
[B] Select and clear the check boxes next to the names of the lists. In this example, you can select the Alumni, Our Consultants, and Our Personnel lists all at once by selecting the Personnel check box.
[C] This category is currently collapsed out of the way. To show the lists within the section, select the arrow.
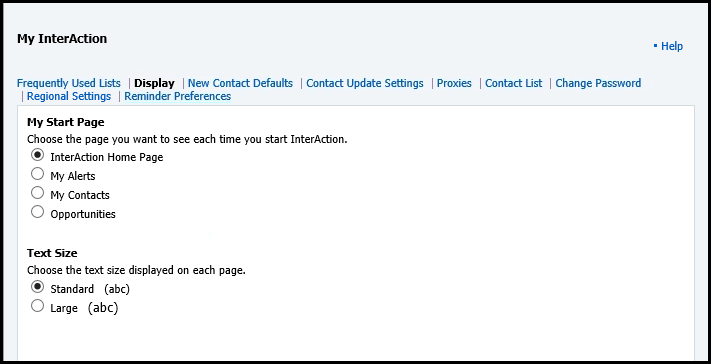
Start Page and Text Size
You can specify two display options:
- My Start Page allows you to select which page is initially displayed when starting InterAction.
- Text Size controls the size of the text used throughout the Web Client. There are two options to choose from: Standard and Large.
You can use one of following pages for your start page:
- InterAction Home Page (see Home Page)
- My Alerts
- My Contacts
If your organization has purchased any of the Related Module components, you can select your Start Page to be a module main page, such as Opportunities, Matters, or Engagements. If for any reason a selected Start Page becomes invalid, InterAction displays the Home Page in its place.
By default, if you do not change your setting, InterAction sets the Home Page as your Start Page.
Set Your Start Page and Text Size Options
-
Choose the My InterAction link.
-
Choose the Display link.
-
Under My Start Page, select the page you want to see each time you start InterAction from the list.
-
InterAction Home Page
-
My Alerts
-
My Contacts
-
Opportunities (if applicable)
-
Matters (if applicable)
-
Engagements (if applicable)
-
-
Under Text Size, select the size you want to use throughout the Web Client.
-
Choose Save.
New Contact Defaults
The New Contact Defaults section of My InterAction allows you to select the default settings applied when you add a new contact to the Firm List. The options are divided into three areas:
- Contact Update Settings
- Confidential Data Settings
- Relationship Settings.
If you make changes and save in either the Contact Update Settings or Confidential Data Settings, you can apply those changes to all existing contacts in your user contact list.
Contact Update Settings
The Contact Update Settings section determines how changes to the Firm Contacts are applied to contacts in your user contact list. These settings apply only to contacts that are in both your list and the Firm List.
You can choose one of the following settings:
-
Automatically keep my contacts up to date. (Information you keep confidential is not automatically updated) - When changes are made to the contact in the Firm List, InterAction automatically updates your version of the contact.
-
I want to review updates to my contacts before they are applied - When changes are made to the contact in the Firm List, InterAction flags the updated fields, allowing you to review what changes you want applied to your version of the contact. You can then review these updates from either of the following pages:
-
Review My Contact Updates from My Contacts
-
There are contacts with updates to be reviewed from the Home Page Message Center.
-
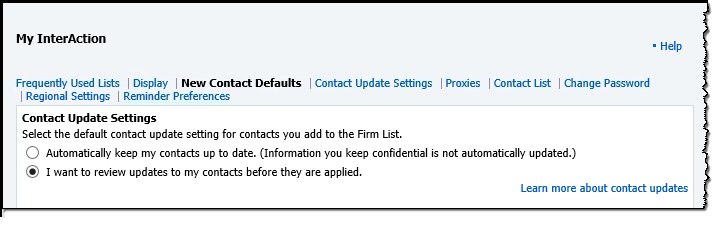
Selecting Contact Update Settings
Confidential Data Settings
Confidential Data Settings
The Confidential Data Settings options within the New Contact Defaults specify the contact data that you wish to keep confidential by default for contacts that you add to the Firm List.
A contact’s Name, Job Title, and Company Name must be contributed to the Firm List and cannot be selected to be kept confidential. Lock icons ( ) indicate information that has been designated as confidential. To select the contact data that you wish to keep confidential, choose the check box to the left of the contact data field.
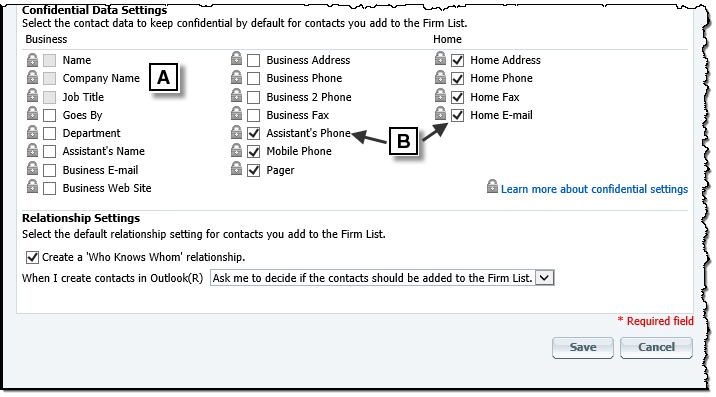
Confidential Data Settings
[A] A contact’s Name, Company Name, and Job Title cannot be kept confidential.
[B] Select the check box next to the lock icon to indicate that you want to keep the data in this field confidential. This becomes the default for new contacts added to your list.
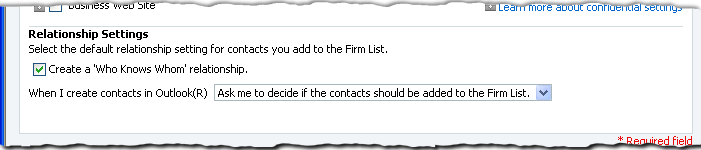
Relationship Settings
The Relationship Settings determine the following:
- Whether or not you want to automatically create a ‘Who Knows Whom’ relationship when you add contacts to the Firm List.
-
What to do with contacts that are created in Microsoft Outlook. You can choose one of the following actions to occur:
-
Add it to the Firm List - this option always adds new contacts from your other contact manager to the Firm List when the synchronization occurs.
-
Keep the contacts in my list only. Do not add it to the Firm List - this option always adds new contacts from your other contact manager to your user contact list, but does not add them to the Firm List when the synchronization occurs.
-
Ask me to decide if the contacts should be added to the Firm List - this option adds new contacts to your user contact list, but provides an indication that you need to decide whether or not it is added to the Firm List.
-
Once you have made all selections in the Contact Update Settings, Confidential Data Settings, and Relationship Settings, choose the Save button.
Relationship Settings
Contact Update Settings
The Contact Update Settings allow you to manage how InterAction processes updates for those contacts in your user list for which you have decided to review updates before they are applied (those contacts for which the I want to review updates to my contacts before they are applied option is selected).
Note: The default settings are available in My InterAction even if you are currently accepting all updates for all contacts.
The Contact Update Settings section of My InterAction is divided into two sections.
- Contact Update Review Settings
- Confidential Information Review Settings
Any changes made to these settings are applied at a global level, which means they can not be changed on a contact by contact basis.
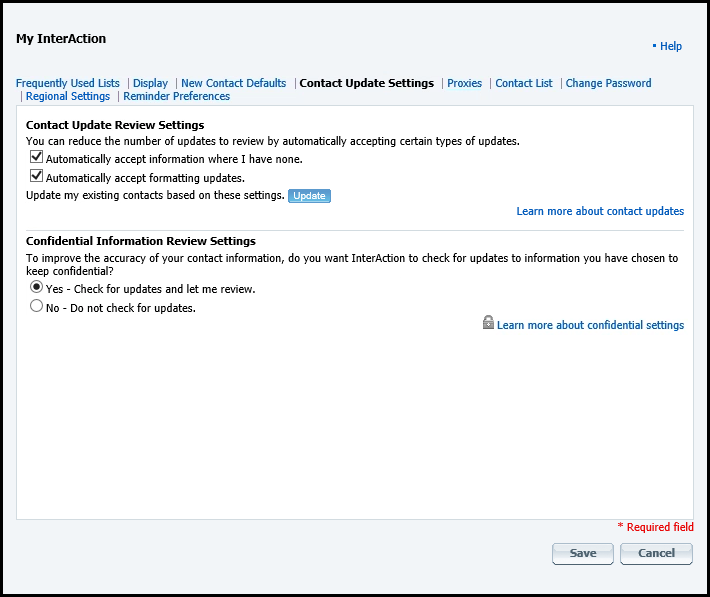
Contact Update Review Settings
The Contact Update Review Settings section provides two options that build in more intelligence and automation to the update process. Each of these options can save you time when reviewing updates.
- Automatically accept information where I have none fills in any fields that you have left blank with the updated information from the Firm List.
- Automatically accept formatting updates applies when a change is made to a field for which your contact has a value and the new value on the Firm Contact has the same value but with different formatting.
Selecting this option automatically applies the change to your contact for the field even if the ‘Automatically keep this contact up to date’ option is not selected. This option saves you time since your organization will most likely standardize the format of certain field values as part of their data quality practices, and, consequently, this may result in a large number of updates for you to review. Since these updates don’t really change the value of the information, you can save the time and effort of reviewing by selecting the second option.
Note that fields set as confidential are not updated.
Confidential Information Review Settings
The Confidential Information Review Settings provide you the means of being notified of updates from the Organization to contact data that you have chosen to keep confidential. By notifying you about these changes, you may decide to unlock more of your contact information that is set confidential because the organization appears to have valuable data that you wish to have added to your contact on an ongoing basis.
The setting asks you if you want InterAction to check for updates to information you have chosen to keep confidential. You can then choose Yes - Check for updates and let me review or No - Do not check for updates.
Once you have made your selections, choose Save.
Proxies
This section allows you to manage the list of other users who can work on your behalf. For details, see “Proxies” on page 271 for more information.
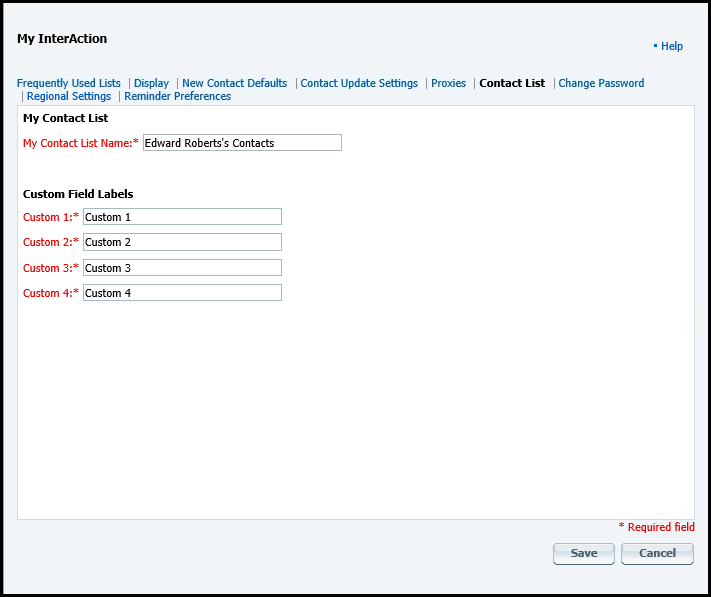
Contact List
The Contact List settings determine the following:
- The name of your user contact list.
- The names of the four custom field labels. Note that these fields are only available for contacts in your list.
Once you have entered your contact list name and/or your custom field labels, choose Save.
Contact List
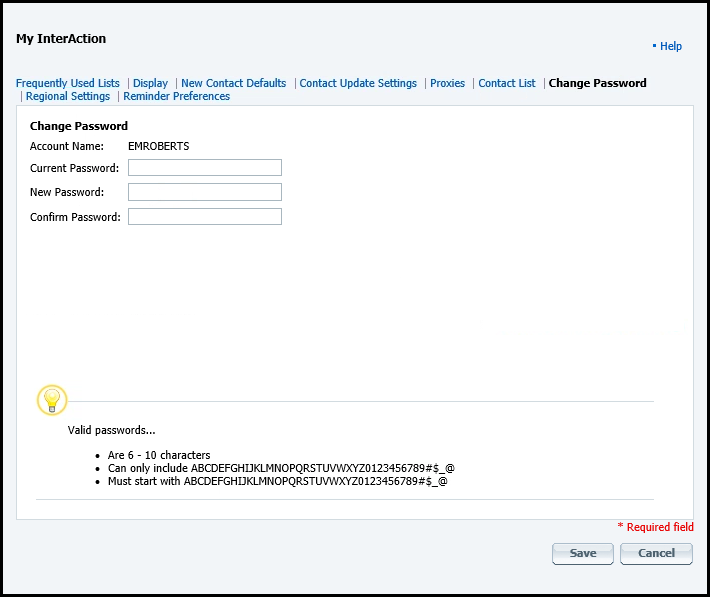
Change Password
You can use the Change Password section to change the password you use to log on to InterAction.
Note that your organization may configure InterAction to not show this option. In this case, you do not need to worry about your password.
To change your password, enter the following:
- Current Password
- New Password
- Confirm Password (re-enter the new password)
If you are working as a proxy on behalf of another user, you can change that user’s password. However, you must know the other user’s existing password to make the change.
Note that there are restrictions on both the number of characters allowed in a password and the type of characters you can use. These depend on how your organization has configured InterAction. The rules for passwords are displayed at the bottom of the Change Password dialog box.
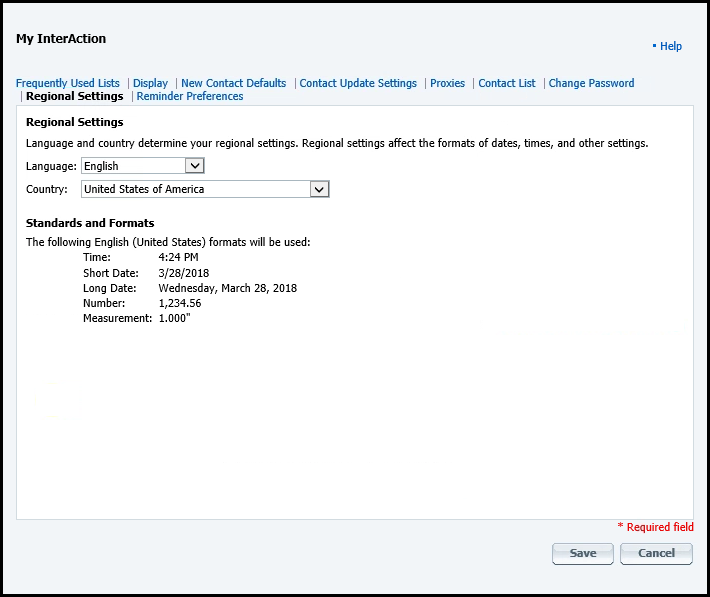
Regional Settings
Depending on how InterAction has been configured for your organization, you may be able to review your regional settings.
Note that the Regional Settings section of My InterAction may not be available in your environment. In that case, your administrator has specified your regional settings for you.
Note: The first time you log on to the Web Client, you may be prompted to review your regional settings. The options are displayed in a separate dialog box in this case.
The regional settings affect several areas of the Web Client:
- Depending on the InterAction configuration, your language settings can control the options available in the Title and Suffix fields when creating and editing contacts. This includes both the items available in the list and the order in which they are displayed.
- When entering a new address for a contact, the Country drop-down list defaults to the country specified in your regional settings.
- The Web Client displays addresses according to country-specific formats. For example, if you set your country to France, addresses for contacts in the United States include the country when displayed in the Web Client or used in a mail merge. Addresses for contacts in France leave off the country information. If you were to switch your country to the United States, the reverse would happen.
- Search forms that include the Country and State/Province fields also default based on your country settings.
- The regional settings control the number and date formats used in most areas of the system. You can see the formats that will be used for your region in the Regional Settings dialog box.
Note that your selected regional settings also affect InterAction when used within your Personal Information Manager (PIM).
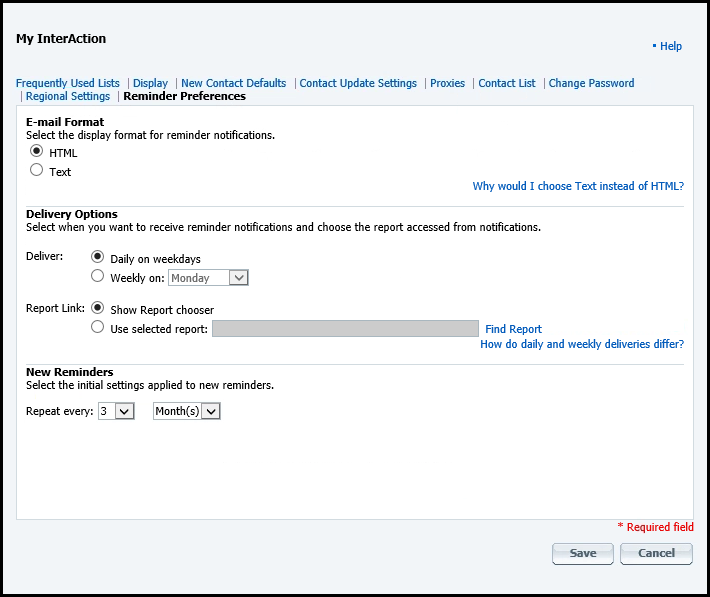
Reminder Settings
If your organization has configured InterAction to use the Reminders feature, you can configure your default reminder settings. These preferences are default settings, which you can override on a reminder basis. You should set your reminder preferences before you begin creating new reminders for your contacts.
For details about changing your reminder settings, see Setting Reminder Preferences in the Web Client.
Reminder Settings