Section Topics
Creating Contacts
You can add companies or people to InterAction using the InterAction Web Client New Contact Wizard. When adding a contact, you can choose the information to contribute to the Firm List.
If you want to create a new contact specifically for a working list, you can choose the New Contact for this List link from the desired working list. For more details on this topic, see Working List-Specific Contacts.
In many cases, another user might have already added the person or company you want to add. Therefore, InterAction automatically checks for any existing contacts that match the one you are creating.
See the following topics:
Create a Company Contact
When you create a new company, you enter the information in a wizard. Fill in the fields on each panel and choose Next to move to the next step.
-
Choose the New Contact button in the left hand menu.
InterAction displays the first panel of the New Contact wizard.
-
On the Create panel, select the Company option, enter the Company name, and choose Next.
By default, InterAction adds the new company to both your contact list and the Firm List. You can change this by clearing either The Firm List or My Contacts check boxes.
If you select to add the company to your list only, the Do not let my proxy see this contact option is displayed. Select this option to create a private company contact.
-
If there are any existing companies that match the name you entered, they are displayed on the Matches panel. Determine whether the contact you are creating is in the list.
-
If one of the companies listed is the company you are creating, select that company and choose Next. Note that the dialog box displays the mailing address for each potential match to make it easier to identify the correct contact.
-
If none of the companies listed match the company you are creating, select None of these and choose Next.
When you select another contact as a match, InterAction merges the information you enter with the information on the existing contact. If there are conflicts (such as you enter a new business phone number for a firm contact that already had a business phone), the information you enter replaces the old information.
To see more information about a company contact, choose the Profile link.
Note: If no matches exist, InterAction bypasses the Matches panel, and displays the Details panel.
For more about how InterAction finds matches, see Finding Duplicates When Creating New Contacts.
-
-
InterAction displays the Details panel. Enter address and phone information for the company in the Details panel.
-
InterAction includes Keep Confidential check boxes next to all business address, phone, and electronic address fields. Check these boxes if you do not want to contribute the information.
-
Under Contact Updates, indicate how you want to manage updates to the contact.
If ... Select this option... You want to be notified when someone else changes the Firm’s version of the contact. I want to review updates to this contact before they are applied. You want the contact to be kept up-to-date with information from others in your organization. Automatically keep this contact up to date (confidential information is not automatically updated). -
Choose Next to proceed to the Manage panel.
-
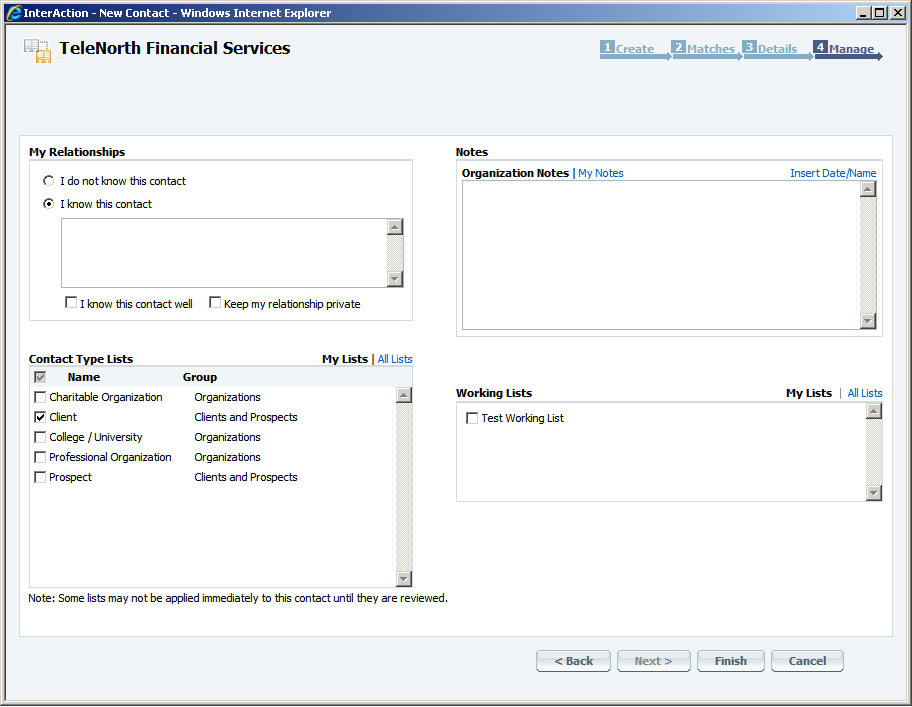
On the Manage panel, select whether or not you know the company, and indicate any details about your relationship with the company.
-
If you select the Keep my relationship private option, InterAction creates an “anonymous” relationship and hides your name when another user views the list of people who know the contact. If another user sends an email inquiry to co-workers who know this contact, however, you still receive the email. You then have the opportunity to reveal your relationship if appropriate.
-
Note, any email messages sent to people who have indicated an anonymous relationship will never be “bounced back” to the originator of the inquiry. Your anonymous relationship is not exposed unless you choose to reply to the inquiry.
-
-
Select to add this company to any contact type, working, or marketing lists.
-
When you have completed entering information in the Review panel, choose Finish.
InterAction creates the company and displays a success message, which also allows you to choose to perform a Next Step action. InterAction then displays the appropriate page for the action after you have made your selection.
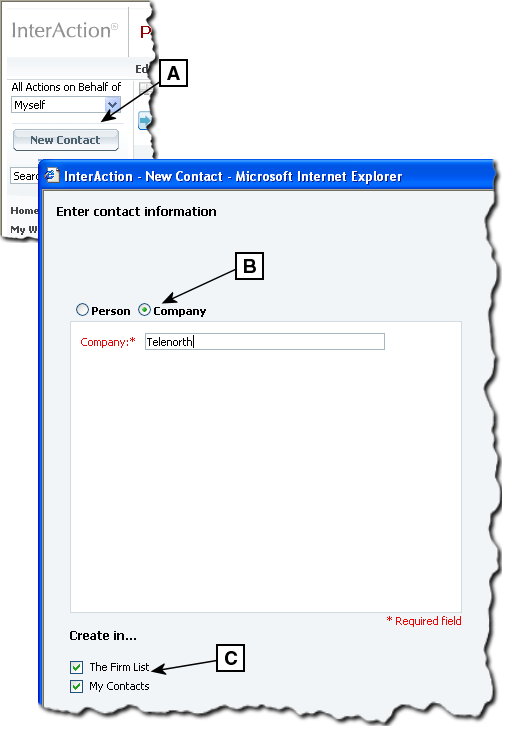
New Company - Create Panel
[A] Choose New Contact from the left-hand menu to start the New Contact wizard.
[B] Select Company and enter the company name.
[C] These options determine whether the contact is a Firm Contact or a user contact.
Select both options to create a user contact connected with a corresponding Firm Contact.
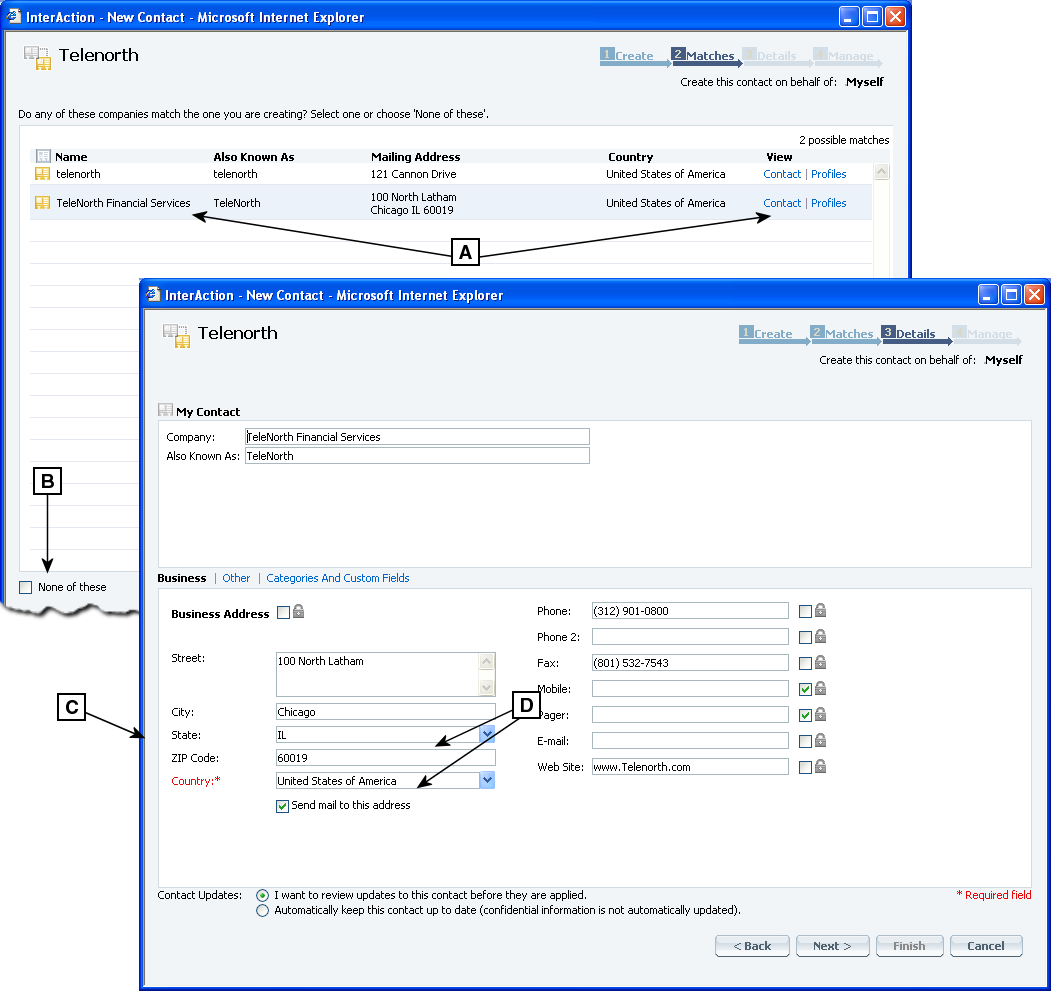
New Company - Matches and Details Panels
[A] Matches panel – This list displays contacts that match the contact you are creating. The mailing address for each potential match is displayed in the column. You can also choose Contact or Profiles to see more information about the contact to determine whether it is the same as the one you are creating.
[B] If none of the listed contacts match the contact you are creating, select this check box.
[C] Details panel – Enter phone and address information here. Select the lock check boxes to keep information confidential.
[D] Tip – select the state or province from the drop-down list. Note that the items available in the list are based on the selected country. Note that for some countries, the state/province field is not applicable and won’t be shown.
Create a Person Contact
When you create a new person, you enter the information in a wizard. Fill in the fields on each panel and choose Next to move to the next step.
-
Choose the New Contact button in the left hand menu.
InterAction displays the first panel of the New Contact wizard.
-
On the Create panel, select the Person option, enter the person’s name information, and choose Next.
By default, this person is added to both your collection of contacts and the Firm List. You can change this by clearing either The Firm List or My Contacts check boxes.
If you choose to add the person to your list only, the Do not let my proxy see this contact option is enabled. This option allows you to create a private person contact.
-
If there are any existing people that match the name you entered, they are displayed on the Matches panel. Determine whether the contact you are creating is in the list.
-
If one of the people listed is the person you are creating, select that contact and choose Next. Note that the dialog box displays the mailing address for each potential match to make it easier to identify the correct contact.
-
If none of the people listed match the person you are creating, select None of these and choose Next.
To see more information about the matching contacts, choose the Profile link.
When you select another contact as a match, InterAction merges the information you enter with the information on the existing contact. If there are conflicts (such as you enter a new business phone number for a firm contact that already had a business phone), the information you enter replaces the old information.
For more about how InterAction finds matches, see Finding Duplicates When Creating New Contacts.
-
-
If there are any existing companies that match the company name you entered for this person, they are displayed on the Matches panel. Determine whether the person you are creating works at any of the listed companies.
-
If one of the companies listed is the person’s employer, select that company and choose Next. This associates the new person with the specified company. Note that the dialog box displays the mailing address for each potential match to make it easier to identify the correct company.
-
If none of the companies listed match the person’s employer, select None of these and choose Next.
-
-
InterAction displays the Details panel. Enter address and phone information for the person in the Details panel.
-
If the person is associated to an existing company, InterAction lists the main address for that company as the Business Address for the person.
-
If the address listed is not the correct location for the person, choose a different location by selecting the Change Business Location link next to the Business Address. If the correct address is listed, choose OK.
-
If none of the addresses listed are correct, choose Cancel and edit the Business Address.
-
-
InterAction includes Keep Confidential check boxes next to all business address, phone, and electronic address fields. Check these boxes if you do not want to contribute this information you are entering to the Firm. If your firm has required at least one email address or a phone number or both, you cannot keep all of these fields confidential.
-
Under Contact Updates, indicate how you want to manage updates to the contact.
If ... Select this option .... You want to be notified when someone else changes the Firm’s version of the contact. I want to review updates to this contact before they are applied. You want the contact to be kept up-to-date with information from others in your organization. Automatically keep this contact up to date (confidential information is not automatically updated). -
Choose Next to proceed to the Manage panel.
-
On the Manage panel, select whether or not you know the person, and indicate any details about your relationship with the person.
-
If you choose the Keep my relationship private option, InterAction creates an “anonymous” relationship and hides your name when another user views the list of people who know the contact. If another user sends an email inquiry to co-workers who know this contact, however, you still receive the email. You then have the opportunity to reveal your relationship if appropriate.
-
Note, any email messages sent to people who have indicated an anonymous relationship will never be “bounced back” to the originator of the inquiry. Your anonymous relationship is not exposed unless you choose to reply to the inquiry.
-
-
Select to add this person to any contact type, working, or marketing lists.
-
When you have completed entering information in the Review panel, choose Finish.
When you finish, InterAction displays a success message, which also allows you to choose to perform a Next Step action. InterAction then displays the appropriate page for the action after you have made your selection.

New Person - Create and Matches Panels
[A] Select Person and enter the person’s name information.
[B] InterAction checks for contacts that match the new person and for companies that match the person’s company. In this example, John Hamilton’s company – Shabbona Enterprises – is already in the database. Note that the dialog box display the mailing addresses of the matches to help you identify the correct contact.
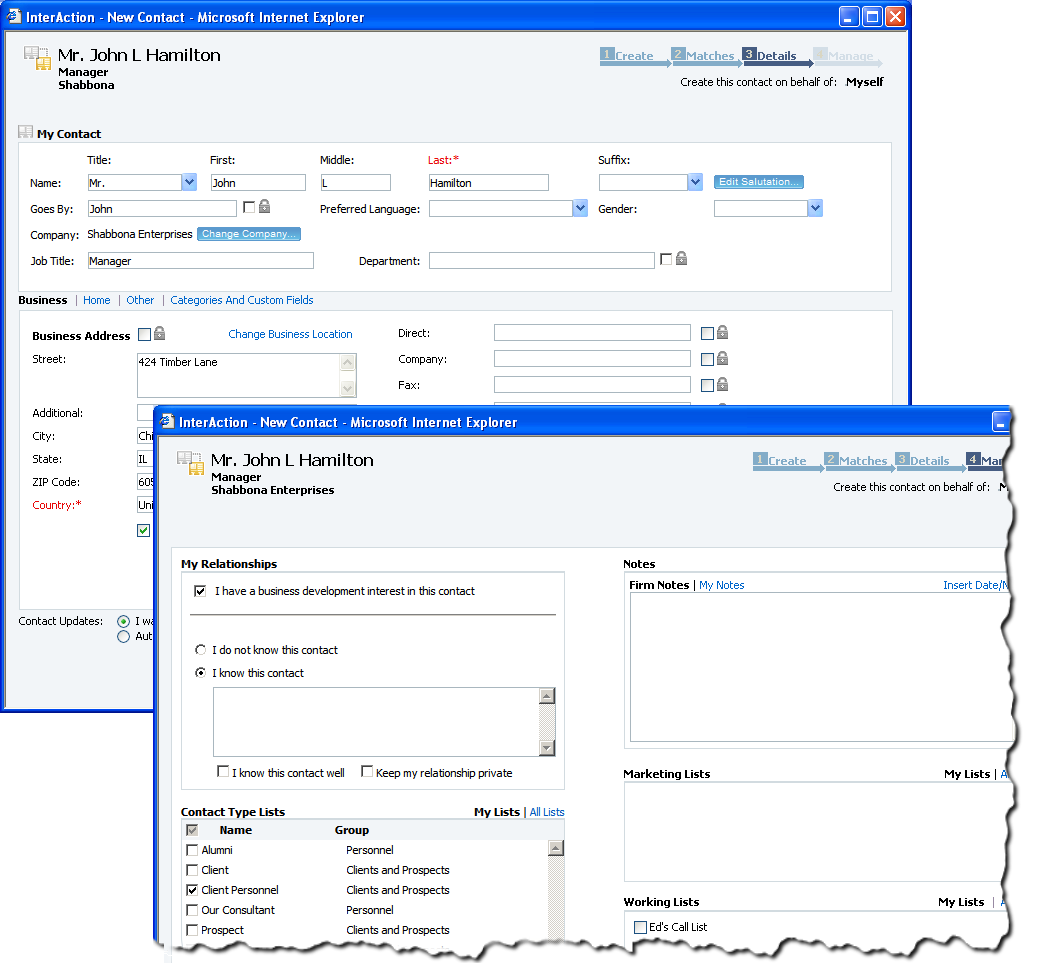
New Person - Details and Manage Panels
Finding Duplicates When Creating New Contacts
In many cases, the contact you want to create might already exist InterAction. Therefore, when you create a new contact, InterAction automatically checks for any existing contacts that match the one you are creating and displays the matching contacts in a list. If one of the matches is the contact you intended to create, you can select the matching contact and add additional information to it as needed. This helps keep duplicates out of InterAction and saves you time when creating new contacts.
The following sections describe how InterAction looks for duplicates when creating new contacts. Note that the same duplicate check is also done when you add a contact that is in your list only to the Firm List.
Finding Duplicates When Adding a Person
When you create a new person contact in InterAction, the new contact wizard uses the last name and company name entered on the first panel to search for any matching contacts.
The results you see in the Matches panel depend on how your organization has configured InterAction. The search does one of the following:
- Finds contacts whose last names exactly match the last name you entered. In this case, entering “Smith” for the new contact’s last name would find April Smith, Jane Smith and John Smith, but would not find Jane Smith-Reynolds or Jane Smithton.
- Finds contacts whose last names contain the last name you entered. In this case, entering “Smith” for the new contact’s last name would find April Smith, Jane Smith, John Smith, Jane Smith-Reynolds, and Jane Smithton.
Finding Duplicates When Adding a Company
When you create a new company in InterAction, the new contact wizard uses the company name entered on the first panel to search for any matching companies. This search finds companies with a name that starts with the company name you entered.
For example, entering “Telenorth” for the company name would find both Telenorth Communications and Telenorth Financial Services. In contrast, entering “Financial Services” would not find Telenorth Financial Services.