Section Topics
Working Lists
Working lists are folders that you can create and manage in InterAction’s Web Client. They are typically used as temporary collections of contacts associated with a particular task. When you create a working list, you determine who at your organization has access to this list.
Viewing a Working List
Examples of working lists include the following:
- A “call down” list of people that you or a particular work group in your organization need to contact in a given timeframe.
- A list of employee candidates a particular department is interviewing for a position.
- A “personal project” that you are working on that requires more functionality than what is available within My Contacts list and categories.
- Lists for other departmental projects, such as a list of employees involved in planning office events.
- Lists for some events that don’t necessarily need to be marketing events – such as events organized by a particular department rather than the marketing department.
The key distinguishing features of working lists are the following:
- They are temporary in nature – most working lists are only needed for a short time. If the list needs to be kept in the system indefinitely (such as the list for a yearly event), it should probably be a marketing list or a contact type.
- They are specific to an individual or a small group of users. If the list needs to be available across the entire organization and represents a key means of categorizing contacts, it should probably be a contact type.
Working lists are organized into types, similar to contact type groups. The types available to you depend on how InterAction has been configured at your organization.
Your organization can change the term used for working lists throughout InterAction.
Contacts on a Working List
A working list can include Firm Contacts. You can also create working list-specific contacts. These contacts are not available to the rest of the organization – they are only available to users who have access to the list.
For details, see Working List-Specific Contacts.
Note that contacts that are only in your contact list cannot be added to working lists.
Additional Fields and Notes
A working list can be configured with additional fields. These fields can store any data you want for the contacts on the list. You can also enter free-form text notes specific to the working list.
You can view the working list additional fields and notes for a contact from the Profiles and Lists section of the Contact Overview page and in the preview pane of a working list.
For details about creating fields for a working list, see Creating and Editing Additional Field Definitions for a Working List.
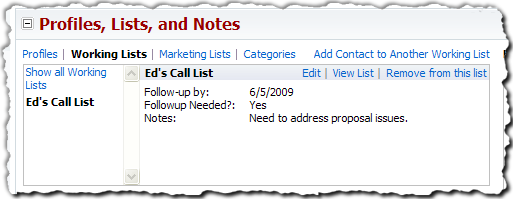
Additional Fields and Notes for a Working List
Working List-Specific Phones, Addresses, and Activities
Contacts within a working list can have phones, addresses (including email addresses), and activities that are specific to the list.
For details, see Creating List-Specific Phones and Addresses and Activities Regarding Working Lists.
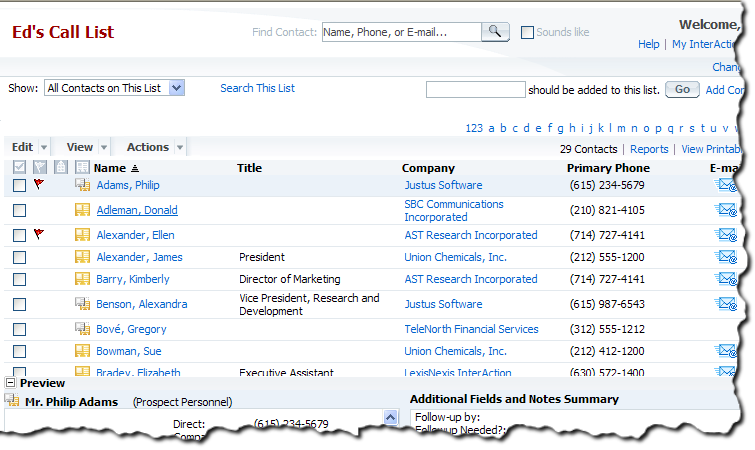
Viewing Working Lists
You can view and manage working lists from the Working Lists page.
-
From the left-hand menu, choose the Working Lists button to display the Working Lists page.
-
Actions you can perform on the selected list are available in the Actions area at the bottom of the page.
-
The Show actions provide options for displaying contacts that are and are not on the list. This is useful for finding contacts in your own list that should be added. For details, see View a List.
-
The Add actions provide options for adding contacts to the list. For details, see Add Contacts to a List.
-
The Manage actions are available if you have access to manage the list. Use these to change the settings and security for the list. For details, see Managing a Working List.
-
The Search This List link displays a form for searching for specific contacts on the list. For details, see Search a List.
-

Using the Working Lists Page
[A] Use this drop-down list to filter the set of working lists displayed.
[B] The working lists appear in this area. Choose the link to display the list; alternatively, select the list and choose one of the Actions at the bottom of the page.
[C] Choose these links to see contacts that are and are not on the list.
[D] Use these links to add new contacts to the list.
[E] If you have the appropriate rights, you can edit the properties of the list with these links.
[F] Choose this to search the list for a specific contact.
Create a Working List
-
From the left-hand menu, choose the Working Lists button.
-
Under the Actions area at the top of the page, choose New Working List.
-
Enter the Name and Description for the list.
The Description is optional. It appears on the Working Lists page when the list is selected and should describe the purpose of the list.
-
If necessary, select a Type for the working list. The types available depend on how your organization has configured InterAction. If only one type is available, you do not need to select anything.
-
If you want to use flags in this list, select the Use flags on this list check box.
-
If you enable flags for a working list, you can mark individual contacts on the list with different colored flags (for example, a red flag or an orange flag:
 ,
,  ). This can be useful as a reminder to follow up with a contact.
 -
Each color can mean anything you want. Enter the meaning you want to use in the text box.
-
If you want to flag all contacts added to the list, select the Flag New Contact check box next to the color you want to use for all new contacts. This is a useful way to distinguish new contacts added to the list.
Note: For more about using flags in lists, see Flagging Contacts.
-
-
Choose Save. InterAction displays a dialog box with links to the most likely follow up actions. Choose one of the links or choose Close.
Follow Up Actions
The following actions are available:
-
Add – Use these options to add contacts to the new list:
-
Contacts From Another List - choose this to find an contact in another list to add to your new working list. You can also search the Firm List. You can add multiple contacts to your working list at the same time.
-
New List Contact - choose this to start the New Contact Wizard and create a new contact. You can create a working list-specific contact or a contact that is in both the working list and the Firm List.
-
-
Manage – Use these options to edit the properties of the new working list.
-
Access Rights - choose this to edit the access rights for your new list. Until you change the rights, you are the only user with access to the list.
-
Additional Fields - choose this to create additional fields for the new list.
For more information, see Managing a Working List.
-
View
-
<List Name> - Choose the name of your new working list to view it.
-
-
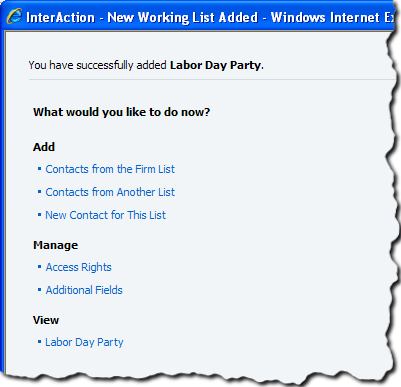
Follow Up Actions
Managing a Working List
You can manage any working lists you create. In addition, other users may grant you access rights to manage their working lists as well.
When you select a working list from the Working Lists page, a Manage section is included in the lower right corner of the page if you have sufficient access right to manage the security and fields for the list.
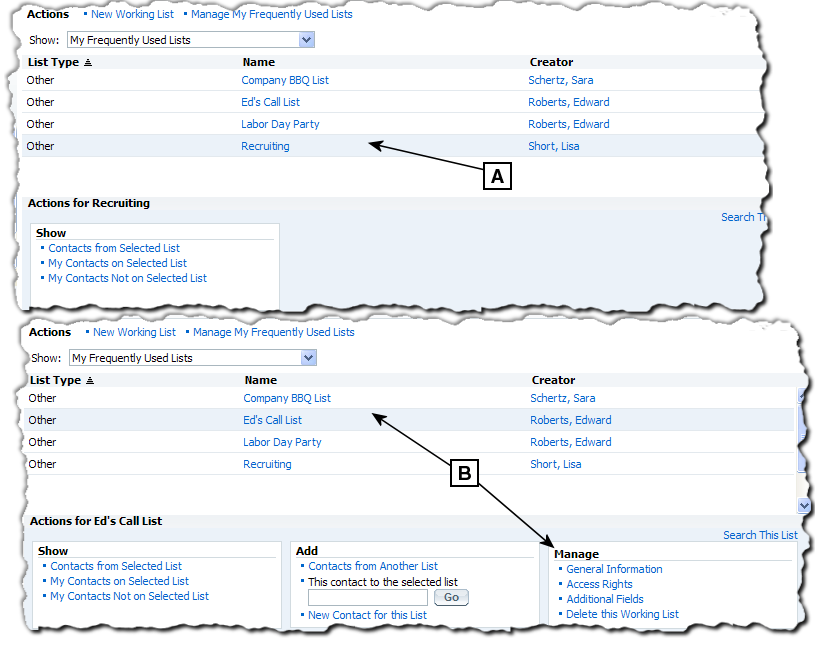
Determining Whether You Have Access to Manage a List
[A] Ed has selected the list Recruiting list. He does not have access to manage list settings, so no Manage section is available.
[B] Now he has selected Ed’s Call List. Since he does have full access to this one, the Manage section is available.
From the Manage section, you can do the following:
- General Information – this edits the same information you enter when creating a new working list – name, description, and flag settings. See Configuring the Flag Settings.
- Access Rights – see Managing Access Rights for a Working List.
- Additional Fields – see Creating and Editing Additional Field Definitions for a Working List.
- Delete the Working List – this removes the working list from InterAction.
Configuring the Flag Settings
You can configure your working list to use flags. You can then mark individual contacts on the list with different colored flags (for example, a red flag or an orange flag: , ). This can be useful as a reminder to follow up with a contact. You can define a specific meaning for each color if necessary.
Note: For more about using flags in lists, see Flagging Contacts.
Automatically Flagging New Contacts
You can configure your list to automatically flag all contacts added to the list with a particular color. This is a useful way to distinguish new contacts added to the list.
For example, you can designate the red flag for this purpose. Whenever you or another user adds a new contact to the list, the contact is automatically set with the red flag.
You can change the color used for new contacts at any time. Note, however, that changing this setting does not change any contacts that are already flagged.
For example, assume you configured the list to automatically flag all new contacts with the red flag. After adding several new contacts, you decide to automatically flag new contacts with the blue flag instead. The contacts in the list that are already flagged red are not changed to blue.
Configure the Flag Settings for a List
-
From the left-hand menu, choose Working Lists.
-
If necessary, filter the list of working lists by selecting from the Show list.
-
By default, the page displays My Frequently Used Lists. The working lists you use most of the time should be in this list. For more about frequently used lists, see My Frequently Used Lists.
-
To see all available lists, choose All Lists.
-
To see all working lists within a specific type, select the group.
-
-
Select the working list that you want to change from the list.
If you have administrator access to the list, a Manage area is available in the lower-right corner.
-
In the Manage area, choose General Information.
-
Select or clear the Use flags on this list check box.
To Do This Configure the list to use flags Select the check box, then configure the flag settings described in steps 6-7. Configure the list not to use flags Clear the check box, then choose Save.
Note that turning off flags for a list does not remove any existing flags from the contacts in the list; the flags are just hidden. If you turn flagging back on, the previously-flagged contacts are still flagged.
-
If you are using flags, each color can mean anything you want. Enter the meaning you want to use in the text box next to the color.
-
If you want to flag all new contacts added to the list, select the Flag New Contact check box next to the color you want to use for all new contacts. This is a useful way to distinguish new contacts added to the list.
-
Choose Save to save your changes.
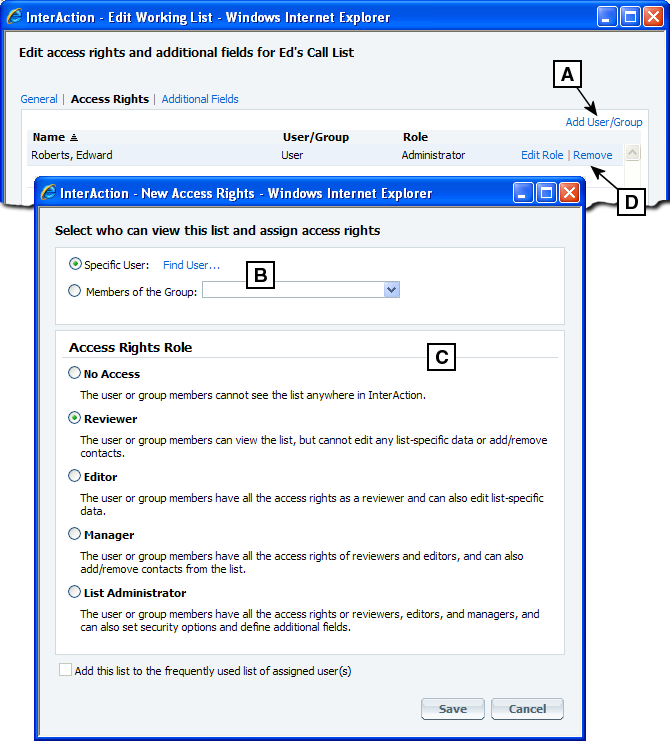
Managing Access Rights for a Working List
Access rights control what users can read, add, edit, and delete in a working list. Access rights control the information that is stored in the list. This means that the access rights for the list control both of the following:
- Who can edit information for working list-only contacts in the list.
-
Who can edit list-specific information for any contacts in the list.
List-specific information includes the following:
-
Working list-specific phones and addresses
-
Working list-specific notes
-
Working list additional fields
-
Activities regarding the list
-
Access Rights Roles
When you assign access rights to a working list, you select a user or group and then select a role. The roles determine what data the user or group can add and edit for the list:
- The No Access role blocks all access to the list.
- Reviewers can read the list, but not edit any data.
- Editors have all the rights of reviewers and can also edit list-specific data.
- Managers have all the rights of reviewers and editors, and can also add and delete contacts on the list.
- List Administrators have all the rights of reviewers, editors, and managers, and can also define additional fields, set access rights, and delete the list.
The roles for working lists only apply when working with the list in the Web Client. Roles then correspond to folder-specific access rights in the Windows Client.
Assign Access Rights for a Working List
-
From the left-hand menu, choose Working Lists.
-
If necessary, filter the list of working lists by selecting from the Show list.
-
By default, the page displays My Frequently Used Lists. The working lists you use most of the time should be in this list. For more about frequently used lists, see My Frequently Used Lists.
-
To see all available lists, choose All Lists.
-
To see all working lists within a specific type, select the group.
-
-
Select the working list that you want to change from the list.
If you have administrator access to the list, a Manage area is available in the lower-right corner.
-
In the Manage area, choose Access Rights.
-
To add access rights for a user or group, choose Add User/Group. Select either the user or group who will be assigned the access, then select the role and choose Save.
-
To assign rights for a user, choose the Find User link, then enter the user’s name information.
-
To assign rights for a group, select the group from the Members of the Group drop-down list.
Note: Note that you cannot add access rights for “all users” from the Web Client. However, if a Windows Client user added access rights for all users, you can edit it as you edit any other access rights.
For details about the rights granted by each role, see Access Rights Roles.
-
-
To remove the role for a user or group, find the user/group row and choose the Remove link.
-
To edit the role for a user or group, find the user/group row and choose the Edit Role link, then change the role as needed and choose Save.
-
Choose Close when you are finished editing the access rights for the list.
Assigning Access Rights
[A] Choose this to add rights for a user or group.
[B] To assign rights to a user, choose Find User. To assign rights to a group, select the group from the drop-down list.
[C] Select the role to assign to the user or group. This determines the type of rights the person or group will have.
[D] Use these links to change or delete existing access rights for a user or group.
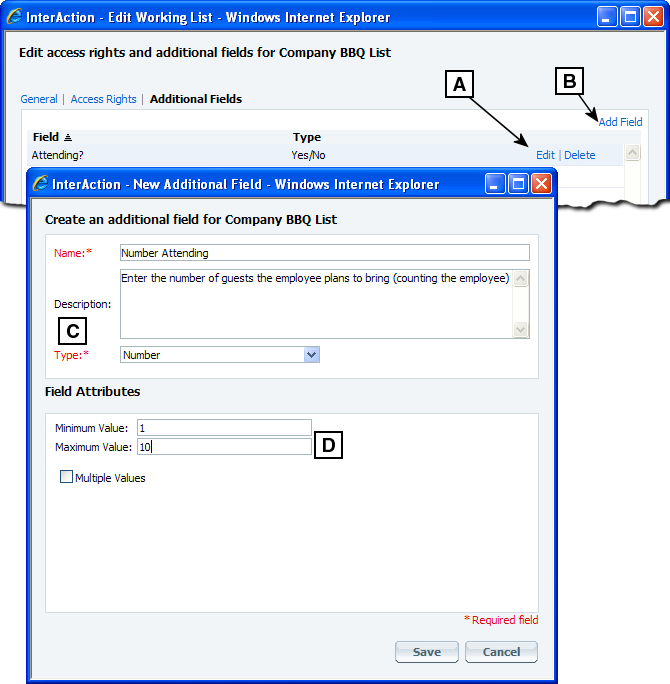
Creating and Editing Additional Field Definitions for a Working List
A working list can be configured with additional fields. These fields can store any data you want for the contacts on the list.
For example, you could use additional fields to store the name of a person’s spouse/significant other, RSVP information, first line of a social invitation, etc.
For details about setting values for fields, see Enter a Value for a Working List Additional Field.
Create an Additional Field for a Working List
-
From the left-hand menu, choose Working Lists.
-
If necessary, filter the list of working lists by selecting from the Show list.
-
By default, the page displays My Frequently Used Lists. The working lists you use most of the time should be in this list. For more about frequently used lists, see My Frequently Used Lists.
-
To see all available lists, choose All Lists.
-
To see all working lists within a specific type, select the group.
-
-
Select the working list that you want to change from the list.
If you have administrator access to the list, a Manage area is available in the lower-right corner.
-
In the Manage area, choose Additional Fields.
-
Choose Add Field.
-
Enter the Name, Description, and Type.
-
You see the Name and Description when entering data in the field.
-
The Type determines the kind of data you can store in the field – text, numbers, list items, etc. For more about types, see Types of Additional Fields.
-
-
Fill in the Field Attributes as needed. The options available depend on the type of field you are creating.
-
For example, fields that store numbers can have maximum and minimum values.
-
If the additional field is a List type field, choose Add to add list items to the field.
-
-
If the field needs to store two related values (such as a code and a description for the code), select the Include secondary field check box and provide a Field Name.
This allows users to enter a secondary value for the field value. This is typically used for multiple-value fields, but can also work with single-value fields.
-
If the field should allow multiple values, select the Multiple Values check box.
-
Chose Save.
-
After you have finished creating additional fields, choose Close on the Edit Working List dialog box.
Remove or Edit a Working List Additional Field
-
From the left-hand menu, choose Working Lists.
-
If necessary, filter the list of working lists by selecting from the Show list.
-
By default, the page displays My Frequently Used Lists. The working lists you use most of the time should be in this list. For more about frequently used lists, see My Frequently Used Lists.
-
To see all available lists, choose All Lists.
-
To see all working lists within a specific type, select the group.
-
-
Select the working list that you want to change from the list.
If you have administrator access to the list, a Manage area is available in the lower-right corner.
-
In the Manage area, choose Additional Fields.
-
To remove an additional field, find the additional field row and select the Delete link.
-
To edit an additional field, find the additional field row and select the Edit link, then change the additional field as needed and choose Save.
-
Choose Close when you are finished editing the additional fields for the list.
Creating/Editing Additional Fields in a Working List
[A] Select an existing field and use these links to edit or delete it.
[B] Choose Add Field to create a new field.
[C] Enter the Name, Description, and Type for the field.
[D] This area varies depending on the field type. In this example, the field is a Number field, so the options include minimum and maximum values.
Enter a Value for a Working List Additional Field
If your working list includes additional fields (see Creating and Editing Additional Field Definitions for a Working List), you can enter values for those fields in the Web Client.
For example, if you have a “Follow-up By” field, you can set it to a specific date for each contact in the list.
Enter Field Values for a Single Contact
-
Display the working list and select a single contact.
-
Choose Edit > Contact Fields. A dialog box showing all applicable working list fields is displayed.
-
Enter the value for each field and choose Save.
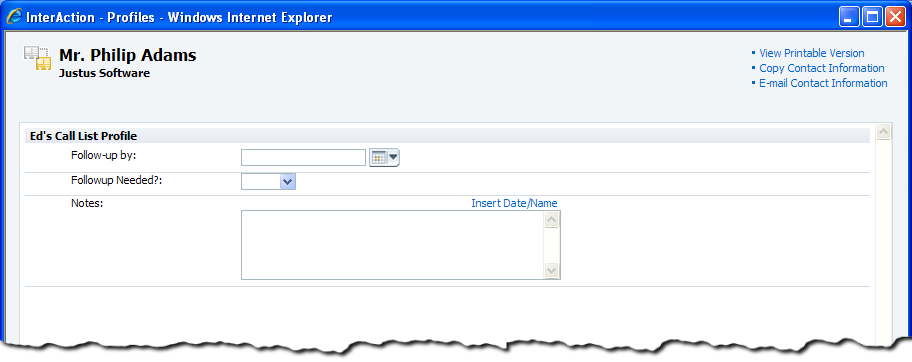
You can also edit field values from the Overview page for the contact.
Entering Field Values for a Single Contact
Enter Field Values for Multiple Contacts
-
Display the working list and select the contacts by selecting in the first column. You can select any number of contacts.
-
Choose Edit > Contact Fields. The Contact Fields dialog box is displayed. This displays applicable fields for the list.
-
For the field you want to set, choose the Set link.
-
Enter the field value and choose Save.
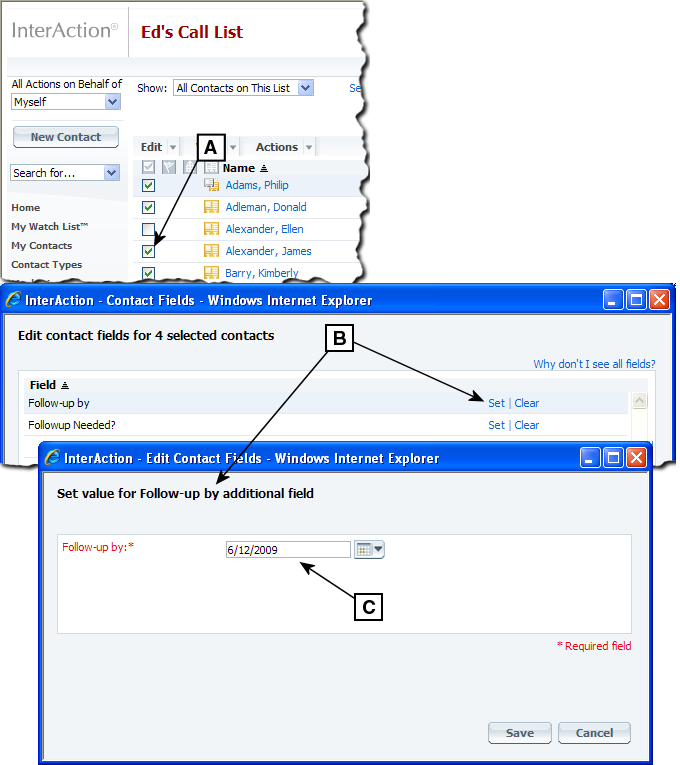
Entering Field Values for Multiple Contacts at Once
[A] Select the contacts to update, then choose Edit > Contact Fields.
[B] Choose the Set link for the field you want to update. In this example, the Follow-up By field on Ed’s Call List will be updated.
[C] Enter the value for the field and choose Save. The specified value is entered for all selected contacts. In this example, each of the three selected contacts is updated with the value 6/12/2009 in the Follow-up By field.
Working List-Specific Contacts
You can create working list-specific contacts in working lists. This means that the contacts are only available within the working list – they are not part of the full Firm List of contacts. This is useful if you have contacts you need to track for a short period of time, but it doesn’t make sense to include them in the Firm List.
Working list-specific contacts appear in InterAction with a different icon next to the name ( ). There are several restrictions for contacts that are working-list specific:
- You cannot include them in any other lists in InterAction. For example, you can’t add a working list-only contact to a marketing list.
- You cannot add them to your own user list (My Contacts).
- You cannot use InterAction’s Web Client to connect them to the Firm List. Note however that a Windows Client user can promote a working list-only contact to the Firm List. You can use the Web Client to send a change request to a data steward to make this change.
Create a Working List-Specific Contact
-
Navigate to the Working Lists page, select the list, and choose New Contact for this List from the Add section.
-
On the Create panel of the New Contact Wizard, clear the Firm List check box. This creates a contact that is only available within the working list.
-
Select either Company or Person, enter the name information and choose Next.
-
Complete the remaining panels of the New Contact Wizard. Choose Next after each step, then choose Finish when completed. For details, see Creating Contacts.
The New Contact Wizard panels are basically the same as when you are creating a Firm Contact or a user contact. The only difference is the final Manage panel, which does not display options for adding the contact to other lists. This is because working list-specific contacts cannot be added to other lists.

Creating a Working List-Specific Contact
[A] Select the list from the Working Lists page and choose New Contact for this List.
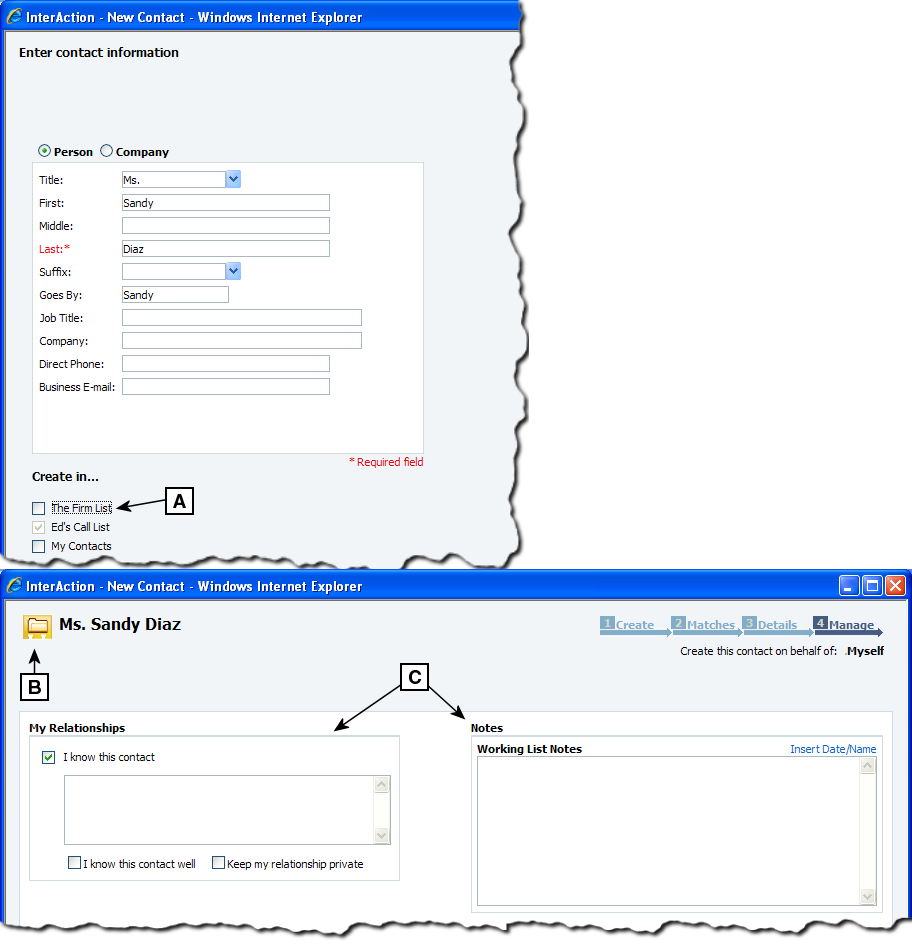
New Contact Wizard for a Working List-Specific Contact
[A] Clear this check box to create a contact that is only in the working list.
[B] This icon indicates that this contact is a working list-specific contact.
[C] The final panel of the New Contact Wizard only includes these sections. Working list-specific contacts cannot be included in other lists.
Activities Regarding Working Lists
You can create activities regarding a working list. For example, if you have a working list for an upcoming personal event, you could create an activity regarding that list when you send out invitations to the event.
For details about creating an activity regarding a working list, see Create an Activity Regarding a List.
When viewing the activities for a contact, the default view Activities Regarding Contacts does not include activities for lists (either working or marketing lists). You need to change the view to include the activities.
For details about filtering the activities view, see View the Activities for a Contact.
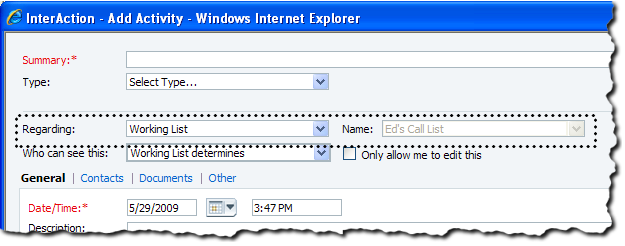
An Activity Regarding a Working List
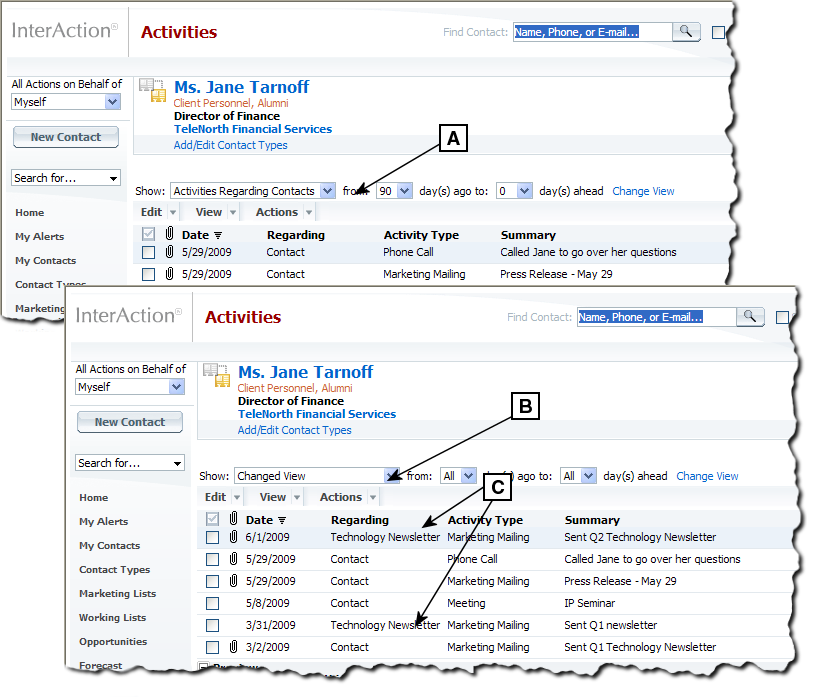
Viewing Activities Regarding Lists
[A] The Activities Regarding Contacts view does not include any of the activities that are regarding working lists.
[B] The view has been changed to a customized view that includes activities regarding lists.
[C] Now activities regarding working lists and marketing lists are displayed.