Section Topics
Creating and Editing Activities
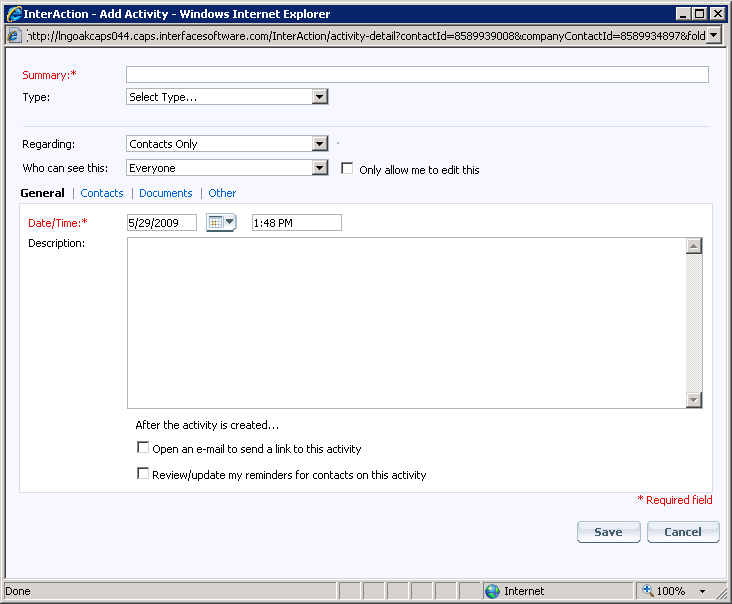
When you create an activity, you need to complete the General, Contacts, Documents, and Other sections of the dialog box.
The following table describes all the information you enter when creating or editing an activity.
| Field | Description |
|---|---|
| Top of Dialog Box/General Section | |
| Summary | A short description of the activity. This is displayed in the Web Client when you view a list of activities. |
| Type | The activity type is used to classify the activity. This is useful for searching and filtering activities. For example, you could quickly filter the activity list to show only phone calls (activities with the type Phone Call). |
| Regarding |
Indicates what the activity is about. This can be set to one of the following: • Contacts. • A specific working list or marketing list. • A specific matter, engagement, or opportunity, if your organization has licensed one of these modules. |
| Who can see this? |
Indicates who in your organization can see the activity. You can set this to one of the following: • Only Me • Everyone • Specific group • Marketing list determines • Working list determines • Matter / engagement / opportunity determines • Account plan determines |
| Only allow me to edit this |
If checked, indicates that only the person who created the activity can edit it. If this is not checked, anyone who can see an activity regarding contacts can also edit the activity. Activities regarding a list or matter, opportunity, or engagement use different security to control who can edit this information. |
| Date/Time | Indicates the date and time of the activity. This is automatically set to the current date and time when you add a new activity. |
| Description | Contains the detailed text of the activity. |
| Open an email to send a link to this activity | Select this to send a link to the activity to someone else. You can edit the email before sending it. |
| Review/update my reminders for contacts on this activity | Opens a dialog box for reviewing your reminders for all of the contacts on the activity. You can also use this dialog box to add new reminders to the contacts. For details, see Reviewing and Updating Reminders for Contacts on an Activity. |
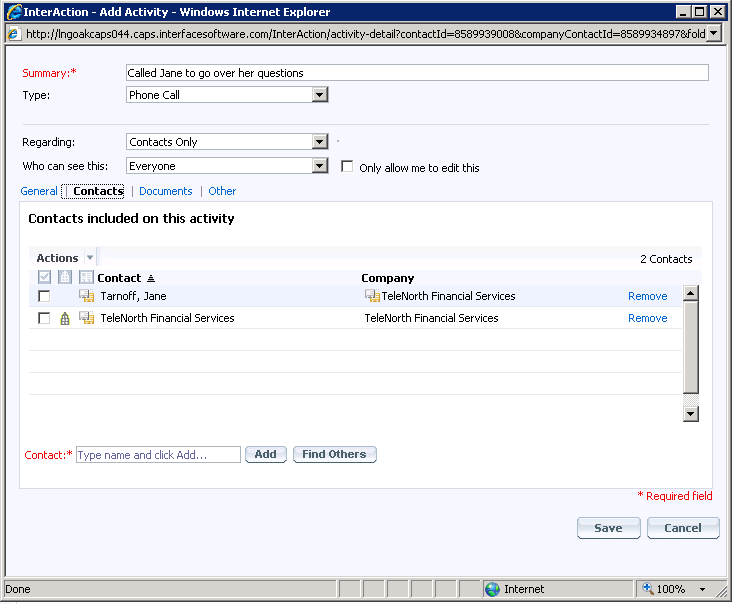
| Contacts Section | |
| List of contacts on the activity |
Each contact included on the activity is displayed in the list. You can add any number of contacts to the activity. Normally when you add a person to an activity, the person’s associated company is also included. For more information about why you should include the company, see Why Should I Include the Associated Company for a Person?. Activities regarding contacts, marketing lists, and working lists always include at least one contact. Activities regarding matters, opportunities, or engagements do not need to include any contacts. |
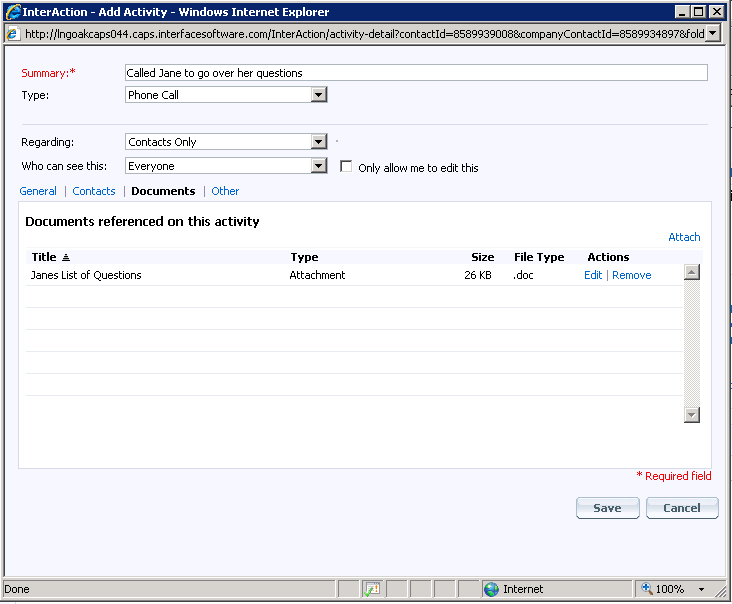
| Documents Section | |
| List of documents on the activity |
Each document included on the activity is displayed in the list. You can add any number of documents to the activity. This section is only included if your organization has enabled the document references feature. |
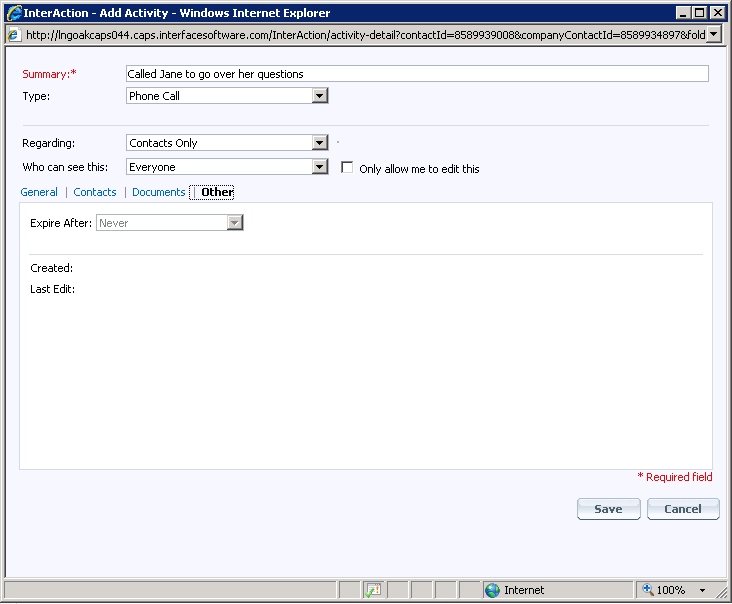
| Other Section | |
| Expire After | Indicates when the activity expires. Expired activities are automatically removed from InterAction on a regular basis. Depending on the activity type, you may not be able to change this setting. |
Adding or Editing an Activity - General
Adding or Editing an Activity - Contacts
Adding or Editing an Activity - Documents
Adding or Editing an Activity - Other
See the following topics:
- Create an Activity Regarding Contacts
- Create an Activity Regarding a List
- Why Should I Include the Associated Company for a Person?
- Delete an Activity
- View the Activities for a Contact
Create an Activity Regarding Contacts
-
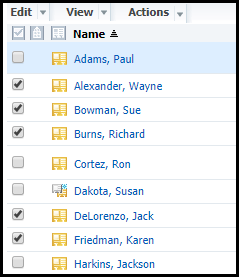
In any contact list, select the contact or contacts to which you want to add an activity.
-
To add an activity to a single contact, select the contact from any contact list.
-
To add an activity to multiple contacts, select the check box for each of the desired contacts in a contact list.
Tip: For tips for quickly selecting multiple contacts, see Perform an Action on Multiple Contacts.
-
-
Choose Actions > Add Activity.
-
Enter a brief Summary of the activity. Note, this field cannot be left blank.
-
Select the appropriate Type. Activity types are used when searching and viewing activities.
-
From the Regarding drop-down list, select Contacts Only.
-
If you are creating the activity from a working list or marketing list, you can create an activity regarding the list. For details, see Create an Activity Regarding a List.
-
If your organization has licensed one of the Related Modules, you can create an activity regarding a matter, opportunity, or engagement. For details, see the help for your module.
-
-
Select the appropriate option from the Who can see this drop-down list. This determines which other InterAction users can see the activity.
To Do This Add an activity that only you and your proxy can see. Select Only Me. Add an activity that everyone can see. Select Everyone.
Note that any other user can also edit the activity, unless you select the Only allow me to edit this check box.
Add an activity that only members of a group can see. Select the group from the list. All groups of which you are a member are displayed.
Note that any user in the group can also edit the activity, unless you select the Only allow me to edit this check box.
Note: If you are creating an activity regarding a working list or marketing list, there are additional options available in the Who can see this drop-down list. See Create an Activity Regarding a List.
-
If you want to restrict editing of the activity to yourself, select the Only allow me to edit this check box.
-
If necessary, change the Date and Time for the activity.
-
By default, these fields are set to the current date and time.
-
For example, you may want to change these fields if the activity represents a meeting or event that has already taken place. You can change the date and time to the actual date and time for the event.
-
You can also select a date in the future.
-
-
Enter the text of the activity in the Description edit box.
-
If you want to send a link to the activity to another InterAction user, select the Open an e-mail to send a link to this activity check box.
For additional details, see Send an Activity or Appointment in an Email Message.
-
If your organization has enabled reminders, you may want to update your reminders for the contacts on the activity. Select the Review/update my reminders for contacts on this activity check box.
This option displays a dialog box for reviewing your reminders after you save the activity. See Reviewing and Updating Reminders for Contacts on an Activity.
-
Choose the Contacts link to review the contacts included on the activity. You can add and remove contacts as needed.
-
To add another contact to the activity, choose Actions > Add Contacts To Activity. Alternatively, type the contact’s name in the Contact edit box and choose Add to lookup and add a contact. If the contact is not found, you can use the Create New Contact to add a new contact.
-
To remove a contact from the activity, select the check box next to the contact and choose Actions > Delete From Activity. Alternatively, choose the Remove link next to the contact.
-
When you add a person to the activity, you can also select to add the person's associated company. For more about why this is a good idea, see Why Should I Include the Associated Company for a Person?.
-
-
If you want to add any documents to the activity, choose the Documents link.
-
For details, see Attach a Document to an Activity.
-
Note that this option is only available if your organization has enabled it.
-
-
If you want to review or change the expiration date for the activity, choose the Other link. Select the number of days, weeks, or years before the activity should be removed from InterAction.
You may not be able to change the expiration date for some activities. This is determined based on the type of activity.
-
Choose OK to finish and save the new activity.
Create an Activity Regarding a List
You can create activities regarding working lists or marketing lists (whether marketing lists or marketing lists with sponsorship).
Note: For more about working lists and marketing lists, see Working Lists and Marketing Lists .
You must create the activity from the context of the list. However, the activity can include any contacts—they do not all need to be contacts within the list. You can also make the activity visible to just yourself, anyone in your organization, a specific group of people, or only others who have access to the list.
-
Display the working list or marketing list for which you want to create the activity.
For example, to display a working list, choose Working Lists from the left-hand menu, then select the list and choose the Show Contacts from Selected List link.
-
Select the contact or contacts to which you want to add an activity.
-
To add an activity to a single contact, select the contact from the list.
-
To add an activity to multiple contacts, select the check box for each of the desired contacts in a the list.
Tip: For tips for quickly selecting multiple contacts, see Perform an Action on Multiple Contacts.
-
-
Choose Actions > Add Activity.
-
Enter a Summary and select the Type for the activity.
For details about these fields, see Information You Enter for an Activity.
-
From the Regarding drop-down list, make sure that either Working List or Marketing List is selected. The name of the list should be displayed as well.
-
Select the appropriate option from the Who can see this drop-down list. This determines which other InterAction users can see the activity.
To Do This Add an activity that only you and your proxy can see. Select Only Me. Add an activity that only users with access to view the working list or marketing list can see. Select Working List determines or Marketing List determines. Add an activity that everyone can see. Select Everyone. In this case, all users in your organization can see the activity, regardless of whether they have access to see the list. Add an activity that only members of a group can see. Select the group from the list. All groups of which you are a member are displayed. In this case, all members of the group can see the activity, regardless of whether they have access to see the list. -
If you want to restrict editing of the activity to yourself, select the Only allow me to edit this check box.
If you don’t select this check box, other users with access to edit list-specific data can edit the activity. For example, for a working list, users with the Editor role will be able to edit the activity. For details about working list security, see Managing Access Rights for a Working List.
-
Complete the remaining sections for the activity (General, Contacts, Documents, and Other). For details about these settings, see Information You Enter for an Activity.
-
Choose OK to finish and save the new activity.
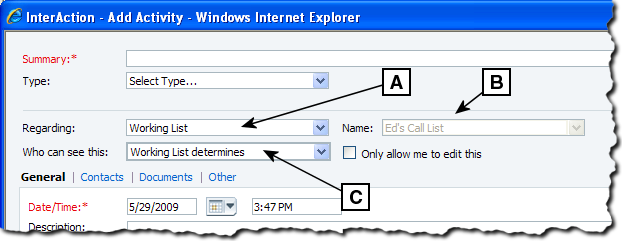
Creating an Activity Regarding a Working List
[A] Set Regarding to Working List.
[B] The Name should default to the name of the working list from which you started the activity.
[C] You can choose Working List determines in the Who can see this list. In this case, the access rights for the working list determine who can see the activity.
Why Should I Include the Associated Company for a Person?
When you create an activity, you can add the activity to multiple contacts. In addition, InterAction offers the ability to automatically include each person’s associated company on the activity. For example, if you add Jane Tarnoff to the activity, her associated company Telenorth Financial Services would also be added.
Including the person’s company on the activity is a good idea for the following reasons:
- When viewing a company in InterAction, you have the full list of activities that occurred with the company. You do not have to check all of the company’s employees for other interactions that may not have been recorded on the company record.
- When the person leaves the company, the activity is not lost from the company.
- Similarly, the person contact retains the activity as a record of your organization’s interaction with the person.
Delete an Activity
If the Only allow me to edit this check box was selected for the activity, you can only delete the activity if you originally created the activity.
If the Only allow me to edit this check box is not selected, then whether you can delete the activity depends on the kind of activity it is:
- For an activity regarding contacts, you can delete it if you can view it.
- For activities regarding a marketing list or working list, you can delete it if you have Delete Activity access rights to the folder.
- For activities regarding a matter, opportunity, or engagement, security settings configured for the module apply. See the help provided with the module for details.
To delete an activity:
-
Find the activity in the Web Client.
-
Activities for a contact display on the contact overview page and on the full page version.
-
You can also search for an activity.
-
For details, see View the Activities for a Contact.
-
-
Select the activity and choose Activities > Delete.
-
Confirm the delete by choosing OK.
View the Activities for a Contact
The Activities section of the overview page displays activities for the contact. From here you can also open the full-page activities page.
In addition, there are several searches you can use to find activities. You can find activities for contacts, matters, opportunities, and engagements. You can also search based on activity criteria. For details, see Finding Activities and Appointments.
When viewing activities for a contact, you can filter the view to display just the activities you need.
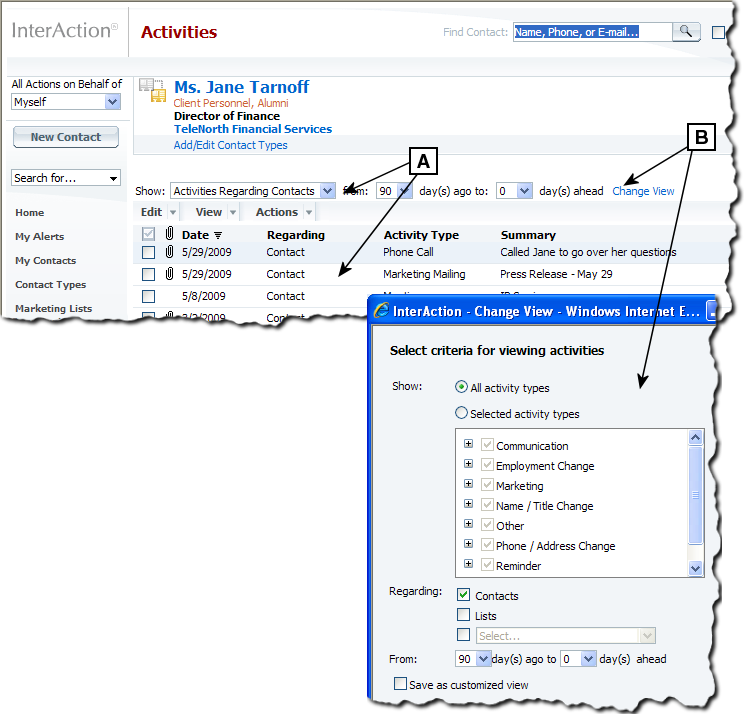
Filtering Your View of the Activities
[A] This activities filter only shows activities that are regarding contacts.
[B] Choose Change View to filter the list based on a variety of criteria.
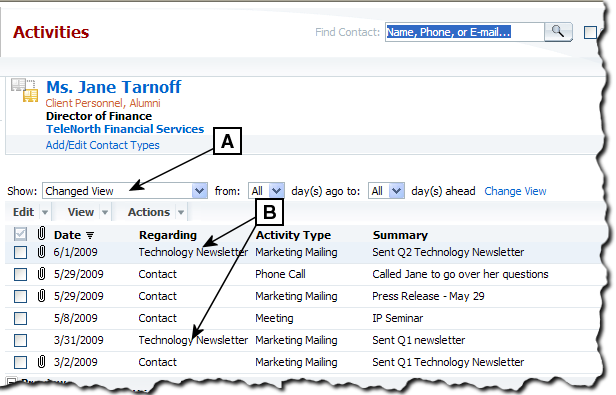
Using a Customized View of the Activities
[A] The view has been changed to a customized view.
[B] The list now includes activities regarding lists (Technology Newsletter) and matters, in addition to activities regarding contacts.
Filter the Activities View
-
Display the contact overview page or the activities page for a contact.
-
Choose the Change View link.
-
Select the criteria for the activities you want to view.
You can filter the activities by a variety of criteria:
-
Activity type. The available types are organized into groups.
-
Regarding. Select Lists to see activities regarding working lists and marketing lists. If your organization has licensed a related module, you can also include activities regarding matters, opportunities, or engagements.
-
Time frame. You can select a date range, such as From 90 days ago to 30 days ahead.
-
-
Choose OK. The view is filtered according to your options.
Print the Activities
You can print reports for any list of activities. You can also print individual activities one at a time. For details, see Viewing and Printing Activity and Appointment Reports.