Section Topics
Attaching Documents to Activities and Contacts
Document references in InterAction give you the ability to connect your organization’s clients and contacts with the materials (documents) produced in support of those clients. For example, you can attach documents such as contracts, proposals, engagement letters, and other information to your clients, contacts, matters, opportunities, and engagements in InterAction. You can easily track a complete view of all pertinent information related to the service of your clients.
Note that the document references features are optional; your organization may choose not to use them. If your organization already has a process for cataloging documents, such as a Document Management System, then you may not have access to these features in the Web Client.
See the following topics:
- Where Can You Attach Documents?
- What Happens to Your Documents When You Attach Them to InterAction Items?
- Requirements for Your Machine
- Attach a Document to an Activity
- Attach a Document to a Contact
- Viewing the Documents for a Contact
- What is the Date for a Document?
- How to View the Activity or Appointment to Which a Document is Attached
- Open or Save a Document
- Editing and Replacing Documents
- Remove a Document
Where Can You Attach Documents?
If your organization has enabled the documents feature, you can attach documents to the following InterAction items:
Note that files two GB or greater cannot be added to InterAction.
-
Activities. The most common example of this is an email attachment. When you create activities from email messages in Microsoft Outlook, any attachments in the original email message are automatically included on the activity in InterAction.
You can also manually add documents to activities, both from the Web Client and from Outlook.
-
Appointments. If you are synchronizing appointments between InterAction and Outlook, any attachments included on the Outlook appointment are automatically attached to the InterAction version during synchronization.
-
Contacts. You can attach documents directly to a contact. For example, you could add a copy of a company’s annual report directly to the company contact. A résumé or longer biographical sketch might be useful to add to a person contact.
-
Matters, opportunities, or engagements. If your organization has licensed one of these modules, you can include documents directly on these items. This is useful for making the various documents associated with this work available to others in InterAction. For example, you could add RFPs, proposals, or contracts to a matter, opportunity, or engagement.
For details about attaching documents to matters, opportunities, or engagements, see the help for your module.
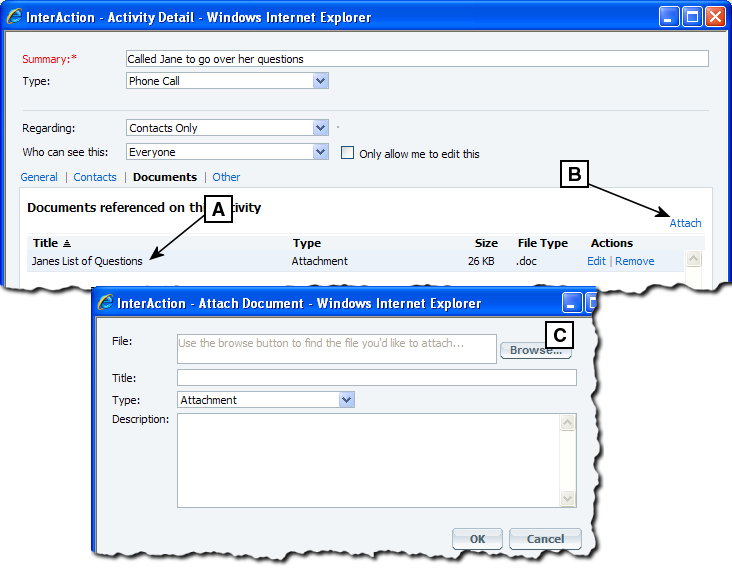
Viewing and Attaching Documents in the Web Client
Attaching documents to an activity in the Web Client.
[A] Documents already attached to the activity display here.
[B] Choose Attach to add an additional document
[C] Use the Browse button to find the document to attach. Fill in the other information about the document.
What Happens to Your Documents When You Attach Them to InterAction Items?
When you attach a document to an item, InterAction makes a copy of your document and places it in a location designated by your system administrator. At this point, there is no longer any connection between the original copy of the document on your machine and the version in InterAction. If you want to make changes to the document in InterAction, you should follow the recommendations given in Editing and Replacing Documents.
Requirements for Your Machine
Attaching and viewing documents requires a special component on your workstation for certain tasks:
- Attaching a document to an InterAction item.
- Opening or saving the document.
The component is not needed for viewing document properties or the list of documents on an InterAction item.
If the Desktop Integration components of InterAction have been installed on your machine, then you have everything needed to work with documents.
If these components are not installed, the Web Client prompts you to install the necessary items the first time you attempt to attach or open a document. However, note that security settings on your machine may block downloading software through Internet Explorer. If this occurs, you may need to have your system administrator either change your security settings or install the Desktop Integration components for you.
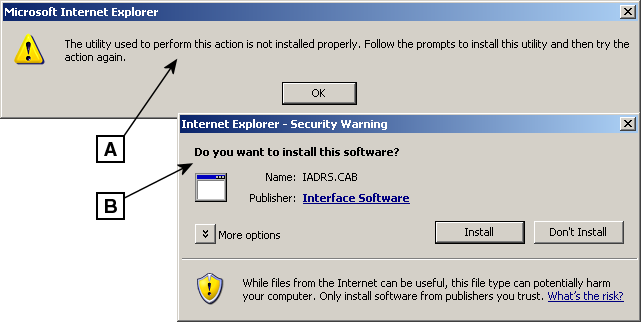
Automatically Downloading the Components Needed to Work with Documents
[A] The initial prompt warning you that the components are not installed.
[B] Security warning dialog box. Choose Install to install the needed components, then choose OK to the first prompt.
Note that your machine’s Internet security settings may block the install dialog box. In this case, contact your system administrator to either change your security settings, or install the Desktop Integration components directly (recommended).
Attach a Document to an Activity
When attaching a document, you can choose any document on your local network or your machine. Once the document is added to InterAction, there is no connection between your original version and the version stored in InterAction.
An activity can have any number of documents.
-
Add or edit an activity as described in Creating and Editing Activities .
-
Choose the Documents link.
-
Choose the Attach link.
-
In the Attach Document dialog box, choose Browse and select the file you want to attach.
-
If necessary, change the Title for the document. This field defaults to the document’s filename. The title is displayed in the Web Client when you view a list of documents.
-
Select the appropriate Type. Document types are useful for filtering and searching on documents.
-
Enter a Description for the document.
-
Choose OK. The document is added to the list of documents for the activity.
-
Make any other changes to the activity as needed, then choose OK. The activity is saved and the document or documents you attached are added to InterAction.
Attach a Document to a Contact
When attaching a document, you can choose any document on your local network or your machine. Once the document is added to InterAction, there is no connection between your original version and the version stored in InterAction.
You can attach documents directly to a contact. This is usually done if the document would extend profile information on the contact, but is not related to a specific action such as an email message or phone call. For example, detailed marketing profiles are sometimes attached to company contacts.
Documents associated with other actions (such as a document you emailed to a client, or a meeting agenda) are normally included on activities (see Attach a Document to an Activity).
Also, a document can only be attached to a single contact. If you need to associate the same document with multiple contacts, add an activity for the contacts and include the document on the activity.
-
Navigate to the contact and open the Attach Document dialog box.
You can do this from several locations:
-
Display the contact overview page and choose Actions > Attach Document.
-
Display the Documents page for a contact and choose the Attach link.
-
From any list of contacts, select the contact and choose Actions > Attach Document.
-
-
In the Document Properties dialog box, choose Browse and select the file you want to attach.
-
If necessary, change the Title for the document. This field defaults to the document’s filename. The title is displayed in the Web Client when you view a list of documents.
-
Select the appropriate Type. Document types are useful for filtering and searching on documents.
-
Enter a Description for the document.
-
Choose OK. The document is added to InterAction.
Viewing the Documents for a Contact
The Documents section of the overview page displays documents for the contact. From here you can also open the full-page documents page.
In addition, you can search for documents using a variety of criteria. For details, see Finding Documents.
When viewing the documents for a contact, the list includes both documents attached directly to the contact and those that are attached to activities and appointments that include the contact.
For example, you could add a new activity to the contacts Jane Tarnoff, Telenorth Financial Services, and Edward Roberts and include the document Telenorth Contract v.2.doc on the activity. This document is included on the Documents view, along with documents attached directly to the contact.
Note that the grid in the Web Client does not distinguish between documents attached to an activity and those attached directly to the contact. You can select a document and choose View > Related Activity for those that are on an activity.
In addition, you can filter the view to display just the documents you need, similar to activities and appointments.
Filter the Documents View
-
Display the contact overview page or the documents page for a contact.
-
Choose the Change View link.
-
Select the criteria for the documents you want to view.
You can filter the documents by a variety of criteria:
-
Type.
-
Regarding. Select Lists to see documents attached to activities regarding working lists and marketing lists. If your organization has licensed a related module, you can also include documents regarding matters, opportunities, or engagements.
-
Time frame. You can select a date range, such as From 90 days ago to 30 days ahead. For details about how the Web Client determines the date for a document, see What is the Date for a Document?.
-
-
Choose OK. The view is filtered according to your options.
What is the Date for a Document?
Because documents can be attached to different InterAction items (activities, contacts, etc.), the date for a document varies depending on how it was attached.
- For a document attached to an activity, the date is the same as the activity date. Therefore, if you create an activity on February 1, 2019, then attach a document to it a week later (February 8), the date for that document is still Feb. 1, 2019 (the activity date).
- For a document attached to an appointment, the date is the same as the Start Date for the appointment.
- For a document attached directly to a contact, matter, opportunity, or engagement, the date is based on when the document was last attached. Therefore, if you attach a document to a contact on February 1, 2019, then edit the document properties and re-attach the document a week later (February 8), the date for that document becomes Feb. 8, 2019. For details about replacing a document, see Editing and Replacing Documents.
How to View the Activity or Appointment to Which a Document is Attached
The list of documents for a contact includes both documents attached directly to the contact and those that are attached to activities and appointments that include the contact. In some cases, you might want to view the activity to which the document is attached. This can be useful for determining the context around the document.
- Display the contact overview page or the documents page for a contact.
- Select the document and choose View > Related Activity or View > Related Appointment.
Open or Save a Document
You can open a document from any list of documents in InterAction. Opening a document retrieves a copy of the file from InterAction. You can either open the document directly, or save a copy on your machine.
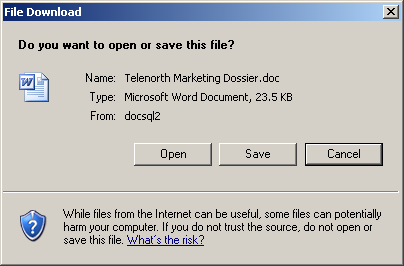
Standard Browser Dialog Box for Downloading a File
Note that you need to have the application used to create the document available. For example, you must have Microsoft Word (or another application capable of reading Microsoft Word files) to open Word documents stored in InterAction.
-
From any list of documents, select the document and choose View > Document.
-
When prompted, choose to either open or save the document.
To Do this Open the document directly Choose Open. Save a copy of the document to your machine first (recommended). Choose Save. When prompted, specify a location for the document and choose Save.
After the document has been saved to your machine, you can open it as you would any other file.
Saving or opening a document from InterAction essentially downloads a copy of the document. The file itself is still stored in a special location within InterAction. Making changes to a copy saved on your machine has no effect on the version in InterAction unless you specifically choose to reattach the changed version (see Editing and Replacing Documents).
Editing and Replacing Documents
If you need to change a document in InterAction, you can save the document to your local machine and make changes, then add the changed version back to InterAction. There are two different ways to add an edited document back to InterAction.
- Add the document as an entirely new document. This leaves the original document still available.
- Edit the document properties for the document and choose to replace the existing version with a new version.
For details about saving a document to your local machine, see Open or Save a Document.
Adding the Revised Document as a New Document
You typically use this method when attaching documents to activities, since the document revisions are often tied to an action that should be captured in an activity.
For example, Ed Roberts sends an email message to his client Jane Tarnoff and includes a draft copy of the client contract. He creates an activity for this action and includes the contract on the activity (see Attach a Document to an Activity).
Later, he needs to update the contract with some minor changes. He opens the contact for Jane in InterAction and saves a copy of the original contract to his workstation. After editing the contract, he sends Jane a new email message with the revised version.
Since this second email message should also be captured in InterAction, this is the quickest and easiest way to add the revised document back to InterAction. Other users who want to know your organization’s history with Jane can see both the communications and the different versions of the contract.
When using this method, include “version” information in the document titles. For example:
- Telenorth Contract v.1
- Telenorth Contract v.2
Replacing an Existing Document with a New Version
This method requires more steps, but is useful if you want to ensure that the document in InterAction reflects the most recent version. This method is more often used for documents attached directly to contacts or directly to matters, opportunities, or engagements.
Replacing an existing document is similar to attaching a new document to an InterAction item; you browse for the file to add.
To replace an existing document, you do the following:
-
From any list of documents, select the document and choose Edit > Document Properties.
-
Choose the Browse button.
-
Select the new version of the document and choose Open.
-
Change the other information in the document properties as needed. For example, you can use the Description field to provide information about the new version and why it has been changed.
-
Choose OK. The revised version of the document is copied to InterAction and the old version is removed.
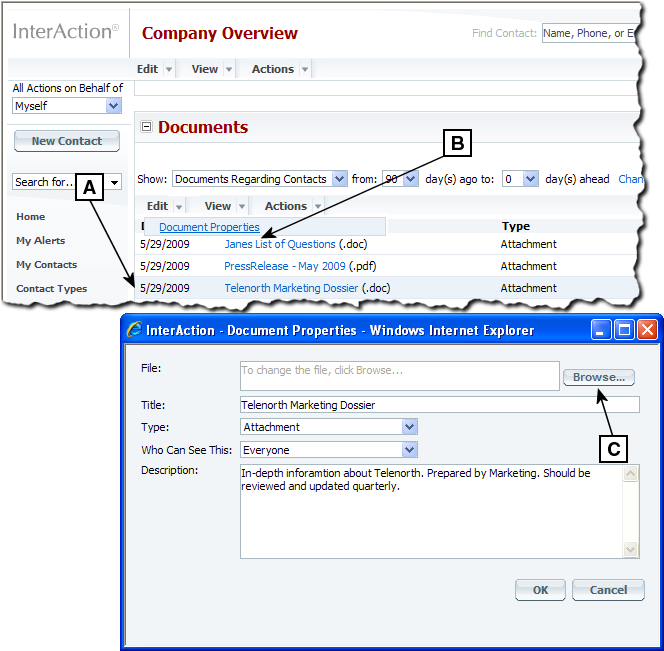
Replacing a Document
For the example, assume you have already saved a copy of the Telenorth Marketing Dossier and updated it with changes. Now you need to reattach it to the contact Telenorth.
[A] Select the document from the list.
[B] Choose Edit > Document Properties. The Document Properties dialog box displays existing information about the document.
[C] Choose Browse and select the revised version of the document to add.
This effectively replaces the existing document. Once the revised version is added to InterAction, the old version is removed. InterAction does not keep track of old versions of documents.
Remove a Document
If you have sufficient access rights, you can remove a document from an activity or contact. For details about the access rights required, see Access to Edit and Delete Activities and Documents.
Note: You can’t remove a document attached to an appointment from the Web Client. If you need to change the documents on an appointment, edit the appointment using Outlook.
-
From any list of documents, select the document and choose Actions > Remove.
-
Read the prompt and choose Yes to continue deleting the document.
-
When prompted to confirm the delete, choose Yes.