Section Topics
Applying and Removing Contact Types
You can apply contact types to a contact when creating the contact with the New Contact Wizard. You can also edit the types for an existing contact.
When applying contact types, the set of types available may vary. This is because some contact types only apply to people or only apply to companies. For example, you cannot apply the College/University contact type to a person.
Your organization can also define other rules regarding which contact types you are allowed to add to contacts. In some cases, adding a contact type submits a Data Change Management request.
See the following topics:
- Apply Contact Types When Creating a New Contact
- Edit the Contact Types for an Existing Contact
- Set or Clear Contact Types for Multiple Contacts at Once
Apply Contact Types When Creating a New Contact
-
Start the New Contact Wizard and fill in the first three panels. For details, see Create a Company Contact or Create a Person Contact.
-
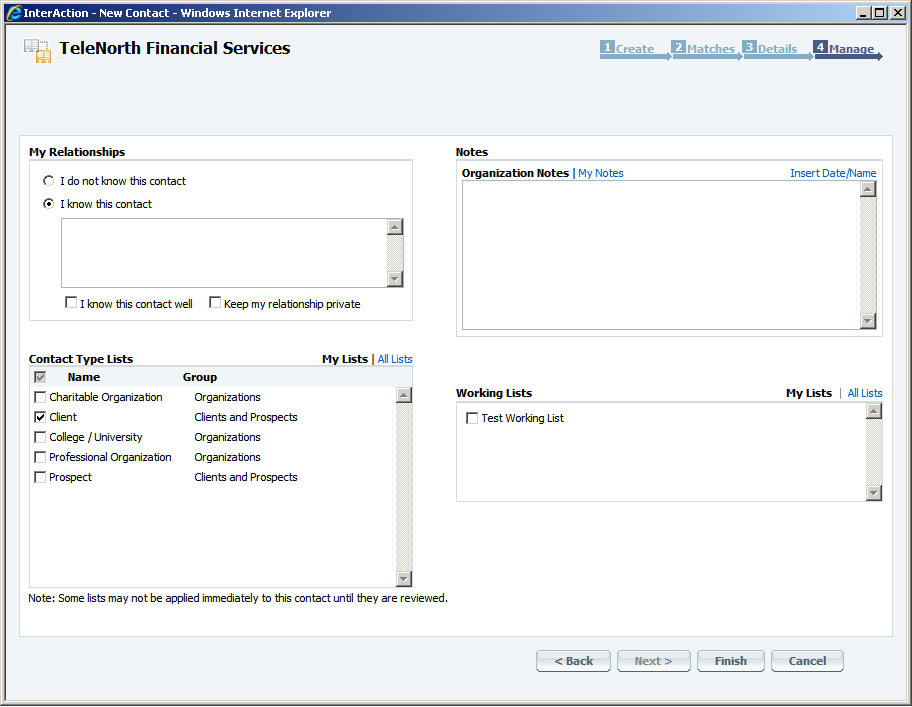
On the Manage panel of the New Contact wizard, select the check box next to appropriate Contact Type Lists that represent relationships between the contact and your organization.
Choose the My Lists link to limit the list of contact types to the set you normally use. Choose the All List link to choose from all possible contact types for the contact.
-
Choose Finish to create the contact and apply the selected contact types.
Edit the Contact Types for an Existing Contact
Tip: You can set and clear the contact types for multiple contacts at once; see Set or Clear Contact Types for Multiple Contacts at Once.
-
Select the contact from a contact list, or navigate to the Contact Overview page.
-
Choose Edit > Contact Types.
Alternatively, choose the Add/Edit link from the top of the Overview page.
-
Choose the My Frequently Used Lists or All Lists link at the top.
-
Select or clear the appropriate contact type(s) for the contact.
-
Choose Save to apply the contacts types selected or removed for the contact.
Note: Some changes may need review and will not be applied immediately due to Data Change Management rules.
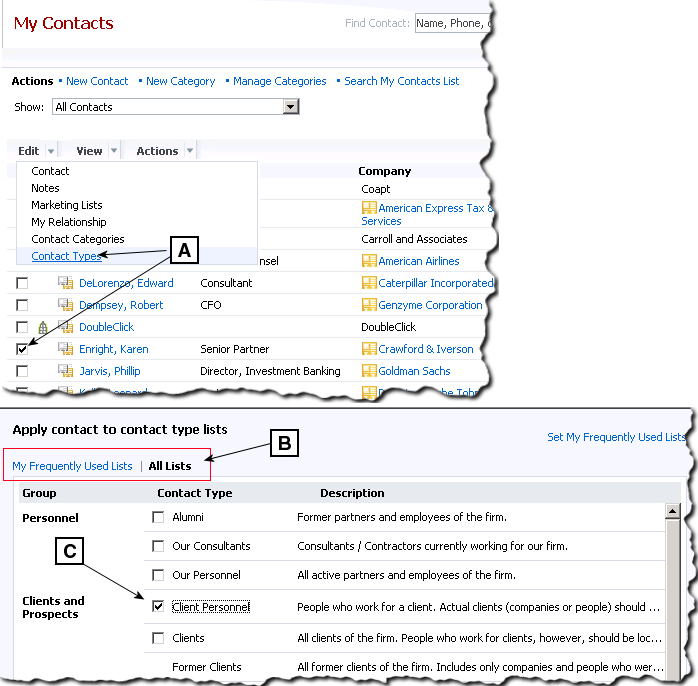
[A] Select the contact in a list and choose Edit > Contact Types.
[B] Choose these links to control the list of contact types available.
[C] Select and clear the check boxes for the contact types.
Set or Clear Contact Types for Multiple Contacts at Once
You can edit the contact types for multiple contacts at once by selecting the contacts in a list.
To set or clear contact types for a group of contacts:
-
Navigate to a list of contacts. This can be any search result or list.
-
Select the check box for each contact to change.
-
Choose Edit > Contact Types. The Edit Contact Types dialog box is displayed.
If the Edit > Contact Types command is disabled, make sure that the selected contacts are not all user contacts (contacts in your list only). A contact must be in the firm list to have contact types.
-
Choose the My Frequently Used Lists or All Lists link at the top to change the set of contact types displayed.
-
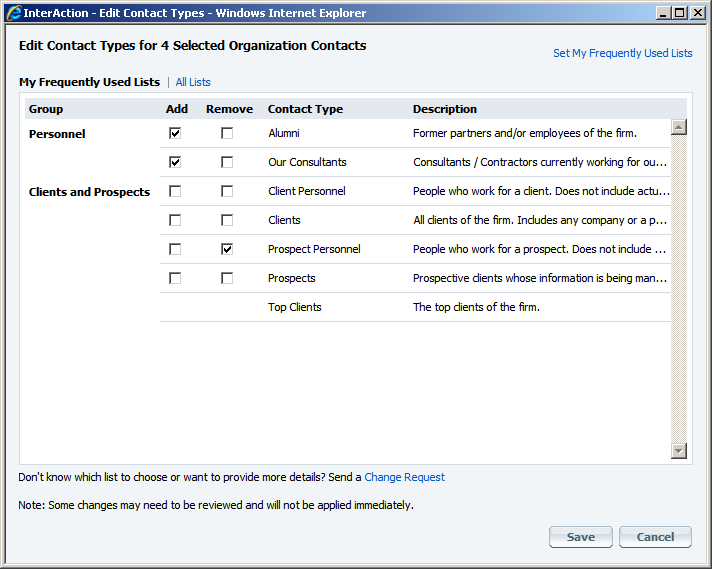
Select the Add and Remove check boxes to change the contact types for the selected contacts.
To Do This Assign a contact type to all the selected contacts Select the Add check box for the contact type. Remove a contact type from all the selected contacts select the Remove check box for the contact type. You can select multiple contact types in the list. You can also select any combination of Add and Remove check boxes. For instance, you could select Add for two contact types and Remove one contact type.
Note: You may not have access rights to apply some contact types, depending on how InterAction is configured at your organization. No Add or Remove check boxes are available for these types.
-
Choose Save to apply the changes to all the selected contacts.
Note: Some changes may need review and will not be applied immediately due to Data Change Management rules.
Editing Contact Types for Multiple Contacts at Once
Selecting People, Companies, or Both
You can select any combination of contacts to update. However, the list of contact types you can change is dependent on whether you select all people, all companies, or a combination of both.
Contact types can be configured to only apply to one type of contact. For instance, the Alumni type is only applicable to people, while the Professional Organizations type is only applicable to companies. Some types, such as Client, are applicable to both.
Therefore, the set of contact types shown in the Edit Contact Types dialog box depends on the group of contacts you select:
| If you select.... | The dialog box displays these contact types.... |
|---|---|
| All people |
• Contact types that apply to just people • Contact types that apply to both people and companies. |
| All companies |
• Contact types that apply to just companies • Contact types that apply to both people and companies. |
| A combination of people and companies |
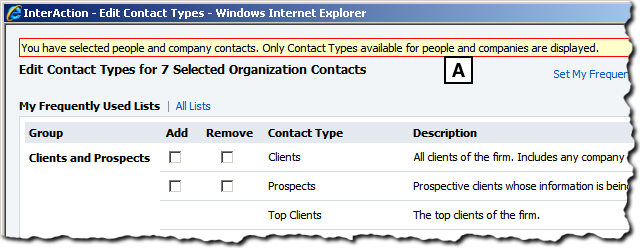
Contact types that apply to both people and companies. Note that a warning explaining this is displayed at the top of the dialog box. |
Editing Contact Types for a Mix of People and Companies
[A] Warning displayed when you select a mix of person and company contacts. Only contact types applicable to both companies and people are available to add and remove.
Contacts in Your List and the Firm List
Only contacts that are in the firm list can be assigned contact types. Contacts that are only in your own contact list cannot have contact types.
Therefore, if the set of contacts you select includes some contacts that are only in your list, those contacts are skipped when applying the contact type updates.
A warning explaining this is displayed at the top of the Edit Contact Types dialog box.

Editing Contact Types When One or More User Contacts are selected
[A] Warning displayed when you select a mix of user contacts and firm contacts. Contact types can only be applied to contacts in the firm list.