Section Topics
Creating and Editing Users Manually
You can create users one at a time in InterAction Administrator. This is useful for adding new users as they join your organization.
Note: If you wish to log into InterAction immediately after creating a new user account, you may need to refresh the Application Server before the account will work. For information on the Application Server cache and refreshing it, see Application Server Cache.
However, for creating a large number of users during implementation, it is much faster to import the users as discussed in Importing Users.
For information on the process to add users to InterAction, see Adding New Users to InterAction on an Ongoing Basis.
If you are already maintaining user accounts in Active Directory that need to be added to InterAction, see Active Directory Integration.
You can edit existing users at any time. However, as noted previously, you cannot delete a user. When an employee leaves, you should inactivate the user account and clean up any of the user’s data. This can be handled conveniently through the Offboarding process in Data Minder.
For more information, see When a User Leaves Your Organization.
Create a User Account
-
Log on to InterAction Administrator.
-
From the main window entity list, double-click User Account and Group Configuration. Then click User Accounts to open the Manage User dialog box.
-
Click New to open the New User dialog box.

If a message that you have reached your limit of active users displays, you may need to update your license file to reflect the number of licensed users your organization has purchased. See Update Your Number of Licensed Users.
-
Specify the values for the account fields: Account Name, Password, Confirm Password and Grace Logins.
The account name cannot contain any special characters, for example, single quotes (’), double quotes (“), ampersands (&), or question marks (?).
Note: The Account Name should be the same as the user’s network login.
-
Enter the user’s full name in the First Name and Last Name fields.
-
If this user is a professional in your organization, select the Professional check box.
-
Click the Groups tab and specify to which groups the new user should belong.
For more information on groups, see User Groups.
-
Click the Proxies tab and specify all proxy information for the applicable user.
For more information on proxies, see Managing User Proxies.
-
Click the Regional Settings tab and specify the regional setting information for the applicable user.
For information on configuring regional settings, see Configuring Regional Settings.
-
Click the Reminder Settings tab and specify the reminder setting information for the user you are creating.
For more information on reminders, see the Configuring InterAction guide.
-
Click the Other tab to do either of the following:
-
If your organization uses InterAction IQ 2.x, see the InterAction IQ 2.x User Guide for information on configuring this option.
-
If your organization has multiple document repositories, assign a document repository to the user by choosing it in the Default Document Repository drop-down list.
-
-
To connect the new user to a contact in InterAction, return to the General tab and click the Set button. This opens the New Contact Wizard. The New Contact Wizard sequence provides possible matches as well as the opportunity to enter and edit contact data, company affiliation, source folder, and link the new contact into other folders, including marketing lists and other folders.
For more information on the New Contact Wizard and its sequence of screens, see chapter 3, Creating Contacts, in InterAction for Data Stewards and Marketing Users.
-
Click OK to save the user and close the New User dialog box. The new user displays in the list of users in the Manage User dialog box. The mapping of the user account is indicated in the Manage User dialog with a figure icon
 .
. -
Click Close to close the Manage User dialog box. Then click Close to close the User Account and Group Configuration dialog box.
Edit a User Account
When you are editing a user account, there is an additional tab labeled Cleanup. For details on this tab, see Making Relationships Former When a User Leaves Your Organization and Cleaning Up Anonymous Relationships.
-
Log on to InterAction Administrator.
-
From the main window entity list, double-click User Account and Group Configuration. Then click User Accounts to open the Manage User dialog box.
-
Select the User you want to change in the list.
-
The user you want to edit may not display if the user does not match the criteria of the selected filter. You can filter users by Status and by group membership.
-
To change the current user filter, click Filter to open the Filter User dialog box, select the desired filter criteria and click OK.
-
-
Click Edit to open the Edit User Account dialog box.
-
Change the fields as needed on all tabs, then choose OK.
For instructions on editing these tabs, review the following information:
- For setting user records, see Connecting a User with an InterAction Contact
- For groups, see User Groups
- For proxies, see Managing User Proxies
- For configuring regional settings, see Configuring Regional Settings
- For reminders, see the Configuring InterAction guide.
-
For settings in the Other tab, see the Configuring InterAction guide (for document repository information) and the InterAction IQ 2.x User Guide (for InterAction IQ 2.x information).
Note: Any existing password does not appear in the Password and Confirm Password edit boxes. When changing this value, enter the new password in both fields. See Resetting a User's Lost Password for more information.
-
Click Close to close the Manage User dialog box. Then click Close to close the User Account and Group Configuration dialog box.
Inactivate (Remove) a User
Users cannot be deleted. To “remove” a user, edit the user and select the inactive status. An inactive user cannot log on to the Web Client, the Windows Client, or the InterAction Administrator applications.
Note: As part of the InterAction implementation, you should have a plan in place for handling InterAction data when a user leaves the organization. For more information, see the InterAction Fundamental Concepts guide.
-
Log on to InterAction Administrator.
-
From the main window entity list, double-click User Account and Group Configuration. The User Account and Group Configuration dialog opens.
-
Click DCM Users to open the Data Change Management Users and Groups dialog box.
-
Remove any users you plan on inactivating as Data Change Management Users.
Select the names of the users you are inactivating from the Data Change Management Users and Groups dialog box, choose Remove from List, and then click Close.
-
Remove users you are inactivating from any Data Change Management Groups to which they belong.
Choose User Accounts, select the user from the Manage User dialog box, click Edit, click Clear All from the Groups tab, and then click OK.
-
Mark the users you want to inactivate in the Manage User dialog box.
-
The users you want to inactivate may not display if they do not match the criteria of the selected filter. You can filter users by Status and by group membership.
-
To change the current user filter, choose Filter to open the Filter User dialog box, select the desired filter criteria and choose OK.
-
-
In the Action drop-down list, select Disable account (set as inactive) and choose Apply.
-
The user cannot log on to the system.
-
The user’s name still appears in the Internal Contact list for activities and in any fields that already contained the name (such as the last edited field for an address).
-
-
Choose Close to close the Manage User dialog box. Then choose Close to close the User Account and Group Configuration dialog box.
Note: You can inactivate a user and choose one or all of the best practice recommendations by using the Offboarding process in Data Minder.
Review History of Changes Made to User Accounts
The Change History - (User Account) dialog box is accessible from the Manage User dialog box. This dialog lets you review changes made to InterAction user accounts.
Note: There is also a Change History dialog box that is accessible from the User Account and Group Configuration dialog box. This shows both user and group changes.
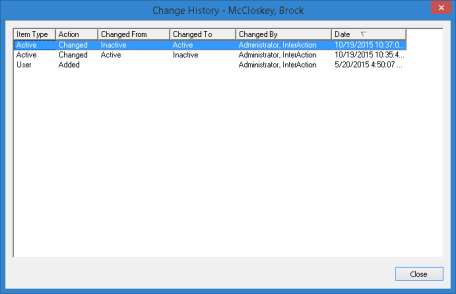
Change History Dialog Box - (User Account)
This dialog box provides the following information:
- Type - Displays what was added, changed, or removed.
- Action - Specifies one of three values: Added, Changed, or Removed.
- Changed From - Displays the previous value.
- Changed To - Displays the new value.
- Changed By - Specifies the user who made the change.
- Date - Displays the date and time that the change occurred.
Making Relationships Former When a User Leaves Your Organization
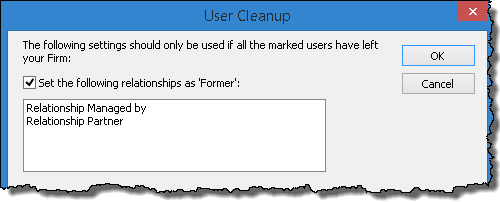
Certain relationships between professionals in your organization and other contacts may be dependent on the fact that the professional works for your organization. For example, the Relationship Partner relationship type is intended to record the person at your organization who is responsible for managing and nurturing your organization’s relationship with a particular client or individuals at the client. If a professional who has been designated as the relationship partner for a client leaves your organization, the relationship needs to become former.
You can partially automate this process by setting the Mark as ‘Former’ when contact leaves firm option for the relationship type. If you select this option for a relationship type, then you can use the user cleanup tools to automatically make the relationships for the user “former.”
In a new installation of InterAction, the Relationship Partner/Relationship Managed by relationships are the only one that uses the Mark as ‘Former’ when contact leaves firm option.
For details about configuring contact to contact relationship types, see the Configuring InterAction guide.
Note: The Offboarding process in Data Minder provides this as an option.
Clean Up Relationships for a User Who Left the Firm
-
Log on to InterAction Administrator.
-
On the main window entity list, choose User Account and Group Configuration. Then choose User Accounts.
-
On the Manage User dialog box, mark the user accounts for the users who left the organization.
-
In the Action drop-down list, select User cleanup options and choose Apply.

-
On the User Cleanup dialog box, select the Set the following relationships as ‘Former’ check box.
-
Choose OK.
-
On the confirmation dialog box, type YES.
Making Relationships Former When a User Leaves the Organization
The professional Ed Roberts is the main person responsible for working with Jane Tarnoff of TeleNorth Financial Services (a very important client for your organization). Therefore, he is set as the relationship partner for Jane.
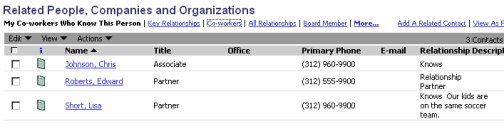
Ed decides to leave your organization to pursue a different opportunity. As part of inactivating his InterAction account, your administrator runs the user cleanup tool against Ed’s account and selects the option to make any relationships between the user and a contact former if the relationship type indicates that they should be made former.
After the tool completes, the relationship partner relationship between Ed and Jane is former instead of current.

Note: The same result occurs with the Offboarding process in Data Minder.
Cleaning Up Anonymous Relationships
To help encourage users to indicate when they know a contact by using the Who Knows Whom™ feature, you can allow anonymous Who Knows Whom. By doing this, users can indicate they know a contact without initially letting other users know who they are. For more information, see the Configuring InterAction guide.
When a user leaves the organization, you can either delete all of the user’s anonymous relationships or make those relationships available to everyone.
Note: This process is one part of the Offboarding process in Data Minder.
Managing Anonymous Relationships for a User Who Left the Organization
-
Log on to InterAction Administrator.
-
On the main window entity list, choose User Account and Group Configuration then choose User Accounts.
-
On the Manage User dialog box, mark the user accounts for the users who left the organization.
-
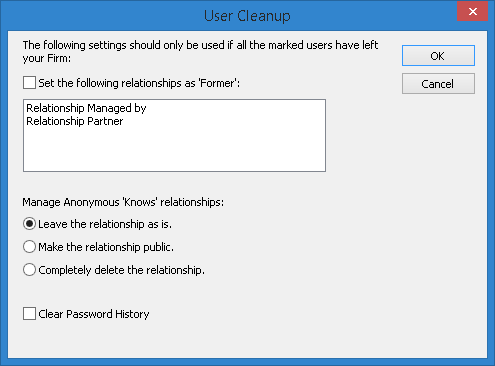
In the Action drop-down list, select User cleanup options and choose Apply.
-
Do one of the following:
-
To make the anonymous relationships available to all users, select Make the relationship public.
-
To remove anonymous relationships from the system, select Completely delete the relationship.
-
-
Choose OK.
-
On the confirmation dialog box, type YES and choose OK.
Clearing External System Ownership for Multiple Contacts at Once
When contacts are brought into InterAction using Application Collaboration, they are considered owned by that other system. Sometimes it is necessary to clear this ownership and break the link between the contacts and the external system:
- Employees leave the organization.
- You have transferred management of the information to InterAction.
You can grant the Clear external system ownership permission to a group. This allows members of the group to perform this action.
You can mark multiple contacts and clear the ownership for all at once.
Set the Clear External System Ownership Permission
-
Log on to InterAction Administrator.
-
On the main window, double-click User Account and Group Configuration, then choose the Permissions button.
-
Under Data Quality Permissions, select the group that should have Clear external system permission.
You can choose a specific group or the system administrator only. You cannot set this permission to everyone.
Clear External Ownership
-
Log on to the InterAction Windows Client as either the System Administrator User or a user with the Clear external system permission.
-
Find the contacts to change and mark them.
-
Choose Tools > Clear External System Ownership.