Section Topics
Importing Users
Importing user accounts rather than creating them individually can save you time, especially when creating many users during the initial rollout.
Before you can import users, you must ensure that your environment is prepared. Failing to properly set up your environment may require many hours of extra work that can be avoided. For example, not configuring your user contact list default settings before creating users could require that you edit each user’s contact list individually to configure the proper settings.
See the following table for the list of steps you must perform before importing users.
| Step | Description |
|---|---|
| Editing the User Contact List Defaults |
When you add a user to InterAction, the user contact list for that user is automatically created using the settings specified on the Edit User Contact List dialog box. This acts as a template for new user contact lists. For instructions on setting these defaults, see Configuring User Contact Lists. |
| Adding a Contact for Each User |
Before users can log on to the InterAction Web Client or LexisNexis InterAction for Microsoft Outlook, they must have a contact record set for their user account. To simplify this process, you should add your firm personnel to InterAction before importing users. For more information, see Connecting a User with an InterAction Contact |
| Check Your License File |
Make sure you have enough licenses for the number of users you want to import. Your license key must be entered into InterAction for your number of licenses to be recognized. All imported users are automatically created with an active status. You must have a license for each active user you create or import. If you have not entered the license key, InterAction only lets you enter 20 active users. See Licensing InterAction Users for more information. |
| Obtain and Format User Account Data for Import |
You may prepare the user account data by doing the following:
Ideally, you should use the same data source for creating users as you used to add contact records for the users to InterAction. This ensures that the names match, making it much easier to tie the accounts and contacts together. Be sure to “clean up” the import file before importing into InterAction Administrator. Make sure each record includes all required fields identified in Import File Format. |
| Set Duration and Grace Login Defaults |
When you add a user to InterAction, the password duration and grace login settings are automatically set for that user. These settings are based on defaults you have identified in InterAction Administrator. For more information, see Password Expiration and Grace Logins. |
| Select Initial Passwords |
Although you can leave the initial password for each user account blank, it is not recommended as this creates a potential security risk. Possible sources for unique initial passwords include:
For more information on user validation, see Configuring User Account Security. |
| Other Guidelines |
When preparing to import the user accounts, keep the following guidelines in mind:
|
See Importing the User Accounts for the steps to take to import user accounts.
Import File Format
You can import users from a comma separate values (CSV) file. The file must include the following fields, in this order:
- Account Name
- First Name
- Last Name
- Password
- Professional Indicator (1 or Yes for professional users, 0 or No for non-professional users)
When a user is imported, the user’s status is automatically set to active.
When you import the user accounts, InterAction Administrator automatically creates a user contact list for each user.
Note: For information about user contact lists, see What are User Contact Lists?.
Importing the User Accounts
Once you have prepared for the account import following the “User Import Preparation Checklist” above, you can test the import file and then import the users.
Testing the import file first is a good practice, as you can ensure that your data file is set up correctly. You can review any errors or warnings, correct the data, then do the actual import.
Note: Remember, you cannot delete a user! Make sure the data in the import file is accurate before importing the users!
Test the Import Source File
-
Create the comma separated values file to import. Make sure it has the format described in Import File Format.
The first row can include field names if desired.
-
Log on to InterAction Administrator.
-
In the main window of InterAction Administrator, double-click User Account and Group Configuration. Then choose User Accounts to open the Manage User dialog box.
-
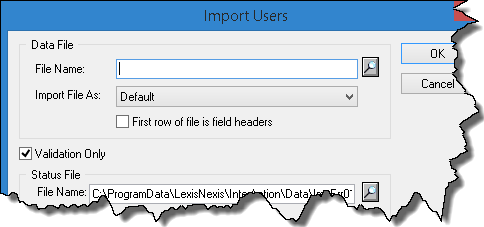
Choose Import Users.
-
Enter the path and filename for the import file in the File Name field. You can also use the lookup button to browse for the file.
-
Specify the encoding in the Import File As drop-down list.
-
Select the Validation Only check box.
-
Enter the path and filename for the Status File, then choose OK.
InterAction Administrator checks the import file for any problems, then displays a status message indicating the number of users accepted and rejected.
-
Review the status file produced during the test.
For help resolving any errors, see Importing User Accounts Error Log.
-
Correct any problems in your import file, then follow the “Import the Users from the Source File” procedure.
For assistance in resolving errors, see Importing User Accounts Error Log.
Import the Users from the Source File
Before you import users, make sure you have completed the steps identified in “User Import Preparation Checklist” above.
-
Log on to InterAction Administrator.
-
In the main window of InterAction Administrator, double-click User Account and Group Configuration. Then choose User Accounts to open the Manage User dialog box.
-
Choose Import Users.
-
Enter the path and filename for the import file in the File Name field. You can also use the lookup button to browse for the file.
-
If it is currently selected, clear the Validation Only check box.
-
Enter the path and filename for the Status File, then choose OK.
InterAction Administrator imports the users from the file, then displays a status message indicating the number of users added and rejected.
-
Correct any problem encountered during the import. For more information, see Importing User Accounts Error Log.
-
Set the Contact Record for each user. For more information, see Connecting a User with an InterAction Contact.
Importing User Accounts Error Log
During the import, InterAction Administrator saves all errors and warnings in a status file. You can select the location for this status file when setting up the import.
Errors occur when the data is invalid and Administrator cannot import the record. For instance, an error occurs if a required field is blank. The record is skipped and added to the status file.
The status file is formatted as an import file, so you can correct the problem record in the status file and re-import. This is generally a quicker method of fixing errors, rather than finding each problem record in your large import file to re-import.
Warnings occur when the problem does not block Administrator from adding the user. For example, if there are extra fields in a row, Administrator still imports the user, then adds the warning to the status file for informational purposes only.
Resolve Import Errors and Problems
-
After importing or checking an import file with the Validation Only option, open the status file in a text editor.
-
Review each error or warning.
- Errors indicate that the user was not imported.
-
Warnings indicate that the user was imported, but there may have been minor problems with the record that did not interfere with the import.
-
If you are resolving errors after performing an actual import (as opposed to validation only), do the following:
-
Correct any records that did not import. These rows display in the status file immediately below the description of the problem. Correct the problem in this version copied into the status file.
-
Attempt the import again, but select the status file for the import file, rather than your original file. InterAction Administrator attempts to import the data.
-
Note: If you are resolving after using the Validation Only option, fix the actual import file to correct any errors.