Section Topics
Using the Windows Client Report Chooser (Accessing Reports)
Windows Client users use the Report Chooser to access and print reports. The Report Chooser contains all the reports that you have rights to view and print. If you have rights to manage reports, the report manager features are accessed through the Report Chooser.
To access the Report Chooser:
- Choose Tools > Reports from the menu bar
- Choose the Reporting icon in the toolbar
NOTE The Reporting icon is active only when a contact list is displayed on the screen.
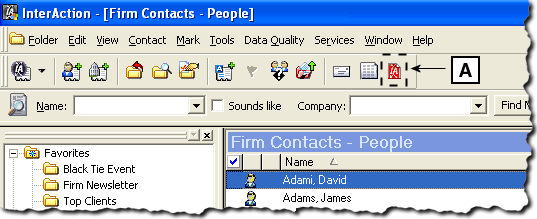
Reporting Icon
[A] The Reporting icon opens the Report Chooser.
The Report Chooser looks slightly different for users with different reporting permission levels. Three permission levels are given to Windows Client users:
- Report viewers (can view and print reports only)
- Report users (can also create personal reports accessible only by them)
- Reporting managers (can also manage reports for the organization)
NOTE For more information on setting up users with different reporting access levels, see Reporting Users and Groups.
How the Report Chooser Displays for Report Viewers
Report viewers can view and print reports only. Report viewers can:
-
Choose View Now to view a report. With the report on the screen, choose Print to print the report.
See Viewing and Printing Reports for more information.
-
Choose Send to Me to email the report to yourself or a user for whom you are a proxy.
See Emailing Reports in the Windows Client for more information.
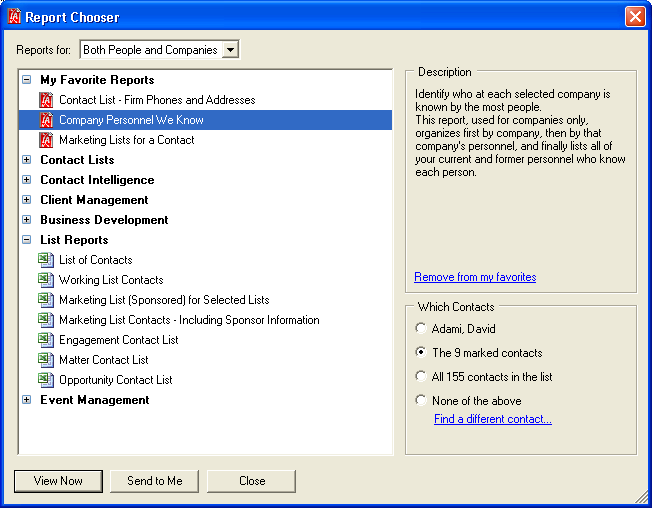
Report Chooser - Report Viewers
How the Report Chooser Displays for Report Users
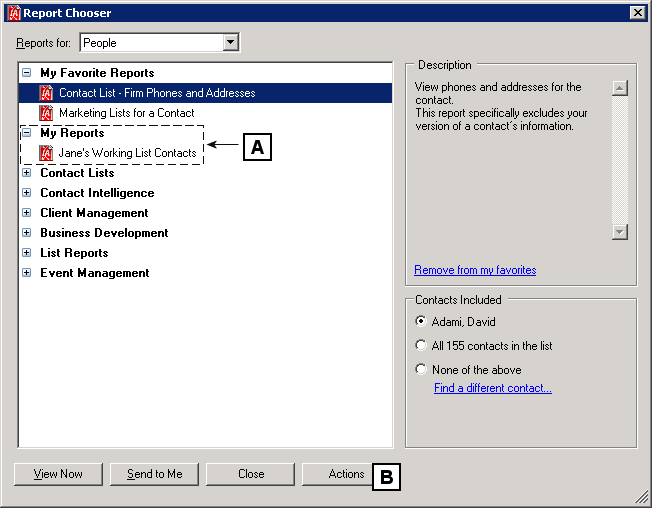
Report users can also create personal reports (My Reports). These reports can only be seen by the person who created them and cannot be shared with the organization. Report users manage My Reports from the main Report Chooser dialog box. The Actions button lets you create new personal reports, edit personal reports, delete personal reports, or save a report on the organization’s report list as a new personal report.
Report Chooser - Report Users
[A] Report users also have a category in the Report Chooser dialog box called My Reports.
[B] The Actions menu is used to manage the personal reports in the My Reports category.
How the Report Chooser Displays for Report Managers
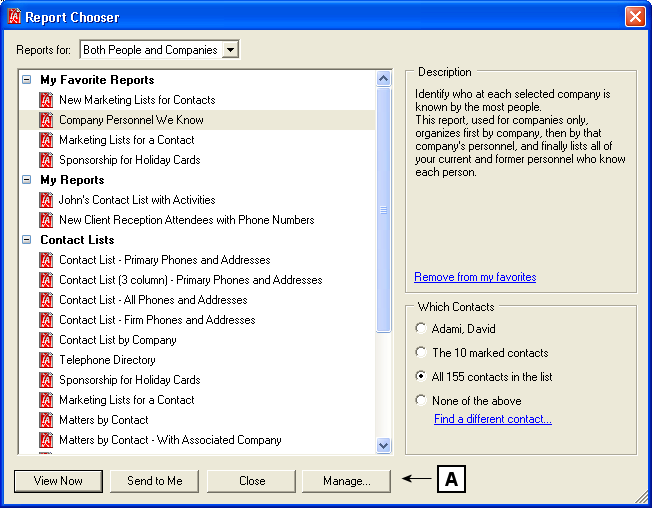
Report managers can also manage reports on your organization’s report list. For these users, the Manage button displays on the Report Chooser dialog box.
Report Chooser - Report Managers
[A] The Manage button displays in the Report Chooser dialog box only for report managers. Choosing Manage Reports takes you to a dialog box where you can create, edit, and manage reports.
Choosing the Manage button opens the Manage Report List dialog box. Report managers maintain reports from this dialog box.
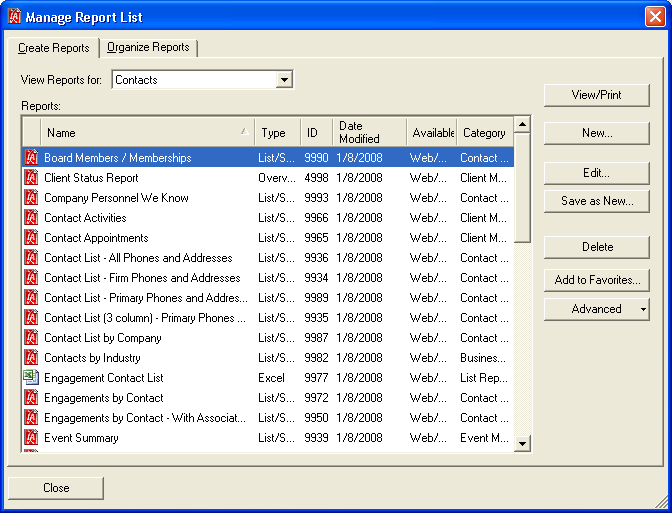
Manage Report List Dialog Box
The Manage Report List dialog box lists all reports created for your organization, regardless of the security or access settings. Report managers cannot see personal reports created by individual users.
For more information on managing reports and the Manage Report List dialog box, see Managing Reports.
Which Reports Display in the Report Chooser?
The report managers in your organization choose which reports each InterAction user and/or group can view. Some reports may apply to some people and not others. Therefore, it is the responsibility of the report manager to create a good reporting experience for all users by only showing which reports are applicable to them.
The Report Chooser displays:
- All reports you have access to view
- Only those reports that apply to the contacts selected (people or companies)
- Any personal reports (My Reports) you have created (if you have rights to create them)
Report managers also choose how reports display. For example, they organize reports by categories and decide which reports display by default when users report on people, companies, or both people and companies.
Report Output Formats
Below is a list of report output formats that you may see in the Report Chooser. Because report managers prefer a wide range of file formats and report design tools, it is very likely that some of these output formats are not used in your organization.
NOTE If you open a report and the application required to open that report is not installed on your computer, you are prompted for a location to save the file.
| Icon | Description |
|---|---|
|
|
List/Summary or Overview - When you choose View/Print, the report opens in InterAction’s report viewer. From the report viewer you can save the report in any of the following formats: RTF, PDF, HTML, XLS, TIF, or TXT. |
|
|
Excel or CSV - When you choose View/Print, the data outputs to Microsoft Excel (or the program you use to view CSV reports). This output format is common for working lists and marketing lists, but can be used for any type of report where you want to manipulate data or don’t care about the output format. |
|
|
Access - When you choose View/Print, the data outputs to Microsoft Access. |
|
|
XML - When you choose View/Print, the data displays in XML format in your web browser. |
|
|
Microsoft Reporting Services - These reports were created in Microsoft SQL Server Reporting Services and are opened in a browser or document reader, as defined by the Microsoft SQL Server Reporting Services Report. |
|
|
Crystal Report - These reports were created in Crystal Reports and are opened in the Crystal Reports Viewer. |
|
|
URL - When you choose View/Print, the URL referenced displays in your web browser. |
Displaying Reports for People or Companies
When you access the Report Chooser, InterAction reads which set of contacts you are currently viewing (people or companies) and by default, displays the reports that only apply to those contacts. This helps keep the number of reports you see in the report chooser manageable.
Reports are categorized by:
- People Only
- Companies Only
- Both People and Companies
For example:
- You mark 20 people contacts to include on a report. The Report Chooser displays reports that apply to People Only.
- You report on a folder that contains all companies. The Report Chooser displays reports that apply to Companies Only.
- You mark 5 people contacts and 8 company contacts to include on a report. The Report Chooser displays reports that apply to Both People and Companies.
You can change the view by choosing an option in the Reports for drop-down list in the Report Chooser. For example, you may want to change the view if you changed the contacts you are reporting on (you were viewing companies but want to print a report for a person).
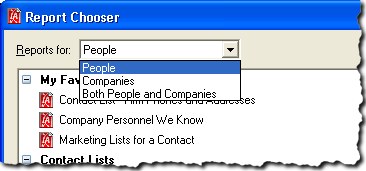
Showing Reports for People or Companies
Adding Reports to Your Favorites List
If you use some reports frequently, add these reports to your My Favorite Reports list. This list is always at the top of the Report Chooser so favorite reports are easy to find.
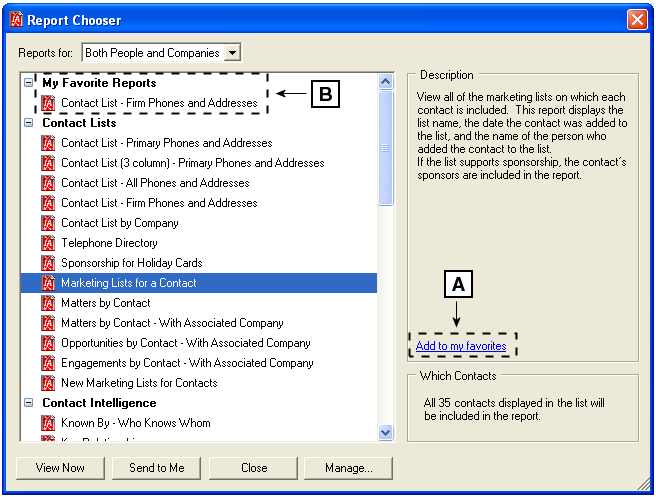
Adding Reports to My Favorite Reports
[A] To add a report to your favorites list, choose Add to my favorites.
[B] The report is moved to the My Favorite Reports category.
Report managers can add reports to users’ My Favorite Reports list. For more information, see Adding Reports to Users' My Favorite Reports List.
Personalizing Reports in the Windows Client Report Chooser
Depending on how your report managers have configured reports for your organization, you may be able to personalize some reports when viewing them in the Report Chooser.
Two different types of reports can be personalized:
- Overview reports can be personalized to include specific sections of InterAction data. Activity/appointment sections may have date range and/or originator filters that can be changed.
- Contact reports that include activities and appointments can be personalized to limit activities and appointments to a particular date range and/or list of originators.
If a report is designed to allow personalization, the Personalize link displays in the Report Chooser (Figure 38-8). Choose Personalize to select the data to include in your report.
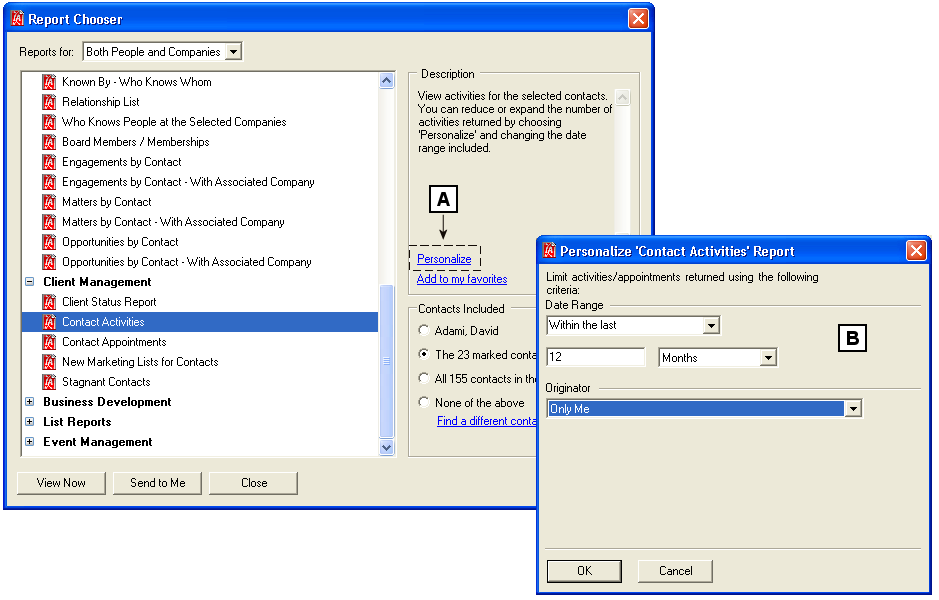
Personalizing a Report
[A] Choose the Personalize link to personalize a report.
[B] The available personalization options display. The options available depend on how your report manager configured the report.
Options you choose in the Personalize Report dialog box are saved for the current report. Next time you choose Personalize to customize the report, the options you previously chose are selected.
Personalizing Overview Reports
Overview reports (also known as Contact Intelligence or Taxi reports) let you include specific sections of InterAction data in your report. For example, report managers can set up an Overview report that includes sections for Contact Information, My Notes, Firm Notes, Recent Activities, and Upcoming Appointments. You can include any of these sections in your report and in some cases, filter the data within specific sections.
NOTE Report managers configure Overview reports by designing sections, making sections available to end users, and choosing personalization options. For more information, see New Overview Report.
-
Choose Tools > Reports to access the Report Chooser.
-
Select the Overview report in the list then choose Personalize.
The Personalize Report dialog box displays.
-
Choose the sections to include in the report by selecting the check boxes for the options in the list.
-
Sections that allow personalization display Available in the Filter column. Highlight those sections and choose personalization options as desired.
-
Choose OK to return to the Report Chooser.
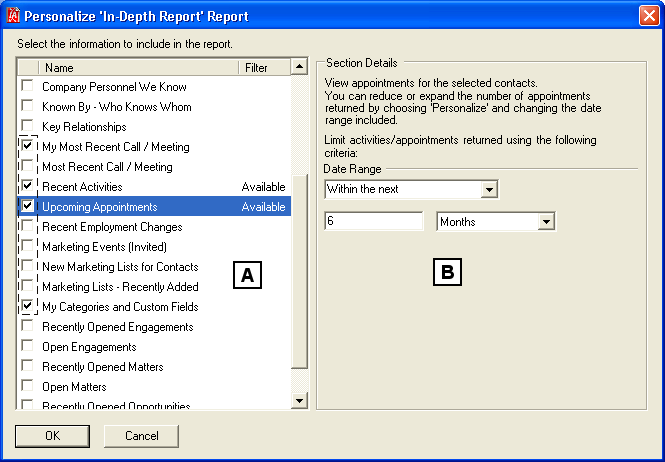
Personalizing Overview Reports
[A] Select the sections to include in the report.
[B] If the section is designed to allow personalization options, choose your options in this area of the dialog box.
Personalizing Activity/Appointment Options in Contact Reports
If a contact report that includes activities or appointments allows personalization, a Personalize link displays.
NOTE Report managers choose the personalization options available to end users. For more information, see Configuring Activity/Appointment Personalization Options for End Users.
To personalize these reports:
-
Choose Tools > Reports to access the Report Chooser.
-
Select the contact report in the list then choose Personalize.
The Personalize Report dialog box displays.
-
Choose the activity or appointment options you want on your report.
-
Choose OK to return to the Report Chooser.
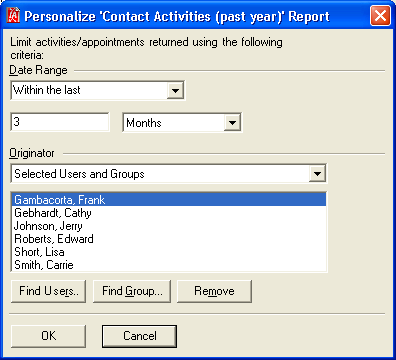
Personalizing Activity/Appointment Options on a Contact Report
Your organization’s report managers choose which options are available to you. Available personalization options are Date Range and Originator.
| Personalization Option | Sections Available |
|---|---|
| Date Range |
Choose a date range for the activities/appointments to include on the report. Choose an date range option in the drop-down list (for example, Within the last) then specify the date information (for example, 3 Months). |
| Originator |
Choose the originator of the activities/appointments to include on the report. Choose an originator option from the drop-down list: • Anyone • Only Me • Selected Users and Groups If you choose Selected Users and Groups, use the Find Users and Find Groups buttons to locate the originators to include on the report. |
Emailing Reports in the Windows Client
If your organization’s report administrator has configured InterAction for report email delivery, you can email a report to yourself or other InterAction users for whom you are a proxy.
NOTE For information on enabling and configuring the InterAction report delivery process, see Configuring Report Email Delivery.
Emailing a report is especially convenient if a report contains a lot of contacts or data and may take a while to generate. The report is generated behind the scenes and is sent to you as an email attachment. The time it takes to receive the email depends on how your report administrator has configured the report delivery process.
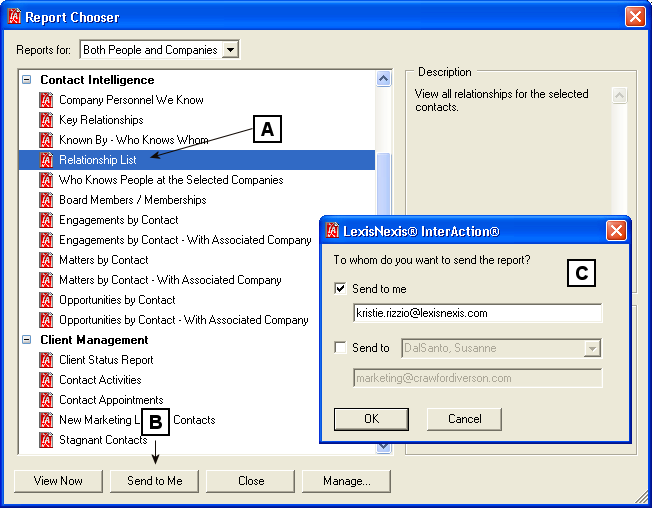
Emailing a Report
[A] Select the report to email.
[B] Choose Send to Me.
[C] If you are a proxy for another user, select who you want to send the report to: Send to me or Send to a user for which you are a proxy (select the user from the drop-down list).
Email a Report
-
Choose Tools > Reports to access the Report Chooser.
-
Select the report to email.
-
Choose Send to Me.
-
If you have an email address on record and you are not a proxy for another user, the email is sent to your email address.
-
If you do not have an email address on record, you are prompted for your email address.
-
-
If you are a proxy for another user, InterAction prompts you for the user to send the report to.
-
Send to me - Sends the report to your email address.
-
Send to - Lets you choose a different user for which you are a proxy. Select the user name from the drop-down list and verify the email address.
-
Can I Email a Report to Another User For Whom I Am Not a Proxy?
You cannot use the Send to Me feature in the Report Chooser to email a report to another user unless you are a proxy for that user. However, you can use the InterAction Report Viewer to save a report (in any of these formats: RTF, PDF, HTML, XLS, TIF or TXT) then attach the report in a new email message.
For more information on using the InterAction Report Viewer, see Using the InterAction Report Viewer.
