Section Topics
New Overview Report
Overview reports, (also known as Contact Intelligence reports or Taxi reports) are reports that consist of several sections of data that users can choose to include in the report.
- For example, InterAction includes the Quick Update Report out of the box, which is an Overview report. This report includes 13 sections that users can include when running the report:
- Name, Company, Job Title, and Contact Types
- Primary Addresses and Phones
- My Most Recent Call/Meeting
- Most Recent Call/Meeting
- My Notes
- Recent Activities
- Upcoming Appointments
- Known By - Who Knows Whom
- Company Personnel We Know
- Recently Opened Matters/Opportunities/Engagements
- New Marketing Lists for Contacts
In the Web Client, Windows Client, or PIM, users select only the sections they want to include in the report. Some sections like activities and appointments can be further customized by the user by choosing Show Options then choosing date range and originator filters for the report.
NOTE Because Overview reports can potentially include a lot of data for each contact, these reports limit the number of contacts included to 50.
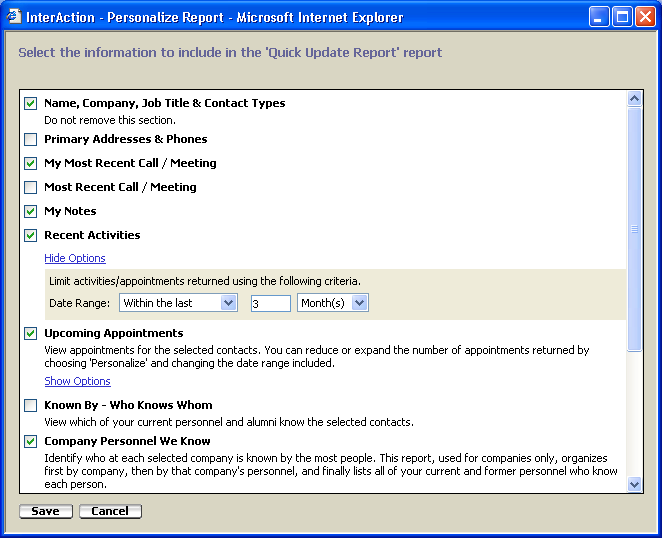
Selecting Sections to Include in an Overview Report
Including Overview reports in your organization’s report list lets you create fewer reports because you don’t have to create several reports that include every combination of data that users need. Instead, create fewer reports and let choosers decide which information to include.
For example, Jane and Marty are in the same practice group. Jane wants to see the My Notes section on her report because she always enters thorough notes. However, Marty does not use notes. Both users can use the same report and choose to include or exclude notes. When they run the report again, InterAction keeps the personalization options each user chose for the report.
Best Practices for Creating Overview Reports
Because Overview reports let choosers control the information included in a report, you can share more reports amongst different practice groups or departments. Therefore, it takes some strategy to decide which reports to create for your organization.
| Do this ... | Because ... |
|---|---|
| Create reports with a specific goal in mind |
Creating a report with too many sections can be overwhelming for users. Only include sections applicable to the report. For example, you can create a report that lets users quickly access information before a phone call with a client. You may title this report Prepare for a Client or Prospect Phone Call and create sections like My Notes, Firm Notes, Most Recent Activities, My Most Recent Call/Meeting, Upcoming Appointments, Open Matters/Opportunities/Engagements, and Recent News. |
| Avoid creating a report for a certain group unless it contains data specific to that group |
Overview reports are generally created to share amongst groups, however you may want to create reports for specific groups. For example, a report specific to a practice group may include folder-specific information from folders that are of interest to that group. You would not want to share this report amongst groups because:
|
| Set security on Overview reports so the reports only display for the right people | Not only is security important to prevent access to reports, but also because you don’t want to clutter a user’s Report Chooser with reports that don’t apply. |
| Consider which sections users should see | Overview report sections do not have security settings. Therefore, you cannot display sections for certain users or groups and not others. If a report contains sections that some groups should not see, create separate reports with only the sections applicable to each group. |
| Consider creating some reports for both people and companies | Sections hide when they should not be shown for people or companies. For example, if a section is for People Only, that section hides when run on companies. Therefore, you can create one Overview report that contains both types of sections - you don’t have to create a separate report for each. |
Create a New Overview Report
TIP If an Overview report already exists that is similar to the one you want to create, select the existing report then choose Save as New. This keeps the page and report headers and footers designs from the original report.
To create a new Overview report:
-
From the InterAction Windows Client, choose Tools > Reports.
-
In the Report Chooser, choose Manage.
-
In the View reports for drop-down list, choose Contacts.
-
Choose New.
The New Report Wizard dialog box displays. The New Report Wizard takes you through four steps to create a new Overview report (see below). Choose the Next button to move through each step the wizard. When you reach the end of the wizard, choose Finish to create the report.
| Step # | Step |
|---|---|
| 1 | Enter general information like report name and description. |
| 2 | Create or find the sections to include in the report. |
| 3 | Design the report layout and choose the sort order. |
| 4 | Set who can access the report and from where. |
New Overview Report Wizard: General Information
When creating an Overview report in the New Report Wizard, the first step is to complete the general information for the report.
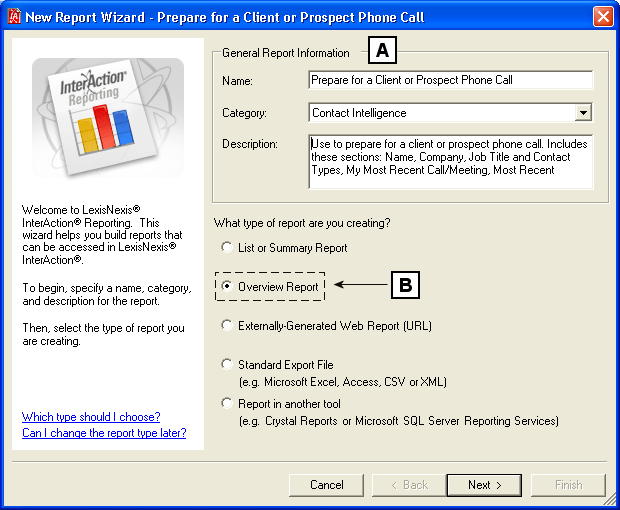
New Report Wizard - Overview Report (General Information)
[A] Give the Overview report a name, category, and description.
[B] Choose Overview Report.
-
Give the Overview report a name, category, and description.
-
Name - Give the report a name that can easily be identified by users. For tips on naming reports, see Naming Reports.
-
Category - Choose a report category from the drop-down list. Since Overview reports are used primarily for contact intelligence purposes, choose Contact Intelligence.
-
Description - The report description is displayed in the Report Chooser and helps users identify the purpose of the report. Include the name of the sections included in the report so users can see this information in the Report Chooser.
-
-
Choose Overview Report.
-
Choose Next to continue to the next step of the New Report Wizard.
New Overview Report Wizard: Add Sections
When creating an Overview report, define which sections to make available to users. Although you can indicate which sections to include by default, users choose which sections to include when they run the report.
NOTE You can make sections inactive or save them as a draft to publish later. For more information, see Hiding Unfinished Sections from Users and Working with Drafts.
There are three ways to add sections to the report:
- Create a new section from scratch
- Add an existing section used in a different report (then optionally make changes and/or rename the section)
- Import a section from file
As you add sections to the report, they display in the Sections box. The order that sections display in the Sections box is the order in which they appear in the report. Use the Move Up and Move Down buttons to organize sections as you add them.
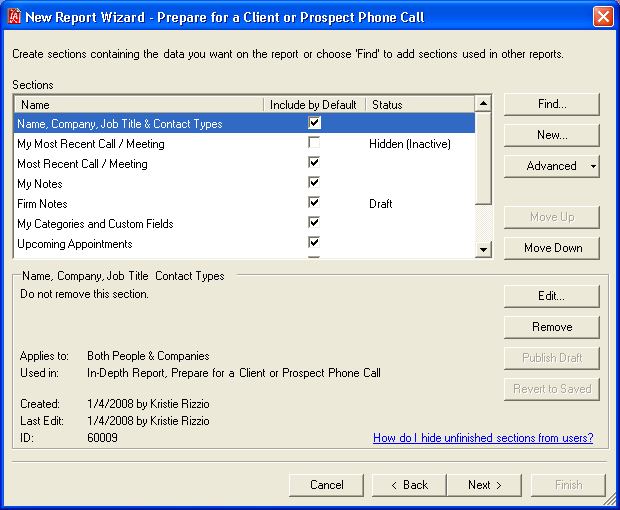
New Report Wizard - Overview Report (Add Sections)
Create a New Section
To create a new section, choose New. The New Section dialog box displays. Create the new section then choose OK to save it.
After you save the section, it is saved on your report. The section is also available to add to other reports later if you choose to do so.
See New Overview Report Section for more information on creating sections.
TIP If an existing section uses the same data and design as the section you want to create, it is almost always easier to start with the existing section. For details, see Can I Save An Existing Section as a New Section?.
Find an Existing Section
Sections can be shared amongst reports. To find an existing section to use in the report, choose Find. The Choose Sections dialog box displays.
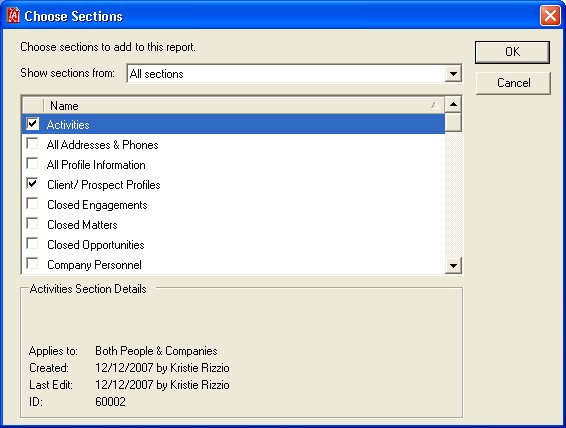
Choose Sections Dialog Box
In the Show sections from drop-down list, choose the report to find sections from or choose All sections. Select the sections to include in the report then choose OK.
When you find sections that already exist then include them in your report, you are not making a copy of the section. You are using the same section that is used in other reports.
If the section you are adding to your report needs to be modified, you can edit the section after adding it to the report by highlighting the section and choosing Edit. Upon saving the edits, you are prompted to update the section for all reports, or only the section used in the current report. If you choose to update the section in the current report only, you are making a separate copy of the section and it is saved as a draft until you publish it later.
For more information on editing sections, see Editing Sections.
Importing/Exporting Sections
When creating or editing Overview reports, InterAction lets you import and export sections. You can also import InterAction list or summary reports as sections (you cannot import Overview reports as sections).
Use the section import/export feature in these scenarios:
- You have an InterAction list or summary report that you want to use as a section. You can import it and modify it rather than create a new section.
- You downloaded a section from the LexisNexis InterAction Support Web site and want to include it in a report.
- You are moving a section from a test database to production (or vice versa).
- You’ve already created a section you like and it is only on the current report. You want to create a similar section on the same report. You can export the section, then import it on the same report so you don’t have to create a new section from scratch (see Can I Save An Existing Section as a New Section?).
To import a section, choose Advanced > Import Section from File. Browse to the IRD file then choose Open. After you import a section, the section is inactive. To activate the section, choose Edit, then choose Make all changes available to users as soon as I save the report.
To export a section, choose Advanced > Export Section to File. Choose a location then choose Save.
Including a Section by Default
When managing the list of sections in an Overview report, you can include a section in the report by default. When checked, the Include by Default check box indicates the section is included in the report if the user chooses to run the report without changing any personalization options.
This check box only sets the default setting - users can choose the sections in a report when they personalize it.
Removing Sections
To remove a section, highlight the section in the list then choose Remove.
If the section is not used in other reports, InterAction warns you that removing the section deletes it permanently and it will no longer be available to include in other reports.

Deleting Section Not Used in Other Reports
Can I Save An Existing Section as a New Section?
No. However, you can do either of the following:
-
If the existing section is on a different report, choose Find to locate that section and add it to the current report. Then you can edit it and choose to apply the changes to only the current report.
For more information on finding sections, see Find an Existing Section.
-
If the existing section is only on the current report and you want to create a similar section on the same report, export the section, then import it as a new section.
For example, you want to create a report with two relationship sections. You create one relationship section that is exactly what you want. Instead of redesigning the second section, export the first section, then import it. Rename the section and make adjustments to the data options and design as needed.
For more information on importing and exporting sections, see Importing/Exporting Sections.
New Overview Report Wizard: Layout
Choose Design in the Layout tab to open the InterAction Report Designer application and design the layout of the common elements of your Overview report (such as the report or page header and footer).
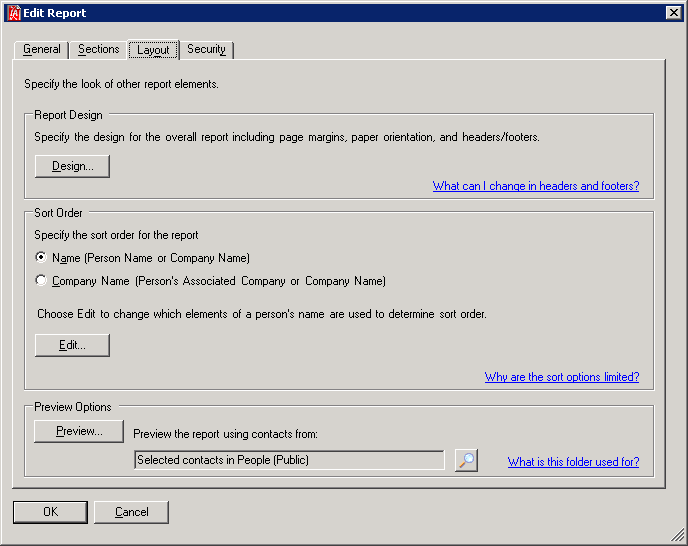
New Report Wizard - Overview Report (Layout)
Because Overview reports contain sections of data that you design separately, you only have to design the following components on a report level:
- Report Header - A header that prints only once at the top of the report.
- Page Header - A header that prints at the top of each page.
- Page Footer - A footer that prints at the bottom of each page.
- Report Footer - A footer section that prints only once at the end of the report.
NOTE For more information on how designing Overview reports is different than designing sections, see Designing Sections vs. Designing Reports.
For more information on using the InterAction Report Designer to design reports, see Designing Reports Using the InterAction Report Designer.
Specifying the Sort Order
When creating Overview reports, you have two sort options:
- Name (Person Name or Company Name)
- Company Name (Person’s Associated Company or Company Name)
The sort options are limited because Overview reports contain individual sections that have their own sort order. At the report level, you are simply indicating how to sort the contacts in the report.
For example, sort person contacts alphabetically by Name in a report so if you include 20 contacts, they can be easily found on the report. Then for each contact, you can create sections that are sorted in their own logical order, such as Upcoming Appointments, or Key Relationships.
Previewing the Report
When designing your report, preview it by choosing the Preview button. During the design process, it is recommended to preview often using a folder that contains data representative of what will be included in the report. For example, if you are creating a report for people and companies, make sure you preview using a folder that contains both people and company contacts. If you use a dummy set of contacts that don't have any values in the fields you'll be using, you cannot get a true example of what the report will look like when it’s finished.
TIP The larger the folder you preview from, the longer it takes for the preview window to display. Therefore, when selecting a folder to preview from, it is recommended to use a smaller folder or a subset of contacts.
When previewing Overview reports, draft sections are shown in preview. This is so you can see all sections in the report for testing purposes. However, there isn’t a visual indicator as to which sections are draft.
By default, the preview folder is the folder you currently have open in InterAction. To select a different folder, choose the search button then find the folder using the Find Folder dialog box. For help using the Find Folder dialog box, see Find a Folder Using Find Folder.
New Overview Report Wizard: Security
When creating Overview reports, report managers can set up security options:
- Security - The users and/or groups that are permitted to access the report
- Accessible from - For the users and/or groups that can access the report, the location where the report can be accessed (Web Client, Windows Client, or PIM)
- Applies to - Whether the report displays by default in the Report Chooser based on the contacts the user is reporting on.
NOTE A single Overview report run on both people and company contacts because only sections that apply to the selected contacts output in the report. For more information, see New Section: General Tab.
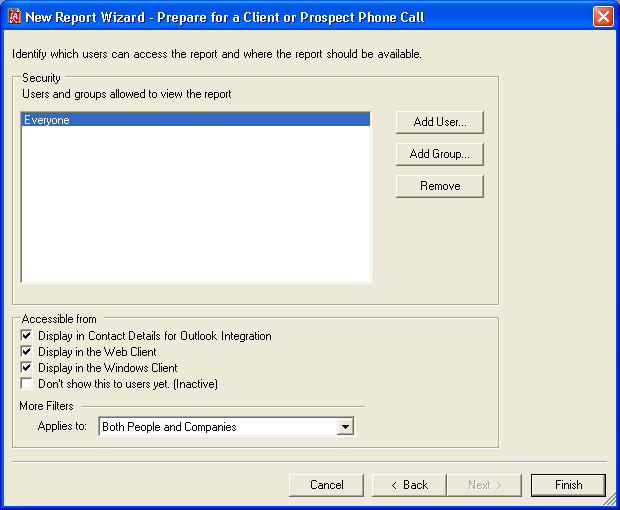
New Report Wizard - Overview Report (Security)
For more information, see the following topics:
- Setting Up Security (Viewing Rights) for Reports
- Indicating Whether a Report Should Display for People or Company Contacts
