Section Topics
New Overview Report Section
Overview reports are comprised of sections, which are individual components of InterAction data. Each section has a specific purpose that may be shared amongst reports. For example, the “Recent Activities” section can list recent activities for a contact and be included on a variety of Overview reports.
Sections can include one data field (such as Activities/Appointments) or several data fields (such as Name, Company Name, and Job Title). However, sections can only include one data item with repeating rows.
For example, following are a few sections included in InterAction out of the box:
- Upcoming Appointments - Lists all appointments for a contact
- Known By - Who Knows Whom - Lists which of your organization’s current personnel and alumni know the selected contacts
- Primary Addresses & Phones - Lists all primary addresses and phone numbers for a contact
- Name, Company, Job Title, and Contact Types - Used on all out-of-the-box reports, includes several fields used to identify the contact
Each Overview report section is individually designed in the InterAction Report Designer. Although each section layout may be unique as far as location of data fields and the way data is sorted, sections should have the same look and feel because they can be shared amongst reports.
Create a New Overview Report Section
To create a new Overview report section:
-
From the InterAction Windows Client, choose Tools > Reports.
-
In the Report Chooser, choose Manage.
-
Select the Overview report to include the new section then choose Edit.
-
Choose the Sections tab.
-
Choose New.
The New Section dialog box displays. Create the new section by choosing each tab in the New Section dialog box. When you are finished creating the section, choose OK.
New Section Steps Step Number Step 1 In the General tab, enter information like the section name and description. 2 In the Information tab, select the InterAction data fields included in the section. 3 In the Design tab, design and preview the section. 4 In the Sort tab, specify how to sort the data in the section.
New Section: General Tab
When creating a section, the first step is to specify the general information, such as the name, description, and whether to output the section when the user is reporting on people and/or companies.
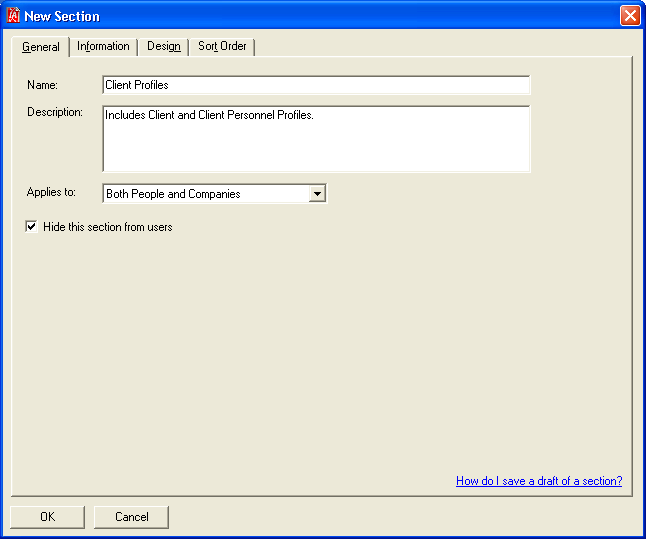
New Section - General Tab
Give the section a name and description.
- Name - Give the section a name that can easily be identified by users (for example, “Upcoming Appointments”).
- Description - The section description displays next to the section name and helps users identify which data is included.
This Applies to field controls whether the section outputs when the report is run on:
- Both People and Companies
- People Only
- Companies Only
The option you choose in the Applies to field does not affect whether a section displays in the section list when a user personalizes the report (all sections that are active display). This field affects whether the section outputs in the report.
For example:
- A user marked 20 people contacts to include on a report. Sections that apply to People Only and Both People and Companies output.
- A user is reporting on a folder that contains all companies. Sections that apply to Companies Only and Both People and Companies output.
- A user marked 5 people contacts and 8 company contacts to include on a report. Sections that apply to Both People and Companies output. Also, the sections that apply to People Only output for the people contacts, and the sections that apply to Companies Only output for the company contacts.
Hiding Unfinished Sections from Users
When creating a section, you may want to hide it from users. For example, the section may be unfinished or you want to preview it in an Overview report before you make it available to users.
To hide a section, select the Hide this section from users check box in the New Section dialog box. The section remains inactive until you clear the check box later.
NOTE If you want to keep an active copy of the section available to users but work on a separate draft, the procedure is different. see Working with Drafts.
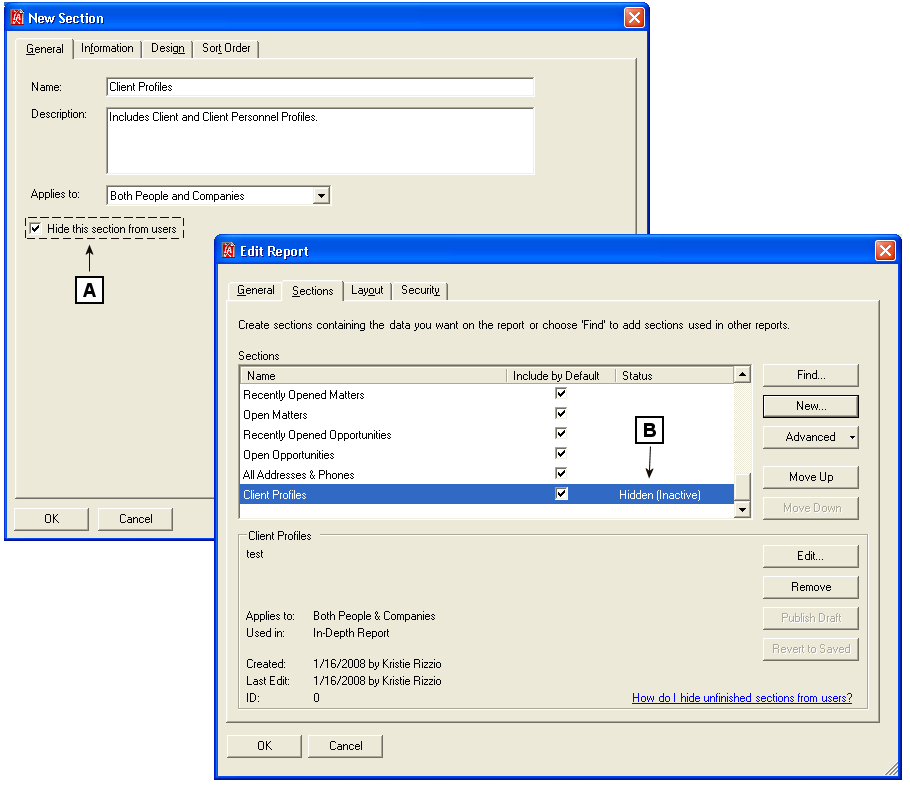
Making a Section Inactive
[A] Select Hide this section from users to make the section inactive.
[B] The section displays Hidden (Inactive) in the list of Overview report sections if it is inactive.
If you make a section inactive and it is shared with other reports, you are prompted whether to make the report inactive for just the current report, or all reports that share that section.
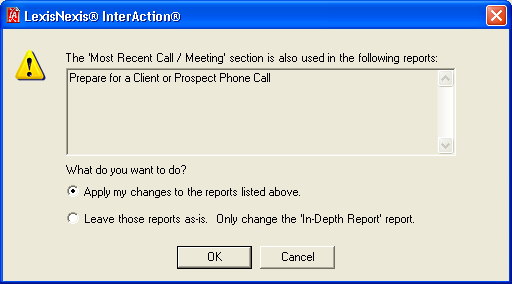
Editing a Shared Section
Choose an option:
- Apply my changes to the reports listed above - update all reports
- Leave those reports as-is - only change the current report.
Managing Sections
When editing sections, it is important that you use drafts rather than make the sections inactive (see Working with Drafts). If you want to change an existing section, don’t save a section as a new section, make it inactive, then delete the original when you are done.
Doing this is a bad practice because end users are able to set personalization options on sections. If you delete the section and then activate a new one with the same name, users will be confused as to why they lost their personalized selections.
Use the Hide this section from users option only when you are creating a new section and want to hide it until you are done.
New Section: Information Tab
When creating a new section, select the data fields to include in the section. Each time the Overview report is run, the data fields you added to the section tell InterAction what information to extract from the database.
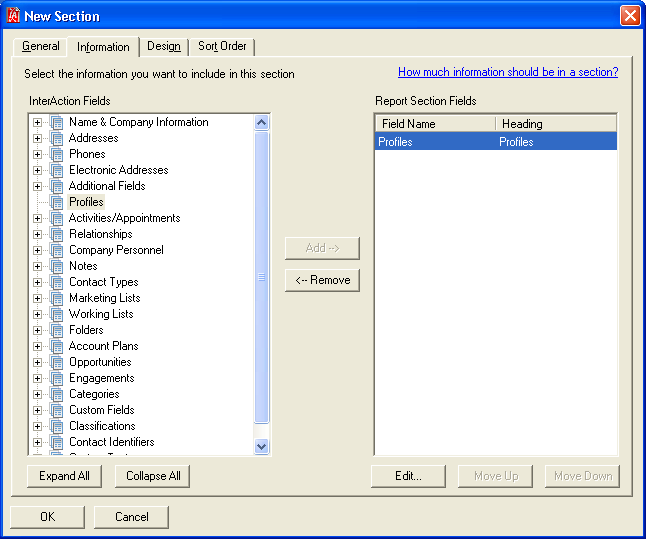
New Section - Information Tab
To add data fields to the section, select the field in the left box (InterAction Fields) then choose Add (if you are adding additional fields, classifications, folder-specific notes, or custom text, you are prompted for information at this time).
The field name moves to the Report Section Fields box. Repeat if adding more fields.
You can also add a field to the section by:
- Double clicking it in the InterAction Fields box
- Dragging the field from the InterAction Fields box and dropping it in the Report Section Fields box
After adding the field to the list of report section fields, choose Edit to specify options for the field. For example, if you are adding profiles to the report, you can select the profiles to add.
Adding data fields from the section does not physically add them to your section layout. At this stage you are simply choosing the data that is extracted from the InterAction database each time the report is run. Choose the Design button in the Design tab to create the section layout.
See the following topics for more information:
- How Much Information Should Be In a Section?
- InterAction Data Fields
- Adding and Removing Data Fields
- Making the Correct Field Selections
How Much Information Should Be In a Section?
Sections can contain as little as one data field, such as Relationships, or several data fields, such as those used to identify a contact’s name, company name, and contact types.
When creating a section, consider the following:
- If the section contains information like relationships where there are many repeating rows of information, only include one data type. For example, do not create one section with both relationships and activities. The results will be unintelligible - activities will be repeated for each relationship row. The duplicative information will make the report unusable.
- Keep the section topical. For example, don’t include one activities section with all types. Use sections to allow users to pick and choose which activity types they want. By creating a section called Marketing Activities, a user can decide whether that section is important to him or her.
- Make the section manageable so it contains only the information necessary. For example, include only the most recent 10 activities or activities originated by a certain group rather than all activities.
New Section: Design Tab
You can only use the InterAction Report Designer to design sections. To open the InterAction Report Designer to design a section, choose Design.
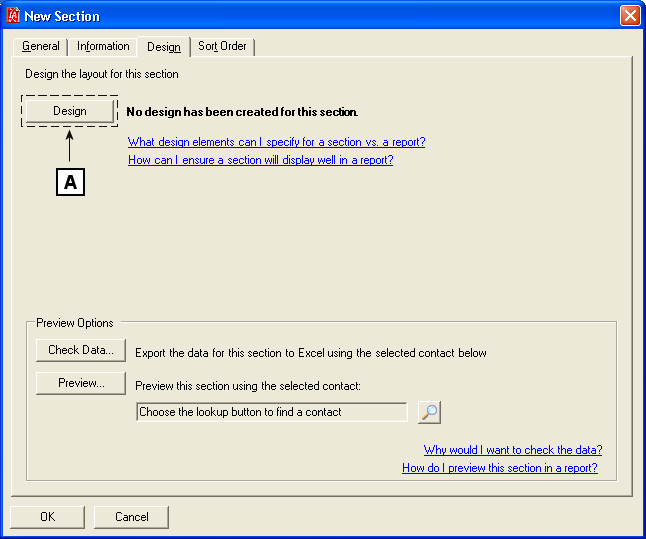
New Section - Design Tab
[A] Choose Design to create a design for the section in the InterAction Report Designer.
Although sections only include a subset of design components, the functionality of the InterAction Report Designer is the same. See Designing Sections vs. Designing Reports for more information.
For more information on using the InterAction Report Designer to design sections and reports, see Designing Reports Using the InterAction Report Designer.
Designing Sections vs. Designing Reports
Designing sections is different from designing reports because sections do not include the following components:
- Report Header - A header that prints only once at the top of the report.
- Page Header - A header that prints at the top of each page.
- Page Footer - A footer that prints at the bottom of each page.
- Report Footer - A footer section that prints only once at the end of the report.
The above components are only defined on a report level.
NOTE For information on designing report-level components for Overview reports, see New Overview Report Wizard: Layout.
Sections, on the other hand, are individual components of data and you don’t have to worry about design elements for the report, only that particular section.
Sections can include any of the components in the following table.
| Component | Description |
|---|---|
| Group Header/Footer |
Each section has a GroupHeader that prints at the top of the section and includes the section name. This is typically a group with no data item defined so it only displays once on the report. A section can consist of additional groups, which have their own header and footer sections. The header section is inserted and printed immediately before the detail section. The footer section is inserted and printed immediately after the detail section. |
| Detail | A section has one detail section. The detail is the body of the section and one instance is created for each record in the section. |
| Section Footer |
The footer that prints at the bottom of the section. Generally, most sections you create do not have section footers. However, section footers can be used to include summaries (such as the total number of activities) or create white space between sections. |
Some section designs can be relatively straightforward and only require a group (section) header and detail, such as the out-of-the-box Primary Addresses and Phones section.
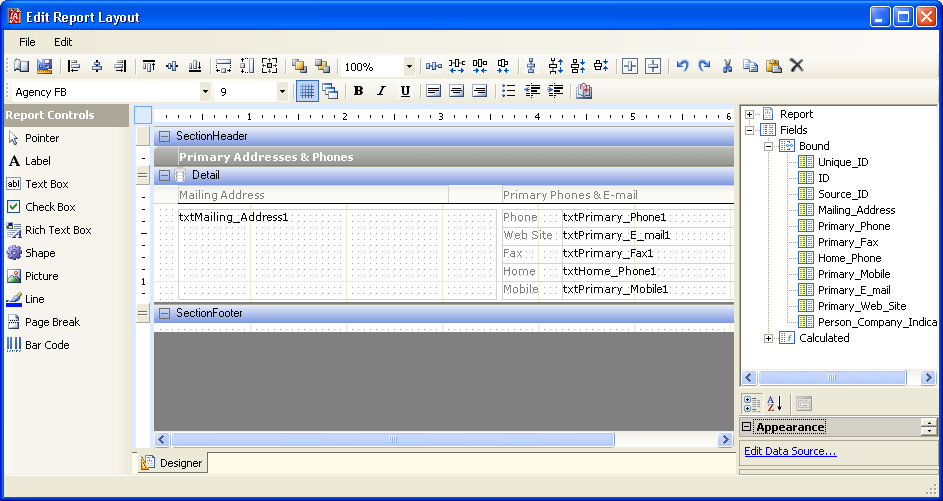
Primary Addresses and Phones Section Design
Other sections may require additional group headers and footers if the data contains repeating rows of data, such as the out-of-the-box Known By - Who Knows Whom section.
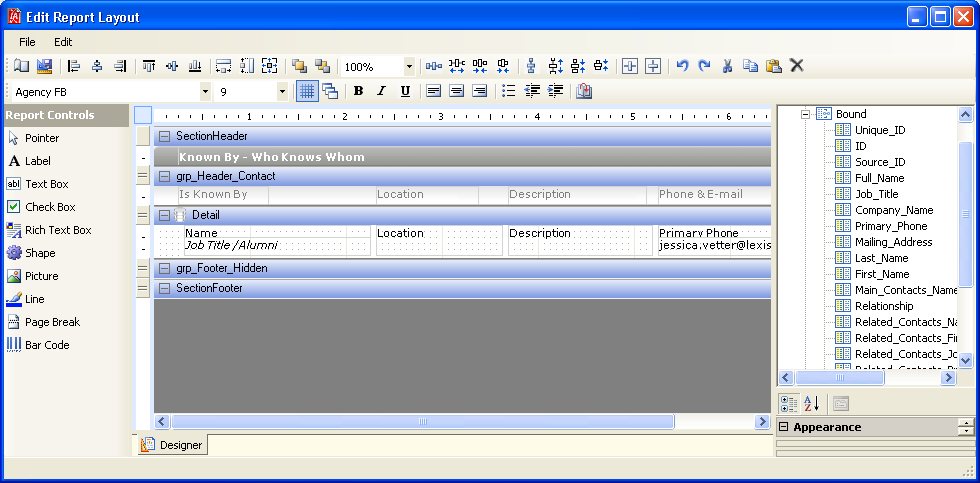
Known By - Who Knows Whom Section Design
Designing Overview Report Sections
Because sections are often shared amongst reports, you will most likely handle the design of sections differently than regular reports.
-
Keep margins consistent. If your Overview reports are all portrait, make sure the margins on your sections are all the same so they can be used interchangeably amongst reports.
If your organization creates some reports that are landscape and others that are portrait, make sure to only add sections that are formatted correctly for the report. For example, do not add sections with portrait margins to landscape Overview reports, and vice versa.
-
In the section header (GroupHeader), include the contact name along with the section name. See the out-of-the-box sections for examples.
Reports often contain more than one contact. It makes the report more readable to have the contact’s name in each section so users are not questioning which contact’s information is printing in each section.
-
Don’t use different fonts in different sections - this creates unattractive reports. When designing a new section, set the Normal font to the font you normally use. See Using Fonts for more information.
-
If a report is designed to include multiple contacts, insert a page break in front of each section GroupHeader (that contains the contact name) to separate the contacts.
-
Use the LexisNexis InterAction standards as a best practice. These standards have been tested thoroughly for consistency and appearance. For more information, see the LexisNexis InterAction Support Center Web site at http://support.interaction.com.
Checking Section Data
Before taking the time to design a section, it is helpful to check the data first by choosing the Check Data button. This exports the data to Microsoft Excel so you can view the data in a spreadsheet format.
Checking the data first lets you see the data on an actual contact with representative data. This lets you:
- View the field headings and compare them with the data in the spreadsheet to ensure you selected the correct data fields
- Verify the settings you chose for the data fields, for example filters for relationships or activities
- Understand which values output for each field so you can determine if you need to create calculations
- Help you determine if any data fields should be added or removed
To check the data:
-
In the Design tab of the New Section dialog box, choose the search button to find a contact with data representative of the section you are creating.
-
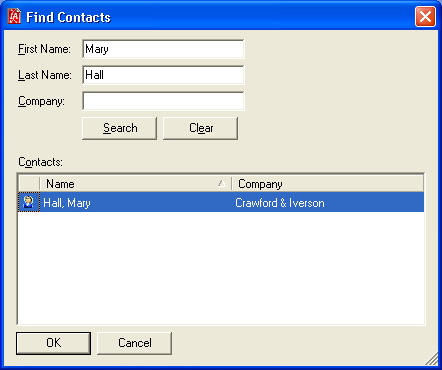
Locate the contact in the Find Contacts dialog box.
Type as much information as you can provide in the First Name, Last Name, and/or Company Name fields. Select the contact then choose OK.
-
In the New Section dialog box, choose Check Data.
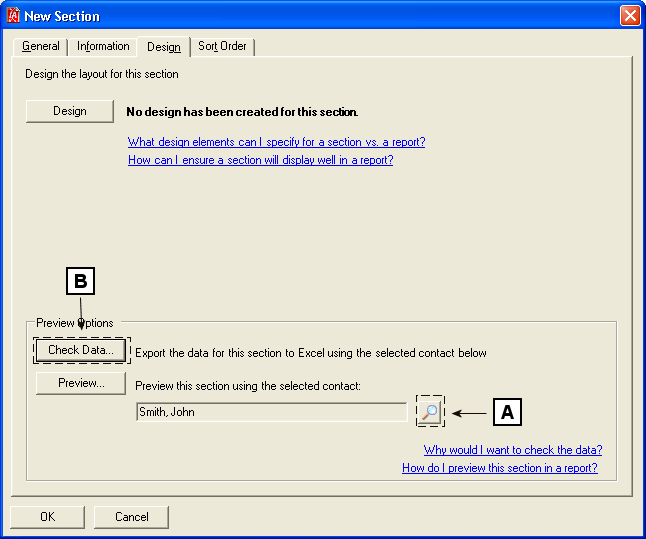
Checking Section Data
[A] Choose the search button to find a contact with data representative of the section data you are checking.
[B] Choose Check Data.
Previewing Sections
When designing your section, you can preview it by choosing the Preview button. During the design process, it is recommended to preview often using a contact that contains a representative set of data for what will be included in the report. For example, if you are creating a report for companies, make sure you preview using a company contact. If you use a dummy contact that doesn’t have any values in the fields you'll be using, you cannot get a true example of what the section will look like when it’s finished.
By default, the preview contact is the contact you currently have selected in InterAction. To select a different contact, choose the search button then find the contact to preview.
Previewing a section only previews that individual section. For information on previewing a section within an Overview report, see “How Do I Preview a Section in a Report?” below.
How Do I Preview a Section in a Report?
Often times when creating or editing a section, you want to see what the section looks like in the context of an Overview report.
To preview a section in an Overview report:
-
If you are currently editing a section, choose OK to exit the Edit Section dialog box and return to the Edit Report dialog box.
Otherwise, choose Tools > Reports > Manage. Select the Overview report that includes the section you want to preview and choose Edit.
-
In the Edit Report dialog box, choose Layout tab.
-
In the Preview Options section, make sure the folder displayed contains data representative of the section you want to preview.
To choose a different folder, choose the search button to find a different folder.
-
Choose Preview.
See the following topics for more information:
New Section: Sort Tab
Sections may or may not need to be sorted, depending on the type of information included in the section. For example, if you are creating a section for My Notes or Primary Addresses & Phone Numbers, it is likely that your report layout does not require sorting because the data fields are already laid out on the report. However, some sections contain lists that do need sorting. For example, if you are creating a section called Company Personnel that lists personnel for a company contact, you will most likely want to sort by a name field to list contacts alphabetically by name.
All the InterAction data fields you added to your section are listed in the Fields in Section box. When creating a new section, the Sort Data By box is empty. To add a field as a sort field, do one of the following:
- Select the field in the Fields in Section box then choose Add
- Double-click on the field in the Fields in Section box
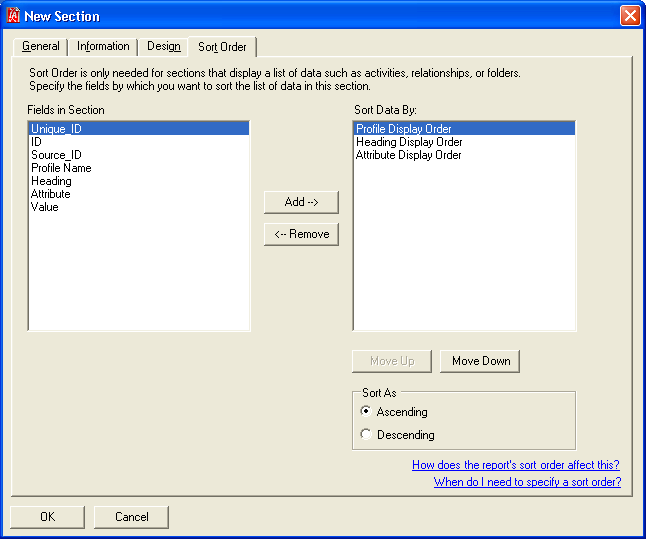
New Section - Sort Tab
The field at the top of the Sort Data By box is the primary sort field. The fields below the primary sort field are secondary sort fields. Fields are sorted by order of importance in the Sort Data By box. For example, if your section includes profiles, you may want to sort by Profile Display Order then Heading Display Order. If your report includes a list of activities, you may want to sort by Start Date then Start Time. Use the Move Up and Move Down buttons to order the sort fields accordingly.
You can sort by ascending or descending order by selecting a sort option in the list then choosing either Ascending or Descending.
How Does the Report Sort Order Affect the Section Sort Order?
When creating Overview reports, you have two sort options:
- Name (Person Name or Company Name)
- Company Name (Person’s Associated Company or Company Name)
Therefore, contacts included in Overview reports are already sorted by contact name. Do not sort by name in each section - sort by fields applicable to that section only. For example, if you are creating a Recent Activities section, sort activities by Start Date then Start Time. This ensures that if you have 10 contacts in an Overview report, each contact is listed alphabetically and the Recent Activities section lists recent activities for each contact sorted by date and time.
Sorting sections is only important when the section includes repeating rows of information, like activities, appointments, and relationships. Sometimes sorting is not necessary.
