Section Topics
New Contact Report
Contact reports are used to report on a single contact or a set of contacts, and can apply to people only, companies only, or both people and companies.
Some examples of InterAction out-of-the-box contact reports include:
- Contact List - Primary Phones and Addresses - Lets you view the mailing address, primary phone number, and electronic address for each of the selected contacts.
- Contacts by Sponsor - A list of contacts organized by sponsor.
- Person Contacts by Industry - Lets you view the list of selected contacts grouped by industry.
- Stagnant Contacts - A list of contacts and the last activity they have had in the last year. It also highlights the contact if they haven't had any activity in the last 6 months.
When creating contact reports, you can include information like relationships, activities, appointments, additional fields, folder-specific information, and much more. You can also select whether to use the organization’s version or the user’s version of contact information.
NOTE Reports are stored in the database. After creating a new report, there is no need to distribute files or copy files to servers. Just set the security settings as needed.
For more information, see the following topics:
- Create a New Contact Report
- Contact Information: User's Version vs. Organization's Version
- Making the Correct Field Selections
Create a New Contact Report
TIP If there is an existing report that's close to what you want to build, it is recommended to begin with the existing report and choose Save As New. See Saving a Report as New for details.
To create a new contact report:
-
From the InterAction Windows Client, choose Tools > Reports.
-
In the Report Chooser, choose Manage.
-
In the View reports for drop-down list, choose Contacts.
-
Choose New.
The New Report Wizard dialog box displays. The New Report Wizard takes you through five steps to create a new contact report (see below). Choose the Next button to move through each step the wizard. When you reach the end of the wizard, choose Finish to create the report.
New Report Wizard Steps Step # Step 1 Enter general information like report name and description. 2 Select the InterAction data fields included in the report. 3 Specify how to sort the report. 4 Select the format of the report and design the layout. 5 Set who can access the report and from where.
New Contact Report Wizard: General Information
When creating a report, the first step is to specify the general report information, such as the name, category, and description. At this stage you also select the type of report to create.
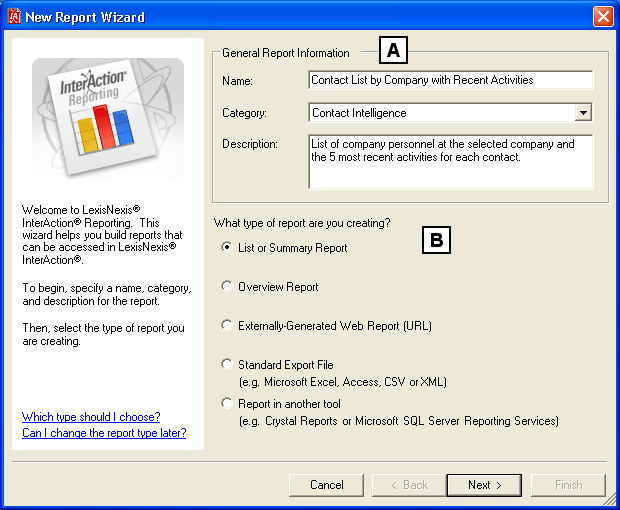
New Report Wizard - General Information
[A] Type a name, category, and description for the report.
[B] Choose the type of contact report to create.
For more information on the report types, see What Types of Reports Can I Create for the Organization?.
-
Give the report a name, category, and description.
-
Name - Give the report a name that can easily be identified by users. For tips on naming reports, see Naming Reports.
-
Category - Place the report in a category by choosing a category name from the drop-down field. Categories are used to organize reports in the Report Chooser. See Organizing Reports in the Report Chooser for more information.
-
Description - The report description is displayed in the Report Chooser and helps users identify the purpose of the report.
-
-
Select the report type to create.
For a list of report types and descriptions, see What Types of Reports Can I Create for the Organization?.
If you are creating an Overview report, the steps are different than for the remaining report types. See New Overview Report for more information.
Naming Reports
A report’s name gives users a clear idea of the report’s purpose. Some tips when giving your report a name:
- Keep report names short and descriptive. Long report names require the user to scroll horizontally to see the entire report name. If you must make the report name long, put the most important information at the front of the name.
- Some reports can be run on multiple subjects. For example, an activity/appointment report can be used on both activities and appointments. To help users, include words like “recent activities” or “upcoming appointments” in report names for example. For Overview reports, indicate the purpose of the report, such as “Prepare for a Client Meeting.”
-
Keep in mind that report names are not forced to be unique, so you can use the same report name for multiple reports. For example, different departments or practice groups may use the same report with the same name, but different filters (for activities or appointments) and different access rights.
Can I Change the Report Type Later?
It depends on the type of report you are creating. If you are creating a list or summary report, you can choose later to change the report type to a standard export file (such as CSV or XLS), a Crystal Reports report, or a Microsoft SQL Server Reporting Services report.
All other types of reports cannot be changed later to a different type. You must create a new report.
New Contact Report Wizard: Selecting Data Fields
When creating a new report, select the data fields to include in your report. Each time a report is run, the data fields you added to the report tell InterAction what information to extract from the database.
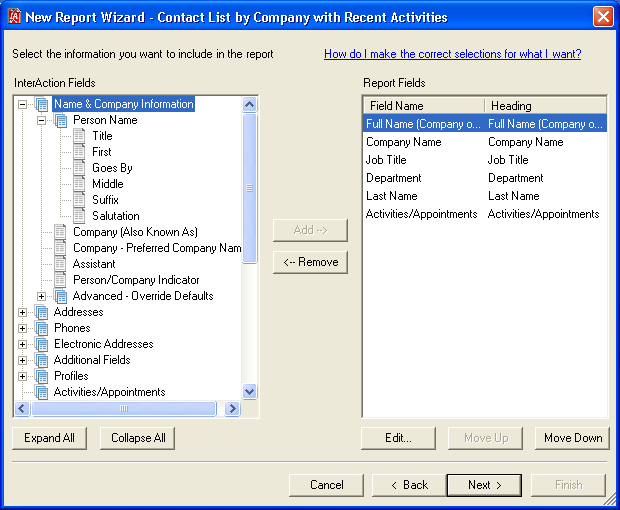
When selecting data fields, also include fields that you want to sort by. These fields may not necessarily be fields that appear in your report. For example, you may want to sort by Last Name but display Full Name in your report. Add both of these fields to the list of data fields so you can choose to manipulate them accordingly in your report design and when specifying the sort order.
See the following topics for more information:
- InterAction Data Fields
- Adding and Removing Data Fields
- Making the Correct Field Selections
Adding and Removing Data Fields
Adding or removing data fields from your report does not physically add or remove them from your report layout. When choosing data fields, you are simply choosing the data that is extracted from your InterAction database each time the report is run. After you add or remove data fields, you must add or remove these fields from the report layout, using your report design application.
For more information, see InterAction Data Fields.
New Contact Report Wizard: Sorting the Information
Sort each report according to the way you want information displayed in the report. Select a field as your primary sort field then add secondary sort fields. For example, if your report lists contacts by company, your primary sort should be a company name field. To sort contacts alphabetically for each company, select a name field as your secondary sort field, such as Last Name.
All the InterAction data fields you added to your report are listed in the Fields in Report box. When creating a new report, the Sort Data By box is empty. To add a field as a sort field, do one of the following:
- Select the field in the Fields in Report box then choose Add
- Double-click the field in the Fields in Report box
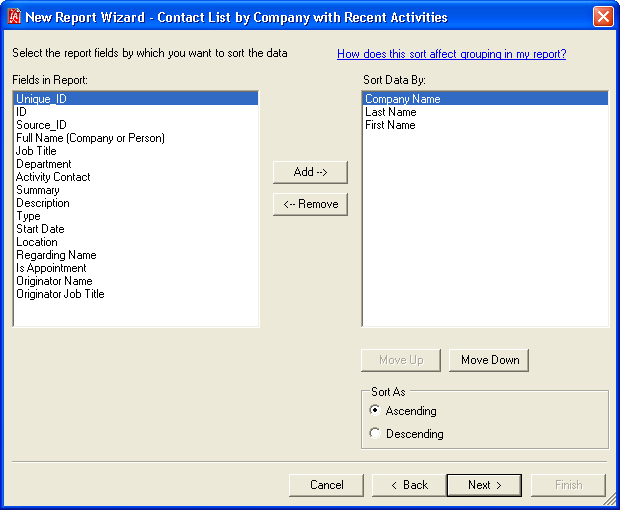
New Report Wizard - Sort Order
The field at the top of the Sort Data By box is the primary sort field. The fields below the primary sort field are secondary sort fields. Fields are sorted by order of importance in the Sort Data By box.
For example, the report’s primary sort field is Company Name and secondary sort fields are Last Name and First Name. Contacts on that report are first sorted by company name, then within each company, contacts are sorted by Last Name. If more than one contact has the same last name, then the contacts are sorted further by the first name.
You can sort by ascending or descending order by selecting a sort option in the list then choosing either Ascending or Descending.
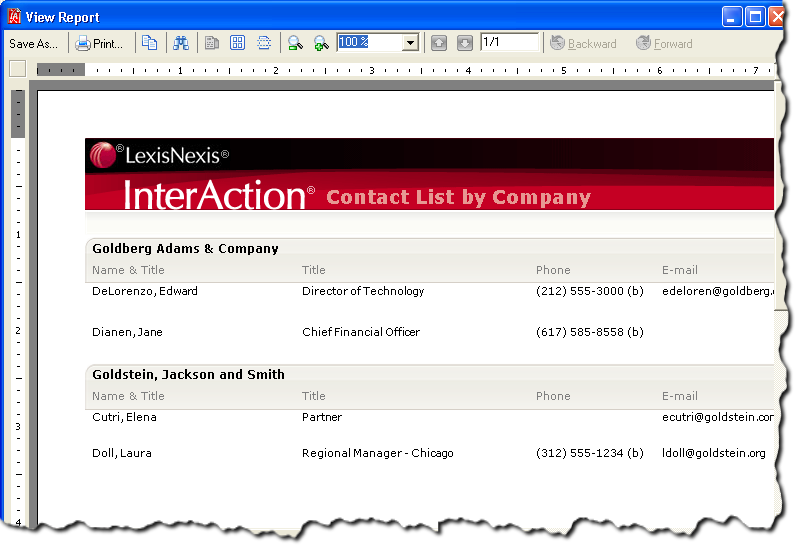
Contact List by Company Report
How Sorting Affects Grouping
Typically, you should sort information by the fields on which you are grouping. For example, a report that contains data for each contact may be difficult to use if you aren't displaying the contacts in alphabetical order by name.
Sorting is especially important when grouping information because if you do not sort the data based on the fields by which you are grouping, your report may have unexpected results. The most common occurrence is that the same information appears twice on the report. For example, if you grouped based on contact name, but didn't sort based on contact name, you may see the same contact on the report multiple times.
If you are using multiple groups in your report, you need multiple data fields on which you are sorting data.
For more information on grouping data using InterAction’s Report Designer, see Grouping Information.
New Contact Report Wizard: Report Output and Design
When creating or editing a report, specify the format of the report. For example, create a custom design for the report using a report design tool, or export the data to an Excel spreadsheet.
You have three options:
- Create the report in the InterAction Report Designer
- Export the information to a file
- Create the report in another reporting application
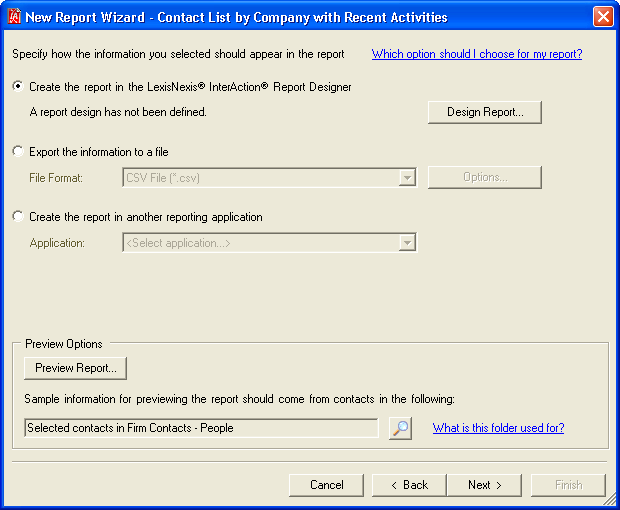
New Report Wizard - Report Output
Choose the report output format based on the report’s use.
| Choose this option .... | If this is important to you ... |
|---|---|
| Create the report in the LexisNexis InterAction Report Designer |
• The report needs to be printer friendly • The report should be attractive and use items like bold text, headers and footers, page numbers, and graphics • You do not already use a report design tool at your organization like Crystal Reports or Microsoft SQL Server Reporting Services |
| Export the information to a file |
• The report’s main function is to quickly export information into a file, for data cleansing or analysis for example • You want to display the information in a spreadsheet format |
| Create the report in another reporting application | Your organization already uses Crystal Reports or Microsoft SQL Server Reporting Services to design reports. |
Create the Report in InterAction's Report Designer
InterAction is equipped with a report design tool that gives you a lot of flexibility when designing the layout of your report. If you design a report in the Report Designer, users can view and print the report in the Report Viewer when they run the report. From the Report Viewer, Windows Client users can save reports in the following formats: RTF, PDF, HTML, XLS, TIF, and TXT.
To open the Report Designer application and design the layout of your report, choose Design Report in the Report Output tab.
For more information on using the InterAction Report Designer to design reports, see Designing Reports Using the InterAction Report Designer.
Export the Information to a File
When you choose to export the information to a file, InterAction data is exported to a file that can be saved on the user’s hard drive. The data is exported directly to a file, then can be manipulated in another application. The following file formats are available.
- CSV File (.csv)
-
CSV File - MS Access Compatible (.csv)
(if you use Microsoft Access to open CSV files)
-
Microsoft Access Database (.mdb, .accdb)
-
Microsoft Excel Document (.xls, .xlsm, .xlsx)
-
XML Data (.xml)
NOTE If you use Microsoft Access to import CSV files, see Which CSV Option Should I Choose?.
When a user runs the report, the report opens in the applicable program. When deciding the file format to use, consider which applications users at your organization have installed on their desktops. For example, if most users use Microsoft Excel, you can choose that format. If end users do not have the appropriate application installed on their desktops, they are prompted for a location on their computer to save the file.
NOTE If you choose to export to a spreadsheet format (XLS), you can set up InterAction so that some information is separated into different worksheets. For more information, see What is the Combined Table?.
Note that some third-party applications may have restrictions on fields with a very large number of characters. If you expect that your report will contain fields with a large number of characters (description and notes fields for example), do not export to a spreadsheet. Omit these fields from your report, or create the report in the InterAction Report Designer using a RichTextBox control. See Adding Long Text Fields to a Report.
International Options for Export
If you want to format the date and numeric values on your report so they match a regional setting other than your default Windows regional setting (not common), choose Options in the New Report Wizard dialog box.
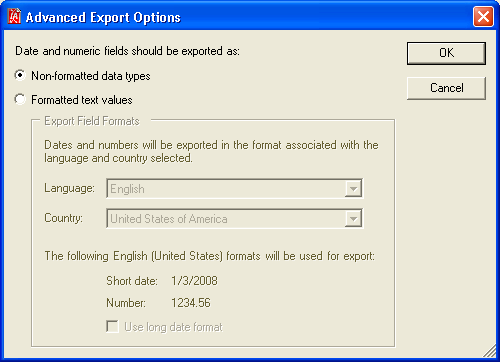
Advanced Export Options Dialog Box
Non-formatted data types is the default (this option is recommended). This means that the exported data is formatted according to your local regional settings in Windows. (If you chose to export to a CSV file, this option is not available.)
IMPORTANT It is recommended to select Non-formatted data types if possible (not available for CSV exports). If you choose Formatted text values and your report uses date or numeric calculations, these calculations do not work after the export because date and numeric fields are converted to text only. You then have to convert the columns back to use calculations (in your third-party application).
To output data in a specific format other than your Windows regional settings format, select Formatted text values (if you chose to export to a CSV file, data and numeric fields are exported as text values automatically). This lets you use a different format for time and date values without having to change your regional settings in Windows.
For example, if your Windows computer is set up in a United States regional format, but you want dates and times on your report to be exported in the French format for Canada, select French in the Language field and Canada in the Country field. Dates and times are exported in the appropriate format for Canadian users who speak French.
If you are exporting to a CSV file, you also have the option to export the file as Unicode (UTF-8) or Western European (Windows).
After choosing OK to save the information, choose the Preview button in the Report Output tab to see the format changes in your report. (Make sure you are previewing a folder that contains the data you are reporting on.)
Create the Report in Another Reporting Application
If your organization prefers to use either Crystal Reports or Microsoft SQL Server Reporting Services, you can output InterAction data into either of these applications so you can design reports there. For more information on using Crystal Reports or Microsoft SQL Server Reporting Services with InterAction, see the InterAction Support Center Web Site at https://support.lexisnexis.com/interaction.
Which CSV Option Should I Choose?
When exporting to a CSV file, you have two options:
- CSV File (.csv)
- CSV File - MS Access Compatible (.csv)
If you do not use Microsoft Access to import CSV files, choose the CSV File (.csv) option.
If you use Microsoft Access to import CSV files, choose the CSV File - MS Access Compatible (.csv) option.
The only difference between the two options is how InterAction handles cells that can contain multiple lines (for example, the multiple line address fields Line 1, Line 2, Line 3). The CSV - MS Access Compatible option places a carriage return and a line feed (commonly termed CRLF) after each of these fields rather than a single line feed. Using this option places each item (for example, each address field) on a separate line.
If you choose the CSV File option and import that file into Microsoft Access, all items (for example, all address fields) are placed on one line, which is most likely not the desired result.
Previewing Your Report
When designing your report, preview it by choosing the Preview Report button. During the design process, it is recommended to preview often using a folder that contains a representative set of data for what is included in the report. For example, if you are creating a report for companies, make sure you preview using a folder that contains company contacts. If you use a dummy set of contacts that don't have any values in the fields you are using, you cannot get a true example of what the report will look like when it’s finished.
TIP The larger the folder you preview from, the longer it takes for the preview window to display. Therefore, when selecting a folder to preview from, it is recommended to use a smaller folder or a subset of contacts.
By default, the preview folder is the folder you currently have open in InterAction. To select a different folder, choose the search button, then find the folder using the Find Folder dialog box. For help using the Find Folder dialog box, see Find a Folder Using Find Folder.
New Contact Report Wizard: Security Settings
When creating a new report, set up security options:
- Security - The users and/or groups that are permitted to access the report
- Accessible from - For the users and/or groups that can access the report, the location where the report can be accessed (Web Client, Windows Client, or PIM)
- Applies to - Whether the report displays for people or company contacts in the Report Chooser (for contact reports only)
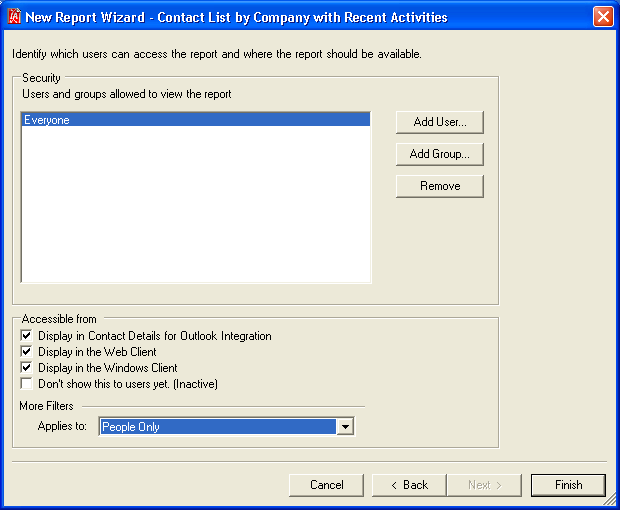
New Report Wizard - Security
For more information, see the following topics:
- Setting Up Security (Viewing Rights) for Reports
- Indicating Whether a Report Should Display for People or Company Contacts
