Section Topics
Configuring How the Report Chooser Displays for End Users
Professionals use the Report Chooser when printing reports in the Windows Client, Web Client, and PIM. When configuring the Report Chooser, your goals are:
- Make reports easy to find. A cluttered Report Chooser makes it difficult to find the report you want.
- Only show reports that should be run on the displayed contacts. Reports for companies should not display on list of people contacts and vice versa.
- Help users find reports that apply to them by pushing reports to users’ My Favorite Reports list.
- Only show reports that end users care about. If you created a specialized report for a particular practice area or group, hide it from the rest of the organization.
See the following topics:
- Organizing Reports
- Indicating Whether a Report Should Display for People or Company Contacts
- Adding Reports to Users' My Favorite Reports List
- Define Which Users Can Access a Report
Organizing Reports in the Report Chooser
Reports display in the Web Client and Windows Client Report Chooser in a set order specified by the report manager. It is important to organize and categorize reports efficiently so professionals can easily find the reports they need.
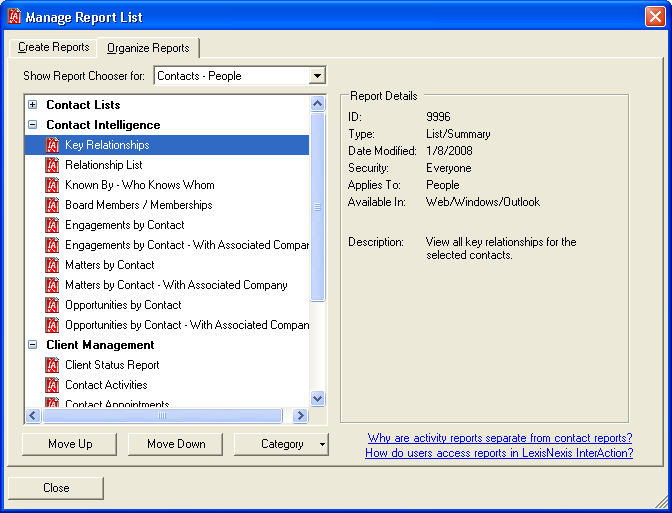
Reports are organized in the Organize Reports tab of the Manage Report List (Tools > Reports > Manage then choose the Organize Reports tab).
TIP Another good way to make the report list manageable for professionals is to make sure reports display only for the applicable contacts - People Only, Companies Only, or Both People and Companies. For more information, see Indicating Whether a Report Should Display for People or Company Contacts.

Organizing Reports
The Manage Report List dialog box displays all your organization’s InterAction reports. To view reports, choose an option from the Show Report Chooser for drop-down list:
- Contacts - People
- Contacts - Companies
- Contacts - Both People and Companies
- Activities/Appointments
- Matters (requires license for Matters module)
- Opportunities (requires license for Opportunities module)
- Engagements (requires license for Engagements module)
NOTE The Show Report Chooser for field lets you see which reports display in the Report Chooser when users have contacts, activities/appointments, matters, opportunities, or engagements selected.
Within these pages, you can use categories to arrange the reports. Categorizing reports helps your users quickly find the reports they are looking for.
Using Categories
Reports are organized by arranging them in categories:
- You can move one report at a time, or you can move an entire category. If a category is selected, you move the entire category and all reports within that category.
- To move a report or category up, select the report or category then choose Move Up. If you choose to move a report up and it is at the top of a category, it moves to the category above.
- To move a report or category down, select the report or category then choose Move Down. If you move a report down and it is at the bottom of a category, it moves to the category below.
To help you organize your organization’s report list, you can create new categories or delete categories.
TIP Use categories and the Move Up and Move Down buttons to move the most useful reports to the top. This makes it easier for users to find commonly-used reports.
Create a New Report Category
- In the InterAction Windows Client, choose Tools > Reports.
- Choose Manage.
- Choose Category > New.
- Type the name of the new category then choose OK.
The category is placed at the bottom of the list. You can use the Move Up and Move Down buttons to move the category to the desired location.
Delete a Report Category
When deleting a category, you must specify where to move the reports in that category.
- In the InterAction Windows Client, choose Tools > Reports.
- Choose Manage.
- Highlight the category to delete then choose Category > Delete.
- Choose Yes to confirm.
Indicating Whether a Report Should Display for People or Company Contacts
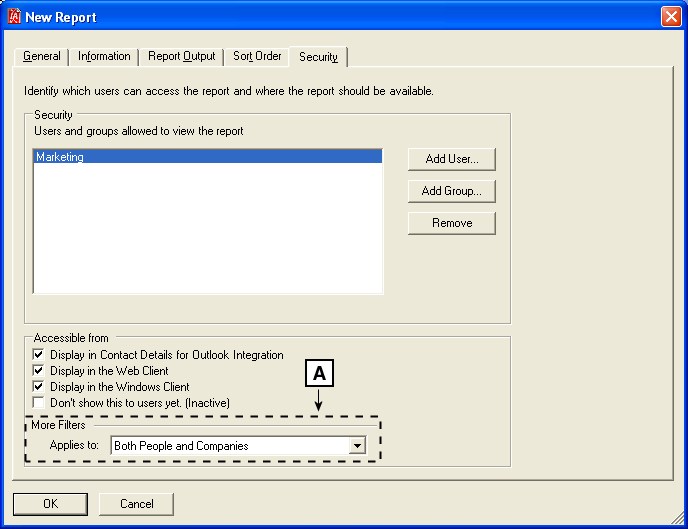
When creating or modifying a contact report, you specify in the Security tab the type of contacts on which the report should be run:
- People Only
- Companies Only
- Both People and Companies

Choosing the Contacts the Report Applies To
[A] In the Applies to drop-down list, choose if the report should be run on People Only, Companies Only, or Both People and Companies.
This setting controls whether the report displays by default in the Report Chooser based on the contacts the user is reporting on.
NOTE Sections on Overview reports are also configured to show or hide based on the contacts a user is reporting on. For more information, see New Section: General Tab.
For example:
- A user marked 20 people contacts to include on a report. The Report Chooser by default displays all reports that apply to People Only and Both People and Companies.
- A user is reporting on a folder that contains all companies. The Report Chooser by default displays all reports that apply to Companies Only and Both People and Companies.
- A user marked 5 people contacts and 8 company contacts to include on a report. The Report Chooser displays by default all reports that apply to Both People and Companies.
Adding Reports to Users' My Favorite Reports List
Users can add reports to their list of My Favorite Reports. This list is a report category that displays at the top of the Report Chooser so the reports are easy to find.
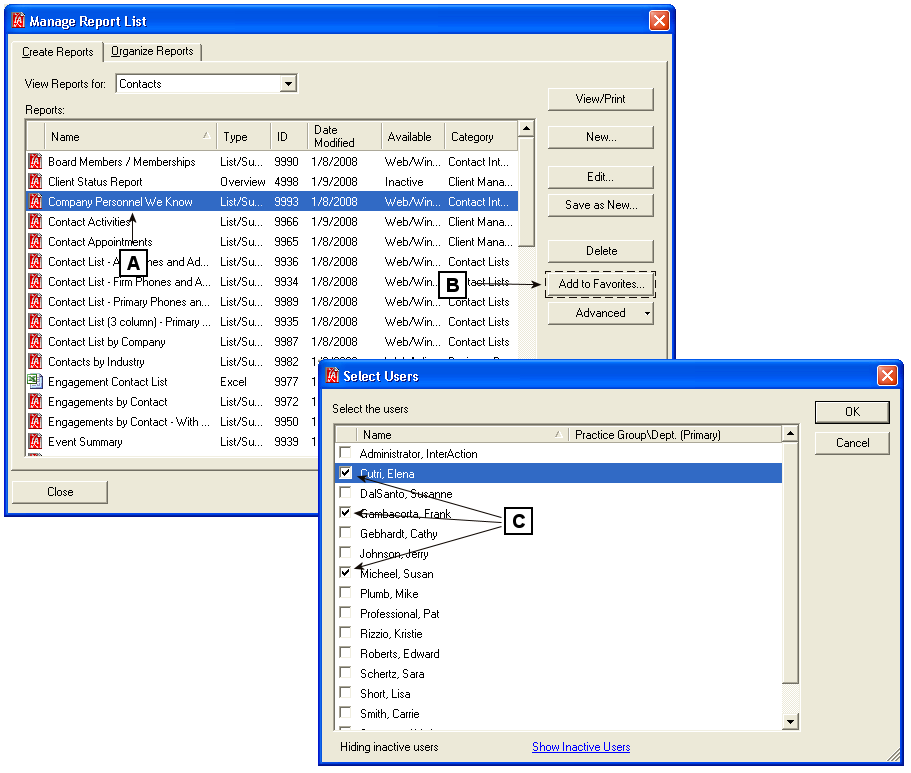
Report managers can push a report to users’ favorites lists by selecting the report then choosing Add to Favorites in the Manage Report List dialog box (Tools > Reports > Manage).
NOTE You cannot remove a report from a user’s My Favorite Reports list.

Adding Reports to Users' My Favorite Reports List
[A] Select the report to add to users’ My Favorite Reports List.
[B] Choose Add to Favorites. The Select Users dialog box displays.
[C] Select the users to receive the report on their My Favorite Reports list, then choose OK.
