Section Topics
Configuring Report Email Delivery
Users can choose to email reports to themselves or other InterAction users by choosing Send to Me in the Web Client or Windows Client. This conveniently processes the report behind the scenes and sends the report to the specified recipients as an email attachment.
To enable the report email delivery functionality, the report administrator must set up and schedule the Report Delivery process in InterAction Administrator.
The report administrator can also optionally edit the subject line and body text of the email. The default subject line and email body are suitable in most cases.
See the following topics for more information:
- Configuring the Report Email Message Subject
- Edit the Email Message Body
- Scheduling the Report Email Delivery Process
Configuring the Report Email Message Subject
You can configure the Subject line that displays for emailed reports. The content of the subject line is comprised of a combination of static text and token variables.

Report Subject Line
Tokens are identified by “$” and surrounded by parentheses, for example, $(Contact Name).
Following are the available tokens:
| Token | Description |
|---|---|
| $(ReportName) | The name of the report as shown in the Report Chooser |
| $(Contacts) |
The contacts included in the report. If the report contains more than 2 contacts, the number of contacts displays instead. |
In most cases, you can use the default Subject line:
InterAction Report ‘$(ReportName)’ on $(Contacts)
For example, this displays in the report email Subject line like this:
InterAction Report ‘In-Depth Report’ on William Smith
Edit the Report Email Subject Line
-
On the main window of InterAction Administrator, double click Report, Label, and Envelope Configuration.
-
Choose Report E-mail Subject.
-
Type the text you want included in every message in the Subject Line box.
-
Position the cursor where you want to include a token variable then choose Insert Token.
-
When finished, choose OK.
Editing the Email Message Content
You use InterAction Administrator to design the layout and fields available in the body of the report email message. The content of the email message is comprised of a combination of static text and token variables.

Editing the Content of the Email Message
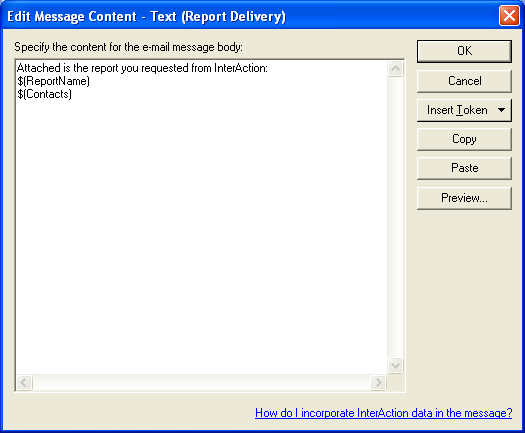
In most cases, you can use the default email message content:
Attached is the report you requested from InterAction:
$(ReportName)
$(Contacts)
For example, this displays in the report email message like this:
Attached is the report you requested from InterAction:
In-Depth Report
William Smith
Edit the Email Message Body
-
On the main window of InterAction Administrator, double click Report, Label, and Envelope Configuration.
-
Choose Report E-mail Body.
-
Type the text you want included in every message in the Specify the content... box.
-
Position the cursor where you want to include a token variable in the message, then choose Insert Token.
-
Continue inserting tokens and text and modifying the layout until you are satisfied with the email message body.
-
When finished, choose OK.
Previewing the Message
-
On the main window of InterAction Administrator, double click Report, Label, and Envelope Configuration.
-
Choose Report E-mail Body.
-
Choose the Preview button.
Scheduling the Report Email Delivery Process
The Report Delivery process delivers reports to users that request them by choosing Send to Me in the Windows Client, Web Client, or PIM. This is a continuous process that you schedule from the Process Manager. Continuous processes run all the time with or without scheduled blackout periods.
The following procedure identifies the information you must provide when scheduling this process. For information on the fields that apply to all processes, refer to the Scheduling Processes section of the Administering InterAction guide.
Schedule the Report Delivery Process
-
Log on to InterAction Administrator.
-
From the main entity list, choose Processes - Schedule and Results.
You can schedule processes from any workstation with InterAction Administrator installed.
-
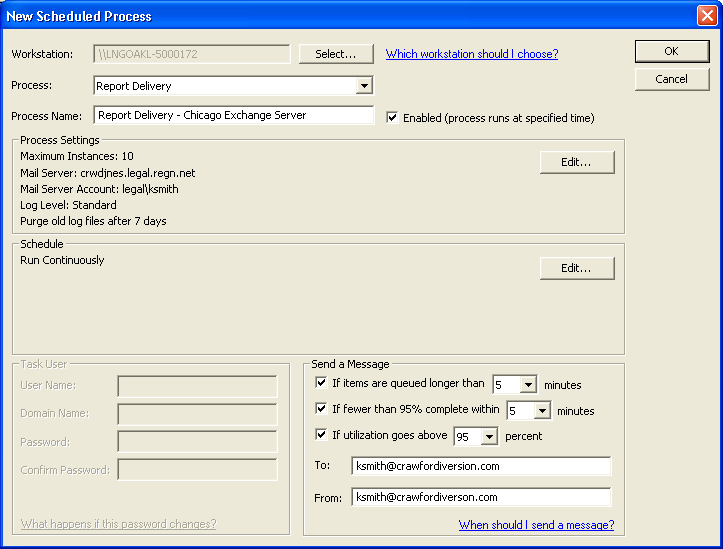
On the Manage Process Schedule dialog box, choose New to open the New Scheduled Process dialog box.

-
To set which workstation is used to run the process, choose Select, then enter the name of the computer or choose Browse to search the network for the computer, and choose OK.
-
Choose Report Delivery in the Process drop-down list.
-
To distinguish between multiple Report Delivery processes, change the Process Name to something meaningful, for example, Report Delivery - Chicago Exchange Server.
You should create multiple Report Delivery processes if you use multiple Exchange or Domino servers in your environment. This is because you need to specify the mail server name and port number when you configure the Report Delivery Settings dialog box.
-
If you do not want the process to run yet, clear the Enabled check box.
When a process is disabled, it is added to the schedule but Process Manager will not run disabled processes.
-
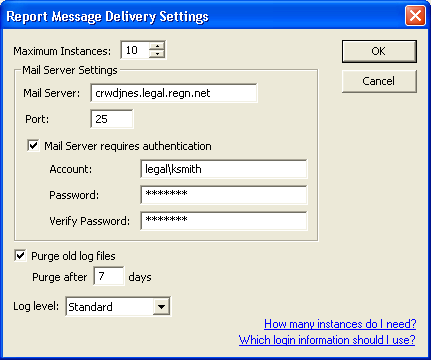
Choose the Edit button in the Process Settings section to open the Report Delivery Settings dialog box.

-
Specify the Maximum Instances to run at a time.
-
Enter the name of the Mail Server that the process will use to deliver reports and its Port number.
-
If the mail server is set up to require authentication, select the Mail Server requires authentication check box and enter a valid user account that has an email account set up and will be recognized by the mail server and the account password.
-
Select whether you want to purge old log files and the time period after which you want the logs purged.
Valid time periods are 1-999 days.
-
Select the level of logging you want recorded for the process, the options are: Low, Standard, High, or Troubleshoot.
-
Choose OK to return to the New Scheduled Process dialog.
-
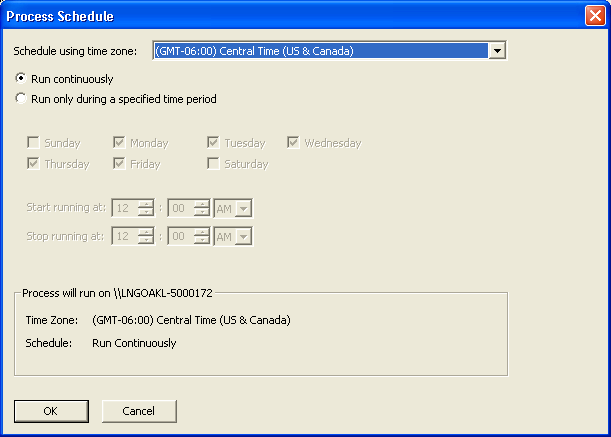
Choose the Edit button in the Schedule section to open the Process Schedule dialog box.

-
Select the time zone of the process manager workstation.
-
Select Run continuously and choose OK.
-
Enter the remaining user and messaging information. For details, see the Administering InterAction guide.
-
When finished, choose OK.
How Many Report Message Delivery Instances Does My Organization Need?
An instance represents one work item, which includes generating the email message and sending it to the appropriate InterAction user email account.
The number of instances your organization requires depends on how many reports you anticipate delivering and the memory of the machine on which you are running the process. Our recommendation is to begin with a maximum of 2 instances and make alterations as necessary.
Once the maximum number of instances is reached, the Report Delivery cannot process another work item until one of the instances delivers a report email. For example, if you specify a maximum of 2 instances and there are 10 work items to process, the Report Delivery can only process 2 report emails at the same time and each instance will process 5 work items total for the process. So, 2 work items will process while 8 work items are in queue. Once the first 2 complete, the next 2 are processed while the remaining 6 items wait, and so on.
