Section Topics
Approving and Rejecting Tickets
Most tickets in your Inbox require you to approve or reject the change made by a Web Client user. You approve and reject tickets that have the category of Contact Type or Edit. These categories include many user changes.
For example:
- The Client Personnel contact type is applied to a contact
- The address for a contact is changed
- A phone number is added to a contact
- A person’s company name is deleted
- A contact is removed from the Prospect contact type
- A contact is removed from the Holiday Card marketing list
Other categories of tickets do not use approve and reject because they require more intervention on the part of the data steward:
- Potential duplicate tickets (see Handling Possible Duplicate Contact Tickets)
- User change request tickets (see Handling User Request Tickets)
-
New person contact tickets (see Handling New Person Contact Tickets)
-
Data conflict tickets
-
New contact tickets
-
Unassociated company tickets
-
NOTE After a ticket has been processed, you can review whether the ticket was approved or rejected by viewing the ticket history. For more information, see Viewing Data Change Management Ticket Details.
See the following topics for more information:
- Approving Tickets and Follow-Up Actions
- Rejecting Tickets
- Taking Action on Multiple Tickets at Once
How Can My Actions on a Single Ticket Affect Other Related Tickets?
Some Data Change Management tickets are closely related due to the nature of the change that was made by the user. For example, a professional edits an address for Telnorth Financial Industries and sets it as the mailing address. Although the user made these changes on one page, it generates two tickets - one for the address change, and one for the mailing address change.
In the By Ticket view, InterAction warns you when the selected ticket has related tickets that might be affected by your action on that ticket.

When you see this message, choose the View All link to open all tickets for that contact in the Comprehensive View. When tickets are related, processing them in Comprehensive View lets you see all tickets side-by-side and ensures that related changes are made together. For example:
- An address was added and set as the mailing address. Rejecting the address ticket also rejects the mailing address ticket.
- An employment change was made to a person contact, which generated several tickets to a contact’s company, job title, address, phone number, assistant name, and more. Resolving these tickets together in the Comprehensive View prevents you from accepting the change to the address, then later accidentally rejecting the new company ticket.
If you do not have rights to access the Comprehensive View, sort the Inbox by contact name to see all tickets for the contact.
For more information on the Comprehensive View, see Overview of Handling Data Change Management Tickets by Contact.
Approving Tickets and Follow-Up Actions
You can approve a ticket by choosing the Approve button in the Modification Details section of the Inbox.
When you approve a ticket, the status of the ticket is automatically set as Completed. If follow-up text is defined for the type of ticket you just completed, the Follow-Up button is still available after completing the ticket.

Approving Tickets and Follow-Up Actions
[A] After the ticket has been completed and approved, the Follow-Up button is still available for you to access any follow-up instructions.
Follow-up text is used to instruct data stewards about any actions that they must complete after approving a change from a user. For example, you may instruct the data steward to ensure that an address is properly formatted when an address is edited or that a contact is completely profiled when a contact is added to a contact type. For more information on follow-up text, see Managing Follow-Up Text.
After you complete a ticket, it is removed from your Inbox. However, you can change your preferences to display completed tickets in your Inbox. To change your preferences, choose Tools > Options. On the Change Management Options dialog box, clear the Immediately remove Completed tickets from my Inbox check box then choose OK.
After a ticket has been removed from your Inbox, you can still find it using the search option. For more information, see Searching for Data Change Management Tickets.
Rejecting Tickets
NOTE In the Comprehensive View, rejecting tickets works differently. For more information, see How Tickets are Processed in the Comprehensive View.
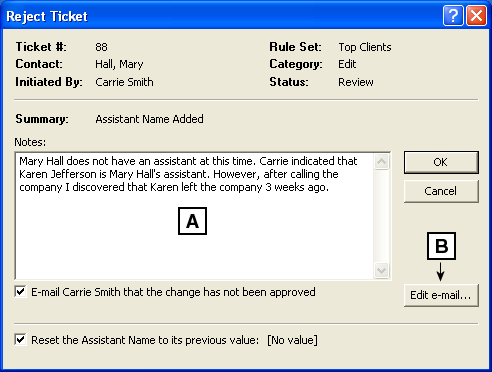
When you reject a change made to a contact, you are given the opportunity to enter the reason why the ticket was rejected. You can also email the user to notify him or her that the change was rejected.
For example, if you reject a change a user made to the business address for a contact because you researched the change and realized the company did not change addresses, you may want to notify the user who requested the change that the company didn’t move. You can notify the user by entering the reason in the notes and selecting the option to email the user. The text entered in the notes field is included in the email message.
TIP You should always email the user if you reject a ticket. For more information, see Why Should I Send an Email to the User if I Reject a Change He or She Made?.

Reject Ticket Dialog Box
[A] The notes you enter are added to the email message sent if you select the option to send an email.
[B] Choose Edit e-mail to change the email message sent.
When you enter a note as to why the ticket was rejected, the note is added to the notes viewed on the Notes tab of the Ticket Details dialog box.
The From field of the email displays the Business email of the data steward who rejected the ticket. If no Business email address exists, then InterAction searches for an email address in these fields (in the following order): Business2, Alternate Business, then the email address on the user record.
After you complete a ticket, it is removed from your Inbox. After a ticket has been removed from your Inbox, you can still find it using the search option. For more information, see Searching for Data Change Management Tickets.
TIP To change your preferences to have completed tickets remain in your Inbox, choose Tools > Options, then clear the Immediately remove Completed tickets from my Inbox check box.
Resetting the Item to the Previous Value
If the ticket that was rejected was a review ticket, you have the option of resetting the item to the previous value. This option is not necessary for submit tickets because when a rule specifies that a change must be submitted to a data steward, the change is not actually made. When rejecting a review ticket, you may select to not reset the item back to the original value if you have already manually edited the item. For example, if a user edits an address and enters correct information but formats it poorly, you may choose to manually correct the address in the Windows Client. This manual correction may outdate the ticket, which you can close later. If the correction did not outdate the ticket, you can reject the ticket and choose to not reset the address to its previous value.
Why Should I Send an Email to the User if I Reject a Change He or She Made?
Sending an email message to the user with the reason why you rejected his or her change is an important step when you reject a Data Change Management ticket for several reasons:
- You can give the user a reason why the change was rejected. This information may be beneficial for the user because you may have researched the information and found that it is outdated or incorrect.
- You prevent the user from losing confidence in the system. If a user is not notified when his or her change is not accepted, the user does not know it was rejected and may think that InterAction has lost the change. The user may attempt to reenter the change, or worse, may stop using InterAction because he or she feels it is inaccurate.
- When a user receives updates from the firm for a contact changed in his or her user contact list, the user’s information will also change on the contact in the user contact list when the change is rejected. This change is most likely unexpected and may frustrate the user.
For information on sending an email to a user after you reject a ticket in the By Ticket view, see Rejecting Tickets.
For information on sending an email to a user from the Comprehensive View, see Sending an Email Message to the Ticket Initiator.
Taking Action on Multiple Tickets at Once
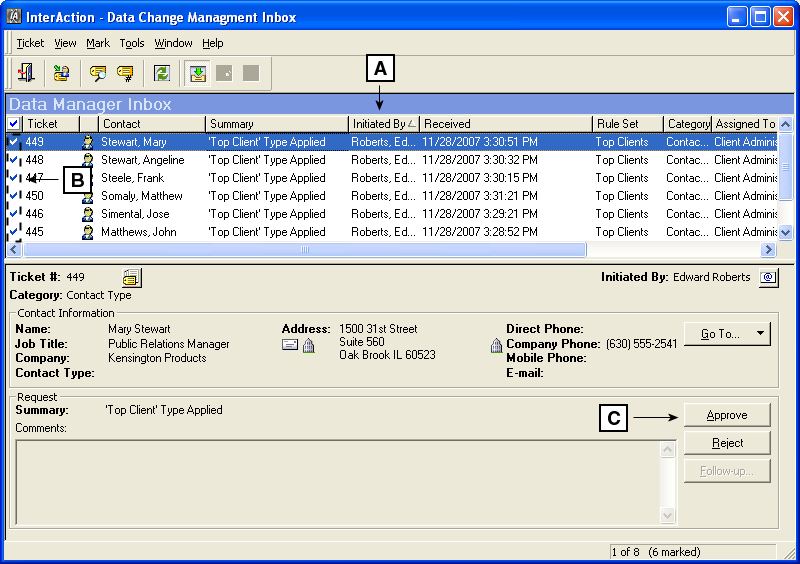
Marking tickets lets you perform operations on multiple tickets. For example, a Web Client user adds a large number of contacts to the Top Client contact type. You want to approve all these tickets at once. You can quickly approve the tickets by sorting the Inbox by Initiated User, marking the tickets, then choosing Approve.
NOTE If you close the Inbox, InterAction does not remember which contacts are marked.

Processing Multiple Tickets at Once
[A] First sort tickets by choosing a column heading. For example, to sort tickets by the user who initiated the change, choose Initiated By.
[B] To mark tickets, click in the mark column next to the ticket number. You can click and drag to mark multiple tickets.
[C] Choose the action to perform on the tickets. For example, to approve all the marked tickets, choose Approve.
Sorting Data Change Management Tickets
To sort Data Change Management tickets, you can:
- Click a column heading to sort by a single column
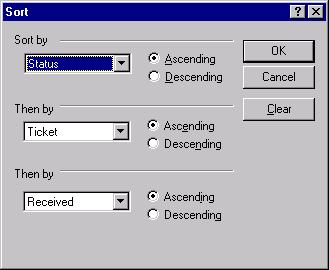
- Use the sort feature for more advanced sorting
The sort feature lets you sort the current list by up to three different conditions. This feature is helpful when taking action on multiple tickets at once. For example, a new user in your organization has just added dozens of contacts to a marketing list. You can sort tickets by Initiated By then Status to group these tickets together so you can mark multiple tickets and accept or reject them all at once.
To sort tickets:
-
Log on to the InterAction Windows Client.
-
Choose an option to access the Data Change Management Inbox:
-
Choose Tools > Data Change Management Inbox - By Ticket to access the ticket list.
-
Choose Tools > Data Change Management Inbox - By Contact to view tickets by contact.
-
-
Choose View > Sort.

-
Choose your sort criteria then choose OK.
