Section Topics
Overview of Handling Data Change Management Tickets by Contact
When using the By Contact view of the Inbox, you can view all open Data Change Management tickets for a single contact. These tickets open in the Comprehensive View. This view helps the data steward understand how and why changes were made to a contact. The Comprehensive View lets data stewards take multiple actions within one dialog box so when changes are saved, all tickets are resolved for a contact.
For example, a key contact at a top client changes employment and a user makes changes to the contact in InterAction. This scenario can potentially create several Data Change Management tickets for different fields, such as Company Name, Business Address, Business Phone, Department, Job Title, Assistant Name, and more. If changes are made by several users, tickets may become outdated. Using the Comprehensive View, data stewards can see the big picture rather than deal with tickets individually, and resolve and close all these tickets at once.
IMPORTANT Because the Comprehensive View is a powerful tool, access is turned off by default. For information on giving access to the Comprehensive View, see Giving Full Edit Rights in the Comprehensive View.
The following is a recommended general workflow when resolving tickets by contact:
| Step | Additional Information | |
|---|---|---|
| 1 | View tickets by contact in the Data Change Management Inbox - By Contact view. | For more information on using the By Contact view of the Inbox, see Viewing Tickets by Contact. |
| 2 | Prioritize and filter tickets accordingly in the Inbox. |
For example, you maintain data quality for your organization’s Prospects list. You can filter tickets by the Prospects folder to resolve tickets for contacts sourced or linked to that folder only. For more information on filtering tickets in the By Contact view of the Inbox, see Finding Tickets by Folder and Find Tickets for Contacts Found in a Saved Search. |
| 3 | Open the Comprehensive View for each contact and process high priority items first. | If a contact is a possible duplicate or possible company, address these issues first. These tickets can outdate others so they should be handled before moving onto other tickets. For more information, see High Priority Items to Review First. |
| 4 | Make decisions on other tickets. | Choose values accordingly in the Comprehensive View. |
| 5 | View informational tickets, if any exist. |
It isn’t required to view informational tickets, but they can be helpful when researching other tickets. For details, see Handling Informational Tickets. |
| 6 | Save your selections and close tickets. | Choose Save Changes or Save and Close to close all tickets for the contact. |
We need a sidebar or something here to talk about which tickets are assigned to me. How are composite tickets handled? Toby says some tickets are redirected if they are part of a composite. What does that mean?
See the following topics for more information:
- Accessing the Comprehensive View
- Navigating the Comprehensive View
- How Tickets Are Displayed
- The Current Value
Accessing the Comprehensive View
You can access the Comprehensive View in the Windows Client from both Data Change Management Inbox views.
IMPORTANT You must give data stewards access to the Comprehensive View in InterAction Administrator. For details, see Giving Full Edit Rights in the Comprehensive View.
To access the Comprehensive View:
- Choose Tools > Data Change Management Inbox - By Contact, search for contacts with open tickets, highlight a contact and choose View Tickets.
- Choose Tools > Data Change Management Inbox - By Ticket, select a contact with multiple tickets, then choose to open all tickets.
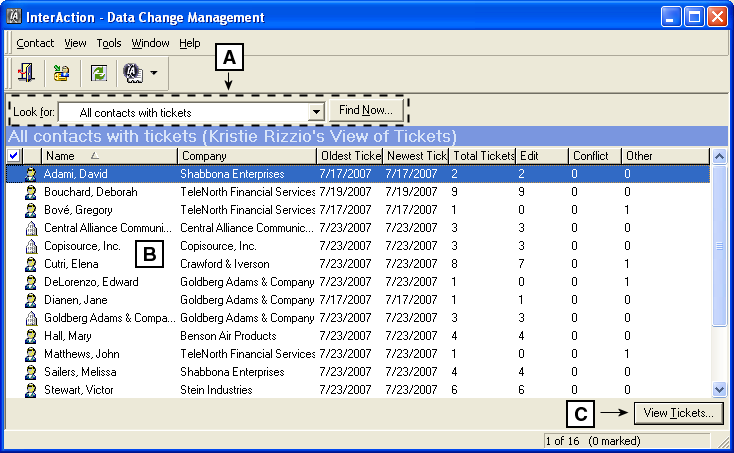
Accessing the Comprehensive View from the By Contact Inbox View
[A] Use the Contact List Toolbar to search for open tickets by folder. You can also find open tickets for contacts found through a saved search.
For more information on searching for tickets in By Contact view, see Finding Tickets by Folder and Finding Tickets for Contacts Found in a Saved Search.
[B] Contacts that have open tickets in the current filter.
[C] Choose View Tickets to open all tickets for the selected contact in the Comprehensive View.
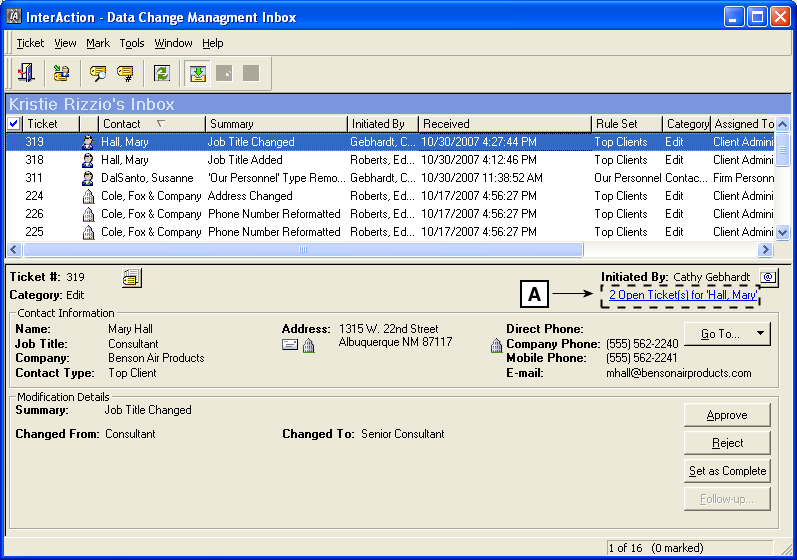
Accessing the Comprehensive View from the By Ticket Inbox View
[A] If a contact has more than one open Data Change Management ticket, a link displays in the By Ticket view of the Inbox. Choose this link to open tickets in the Comprehensive View.
The method to access the Comprehensive View depends on your current workflow. For example:
- Your top priority is to resolve all open tickets for your organization’s top clients. Use the By Contact view of the Inbox to search for open tickets for contacts in the Top Clients folder and resolve tickets in the Comprehensive View.
- A professional added several new contacts to the Holiday Card marketing list and you are reviewing those tickets in the By Ticket view of the Inbox. You notice John Smith has several open tickets. Open the Comprehensive View and resolve the tickets all at once.
NOTE For more information on working with the By Ticket and By Contact Inbox views and why you would use each, see Should I Resolve Tickets by Ticket or by Contact?.
After choosing to open all tickets for a contact in the By Ticket or By Contact view of the Inbox, the Comprehensive View dialog box displays.
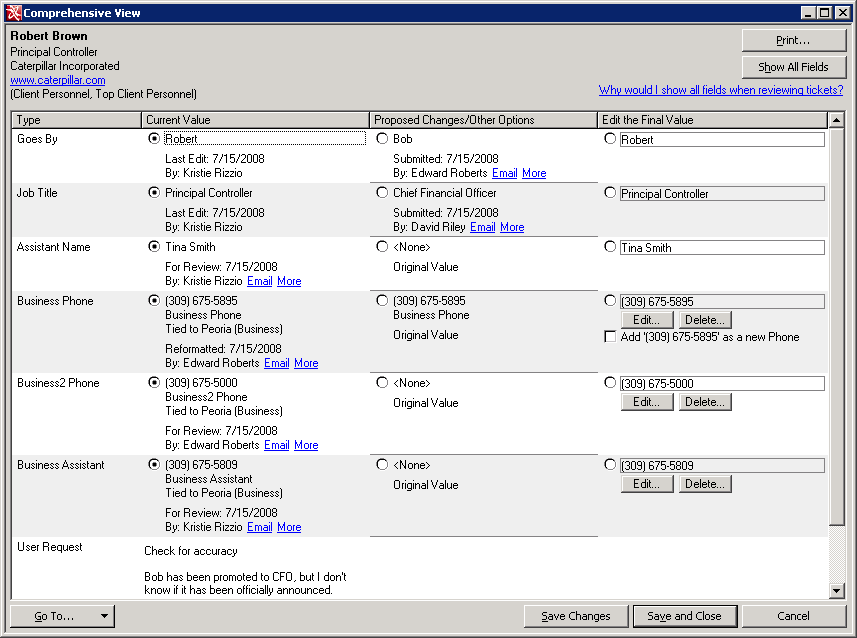
The Comprehensive View
Navigating the Comprehensive View
You can perform most of your ticket research from the Comprehensive View dialog box.
Accessing Contact Details
To access contact details from the Comprehensive View, choose the Go To button in the lower left-hand corner of the dialog box, then choose the contact details information to view. For example, to view phones and addresses for a contact, choose Go To > Phones & Addresses. This opens a new dialog box so your selections in the Comprehensive View aren’t affected.
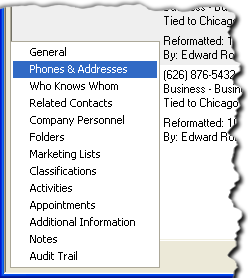
Accessing Contact Details
Basic contact information also displays in the upper left-hand corner of the Comprehensive View dialog box for easy reference.
For person contacts, InterAction displays:
- Name
- Job Title
- Company Name
- Web site (a URL to the associated company’s Web site)
- Contact Types
For company contacts, InterAction displays:
- Company Name
- Company Also Known As Name
- Web site (a URL to the company Web site)
- Contact Types
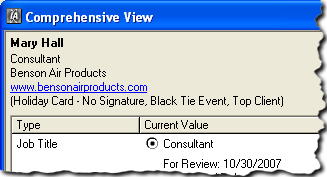
General Contact Information in the Comprehensive View
Viewing All Fields for a Contact
Upon accessing the Comprehensive View, only fields with open tickets display. This makes it easy to view proposed changes for the contact. However, you may want to show all fields to also view fields without tickets.
For example, the contact R. Peter Adamson goes by his middle name, Peter. You receive a ticket to change his first name to Peter. Showing all fields displays Peter in the Goes By and Middle Name fields. If you had not shown all fields, you would have mistakenly accepted the ticket to change his first name to Peter.
To show all fields for a contact, choose Show All Fields.
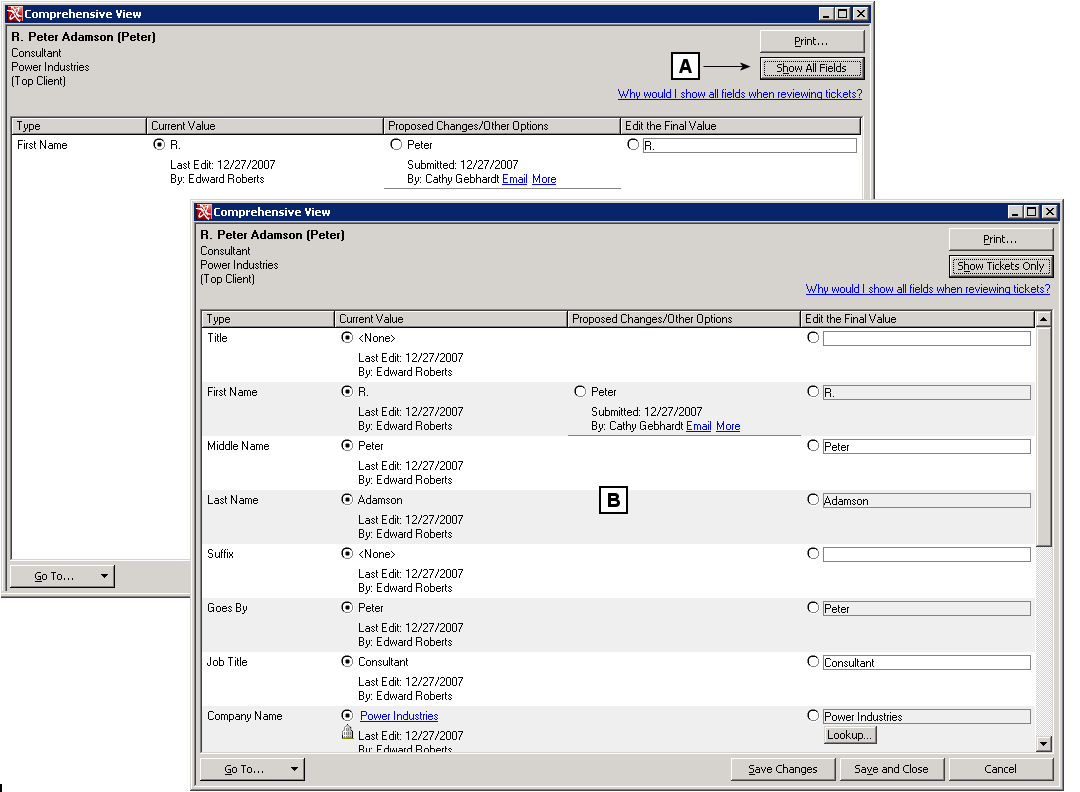
Showing All Fields in the Comprehensive View
[A] To display all fields, choose Show All Fields.
[B] The Comprehensive View displays all fields for the contact. You can add, edit, or delete data by making changes to the value in the Edit the Final Value column.
[C] To show fields with open tickets only, choose Show Tickets Only.
Unlike other fields, rows for addresses, phones, and electronic addresses only appear if there is a value.
- For example, if there is no Alternate Business Phone on a contact record, no row appears for Alternate Business Phone after choosing Show All Fields.
- Fields that are not address, phone, and electronic address fields always display rows after choosing Show All Fields. For example, if no middle name exists on a contact record, the Middle Name field displays <None>.
If you made any selections before choosing Show All Fields or Show Tickets Only, InterAction warns you that those selections will be lost. If you choose to proceed, InterAction selects the values in the Current Value column.
For more information on showing all fields, see Why Would I Show All Fields When Reviewing Tickets?.
Printing
Choosing Print prints the current view of the Comprehensive View dialog box. The report includes your current selections and displays the contact name on the top of the first page.
A hard copy of a contact’s open tickets can be useful when you require more information from a professional. For example, you receive several tickets for Jane Tarnoff in your Inbox, many of which seem conflicting. If you are unsure of which data is correct, you can print a snapshot of the Comprehensive View and deliver the hard copy to a professional. The professional can then mark up the document and return the feedback to you.
Why Would I Show All Fields When Reviewing Tickets?
By default, the Comprehensive View only displays fields for which there are open Data Change Management tickets. Choosing Show All Fields displays all fields for a contact.
Showing all fields while reviewing tickets can prevent you from making errors on a contact’s record. It also lets you clean up data or add additional information when available.
For example, showing all fields would be helpful in these scenarios:
- A user changed Bill Smith’s Business Address and Business Phone to the company’s London location. When you show all fields, you notice Bill’s Home Address still displays as Chicago when he has clearly moved to London. This prompts you to find his new Home address in London and correct the information.
- By scanning open tickets for Catherine Church in the Comprehensive View, you can see that a user changed her employment information. She now works for a new company, but the information provided by the user is minimal. After doing some research, you are able to add Catherine’s new Job Title, Department, and Assistant Name.
For more information on showing all fields in the Comprehensive View, see Viewing All Fields for a Contact.
How Tickets Are Displayed
By default, the Comprehensive View shows all open Data Change Management tickets assigned to you or a group of which you are a member.
NOTE To also view fields without open tickets, choose Show All Fields. See Why Would I Show All Fields When Reviewing Tickets? for details.
The types of tickets include:
- Add, Edit, and Delete
- Data Conflict
- Unassociated Company
- Contact Type Add/Remove
- Marketing List Add/Remove
- User Requests
- Total number of informational tickets, such as Notify and New Contact Created tickets
NOTE Informational tickets display in a separate dialog box and are accessed by choosing the View Informational Tickets link. See Handling Informational Tickets for details.
By default, each field that has an open or outdated ticket displays in a row. Possible values display in the Current Value and Proposed Changes/Other Options columns.
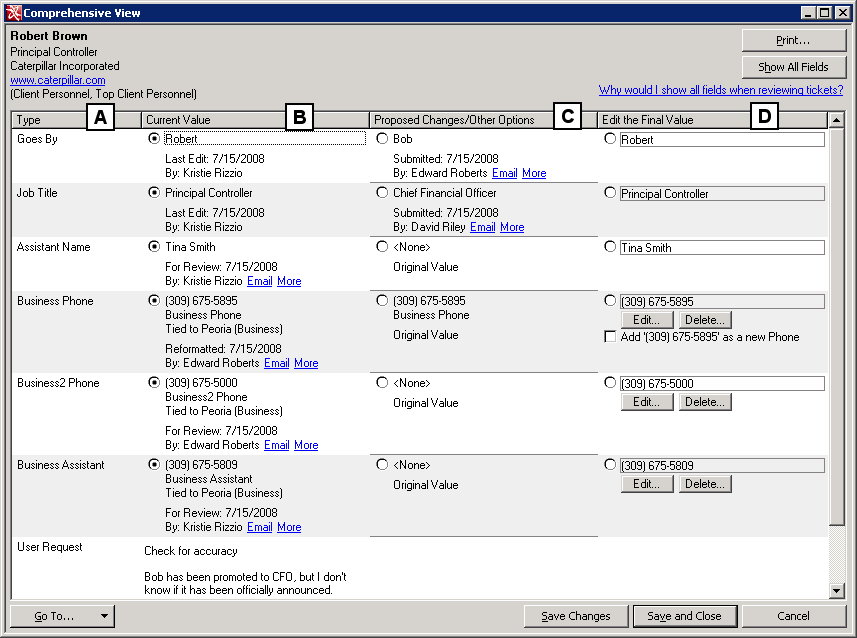
Columns in the Comprehensive View
[A] The Type column displays the change being requested (for example, Job Title).
[B] The Current Value column lists the value that users see now in InterAction. This may be a change proposed by a user through a review ticket.
[C] The Proposed Changes/Other Options column displays other values that are not the current value, such as: the original value of a field with an open review ticket, outdated suggestions, or proposed values through submit tickets.
[D] The Edit the Final Value column lets you modify values before choosing Save Changes or Save and Close.
| Column Name | Description |
|---|---|
| Type |
The field name. Name fields are labeled to match the field name (for example, Last Name, Company Name, Assistant Name). Address, phone, and email address fields are labeled according to location type (for example, Business Address, Alternate Business Fax, Home Web site). Other requests are named accordingly (for example, Change of Mailing Address, User Request, and Contact Type). |
| Current Value | The value that displays now in InterAction. See The Current Value. |
| Proposed Changes/Other Options |
All other values that are not the current value, such as: the original value of a field with an open review ticket, outdated suggestions, or proposed values through submit tickets. For more information, see: • What Was the Original Value for the Field Before Changes Were Submitted? |
| Edit the Final Value |
A place to change the value before you choose Save Changes or Save and Close. For more information on the actions you can take in this field, see Saving Selections/Closing Tickets. |
See the following topics for more information:
- What Type of Ticket Is It?
- What Was the Original Value for the Field Before Changes Were Submitted?
- What Are Outdated Suggestions?
What Type of Ticket is It?
The ticket type is indicated in the ticket summary. For example, submit tickets are labeled Submitted and review tickets are labeled For Review.

Identifying Ticket Types
[A] Review tickets
[B] Original values before tickets were received
[C] An outdated suggestion (see What Are Outdated Suggestions?)
[D] A submit ticket
NOTE InterAction displays the main user as the user who initiated the change, not the proxy.
Each ticket displays the date the ticket was received and the user who initiated the change. See the following table for examples.
For each ticket:
- Choosing Email lets you send an email to the ticket initiator.
- Choosing More opens ticket details.
| Ticket | Example | Description |
|---|---|---|
| Review |

|
Review tickets are labeled For Review. Review tickets display in the Current Value column because the data is written on the contact record. Older review tickets display in the Proposed Changes/Other Options column as outdated suggestions. See What Are Outdated Suggestions? for more information. |
| Submit |

|
Submit tickets are labeled Submitted. Because InterAction does not display updates made on submit tickets immediately (the data steward must approve the ticket before the value is written to the database), submit tickets always display in the Proposed Changes/Other Options column. |
| Suspect |

|
Suspect tickets are labeled Suspect. Suspect tickets can display in either the Current Value or Proposed Changes/Other Options columns, depending on whether there are open review or submit tickets. |
| Delete |

|
When data is deleted, you can approve the ticket by selecting <None>. In this example, the rule set determined that deleting the data generated a submit ticket. Deletes are displayed differently when contacts are removed from contact types and marketing lists. See Handling Tickets Regarding Contact Types and Marketing Lists. |
| Reformat |

|
Reformat tickets are labeled Reformatted. Reformat tickets can display in either the Current Value or Proposed Changes/Other Options columns, depending on whether the ticket is a review or submit ticket (as determined by the rule set). |
| Conflict |

|
Conflict tickets are labeled Conflict. |
| Outdated |

|
Outdated review and submit tickets are labeled Outdated Suggestion in the Proposed Changes/Other Options column. See What Are Outdated Suggestions? for more information. |
| Multiple Tickets with the Same Value |

|
When there are multiple tickets with the same value, InterAction displays the value only once. The user who initiated the oldest ticket is displayed as the user who submitted the change. Choose View to view a list of other users who submitted a matching change. |
What Was the Original Value for the Field Before Changes Were Submitted?
The original value is the value for a field before Data Change Management tickets were received for the contact.

Original Value in InterAction
[A] The original value for a field before tickets were received.
The original value can be:
- The oldest review ticket on the contact
- The current value in the InterAction database (shown in the Current Value column) if no review ticket is on the contact (see The Current Value).
- Nothing (displayed as <None>) if there wasn’t a previous value for the field
NOTE The original value is displayed in either the Current Value or Proposed Changes/Other Options column, depending on whether there are open review or submit tickets.
What Are Outdated Suggestions?
Often InterAction displays outdated suggestions in the Proposed Changes/Other Options column. These are outdated review and submit tickets in InterAction. Although these values may be outdated, they are still displayed, providing you with as much information as possible when choosing a final value.
If you choose an outdated suggestion as the final value for a field, these tickets are processed a bit differently than other tickets. InterAction actually closes the ticket then edits the value on the field. This is important to know when viewing the ticket history. The user who made the change that generated the outdated ticket does not display as the user who made the change. The data steward who accepted the outdated suggestion as the final value in the Comprehensive View is shown as the owner of the change.
Other tickets, such as Possible Duplicate Contact and Possible Company tickets, can also become outdated over time. These tickets are informational tickets and can be viewed by choosing the View Informational Tickets link in the Comprehensive View. For more information, see Handling Informational Tickets.
The Current Value
The current value is the value for the field in the InterAction database and is what users see now. For example, the current value for John Matthews’ job title is Senior Financial Consultant.
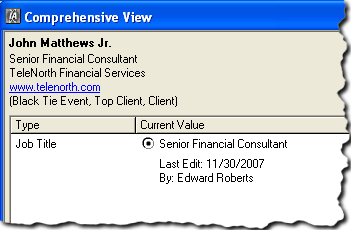
The Current Value
Upon accessing the Comprehensive View, the value in the Current Value column is selected by default. As a result, the current value is chosen as the final value if you make no selections before choosing Save Changes or Save and Close.
NOTE The current value is often not the correct value. You should review all suggestions and choose the correct value before choosing Save Changes or Save and Close.
The current value for a field can be different things, depending on the types of Data Change Management tickets that have come in.
For example:
- If there is an open review ticket, the current value is the suggested value that was entered by the user and displays For Review.
- If there is an open submit ticket, the current value is the original value in the database before the submit ticket was generated. The value can be <None> if the field was empty before the submit ticket came in.
- If there is an open submit and review ticket, the current value is the open review ticket and displays For Review.
- If there is an open data conflict ticket, the current value displays the firm’s version of the data, because the firm version is the data that is currently saved on the contact record.
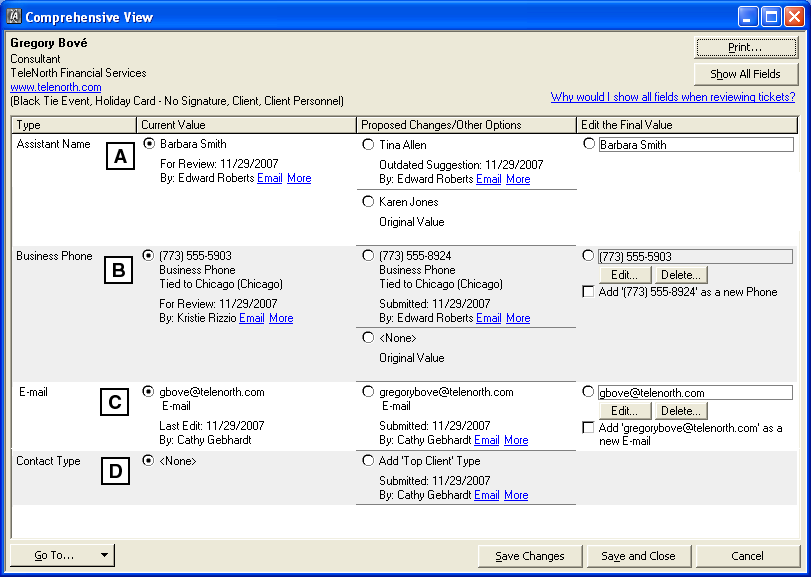
Current Values
[A] If there are open review tickets, the most recent review ticket is the current value in InterAction. In this example, an outdated ticket and the original value for the field are listed as possible values.
[B] The most recent review ticket is the current value in InterAction. In this example, a submit ticket and the original value for the field are listed as possible values.
[C] If there are open submit tickets, the original value is the current value in InterAction. In this example, there is a single submit ticket open.
[D] The current value is <None> if there are open submit tickets and the field was previously empty. In this example, a user added the contact to the Top Client contact type, which generated a submit ticket (see Handling Tickets for Contact Types and Marketing Lists).
Is There an Undo Function in the Comprehensive View?
No. All tickets for a contact are resolved after you choose Save Changes or Save and Close. You can view history information for the tickets that were processed, but you cannot bring the tickets back up in the Comprehensive View dialog box or take any additional action on them. However, you can search for the closed tickets in the Data Change Management Inbox - By Ticket view and view the tickets there.
For more information, see:
- What Happens to Data Change Management Tickets in the Comprehensive View After Save My Selections?
- Saving Selections/Closing Tickets
