Section Topics
Using the Main Window of InterAction Windows Client
The Main Window appears after you have logged on to the InterAction Windows Client. The figure below identifies the various components of the Main Window.
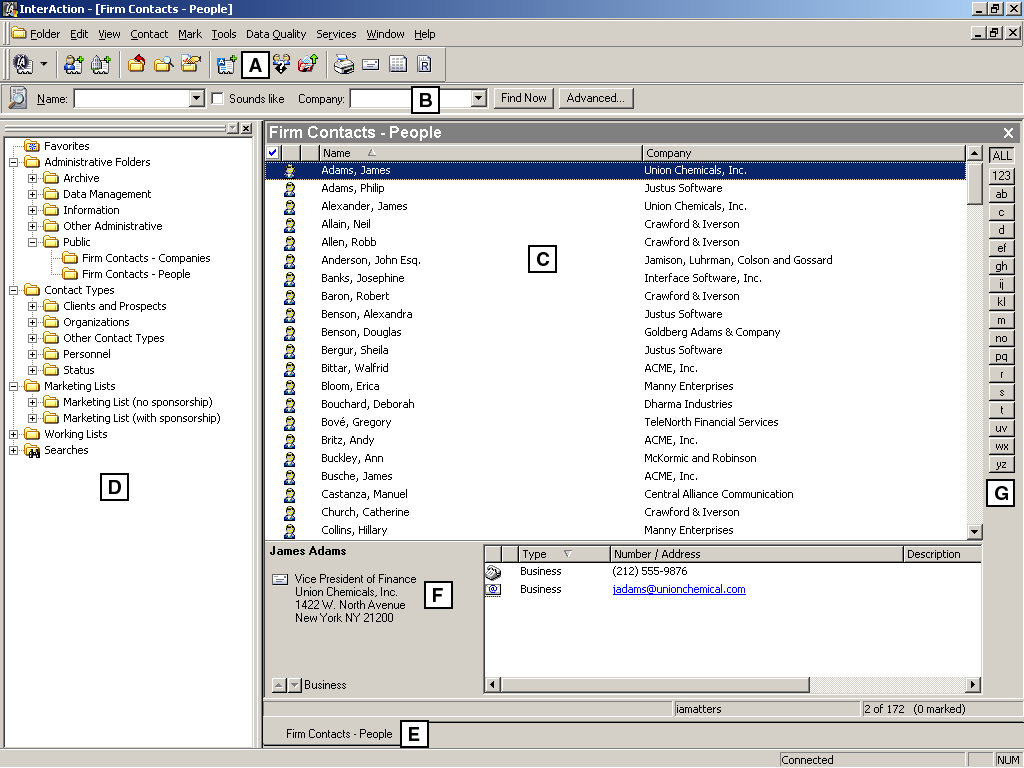
InterAction Windows Client Main Window
[A] Toolbar
[B] Find Bar
[C] Contact List
[D] Folder List
[E] Open Folder
[F] Summary Pane
[G] Letter Bar
Working with the Folder List
The folder list displays a list of folders and searches to which you have access. The folder list is organized into the following three sections:
- Favorites - contains your most commonly used folders and searches. Some special features are associated to folders and searches in this section. For more information, see Favorites.
-
Folders - contains all folders to which you have read access. Folders are organized first according to folder class then by folder type/group. For more information, see Folders in the InterAction Windows Client.
- Searches - contains all searches to which you have access. Searches are divided into two categories: private and shared. For more information, see Searches in the Windows Client.
You can open folders by navigating to a folder in the folder list and then choosing Folder > Open or double-clicking on the folder. InterAction displays the contacts the folder contains in the contact list.
TIP Another way to display a list of contacts is to use the Find Bar. When you enter a name in the find bar and choose Find Now, InterAction searches for the contact and returns a list of possible candidates.
To close folders, chose Folder > Close or click the X in the upper right corner of the contact list view.
Folder Windows and Workbook Mode
You can open multiple folders at one time. Each folder appears in a folder window that you can move and resize as needed. To help switch between multiple open folders, you can use the workbook mode. When it is turned on, tabs display at the bottom of the folder window representing each open folder.
Workbook Mode
To turn workbook mode on, choose View > Show Workbook.
To turn workbook mode off, choose View > Hide Workbook.
Favorites
The Favorites item in the folder list provides a quick way to access the folders and searches you use most often. In addition, the folders in your Favorites can affect other operations in InterAction. These include the following:
- Folders and searches automatically open at startup.
- Folders that are searched using the find bar.
- Folders displayed in numerous features including the new contact wizards and the Folders view.
To add a folder to your favorites, right-click on the folder in the folder list and choose Add to Favorites.
To remove a folder from your favorites, right-click on the folder in the folder list and choose Remove from Favorites.
To set a folder in your favorites to open at startup, right-click the folder and choose Open at Startup.
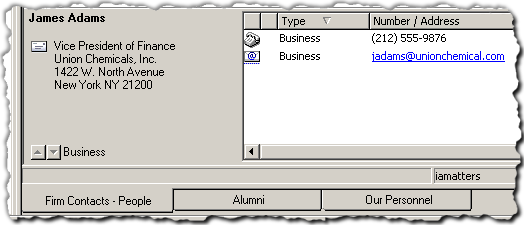
Working with the Contact List
When you open a folder, the list of contacts contained in that folder is displayed in the Contact List. If the folder is set as a large folder, the contact list may not be populated when the folder is opened. To view contacts, in a large folder, select a button in the letter bar.

Contact List
[A] Marked contacts
[B] Flagged contacts
[C] Person or Company
[D] Type of source folder
| Column in Contact List | Meaning |
|---|---|
| First | Marked Contacts |
|
Second Note that this column only appears if you have flagging turned on for the folder you have currently open. |
Flagged Contacts |
| Third | Indicates whether a contact is a person or a company |
| Fourth | Indicates the source folder for a contact |
Marking Contacts
Marking contacts allows you to perform operations on multiple contacts. To mark a contact, click in the mark column (the first column) next to the contact. To unmark a contact, click again in the mark column next to the contact.
When you first open a folder, none of the contacts are marked. Once you close the folder, InterAction does not remember which contacts are marked.
After you have marked a set of contacts, you can do any of the following:
| Action | More Information available in the following location |
|---|---|
| Add Activity | Creating and Editing Activities in the Windows Client |
| Apply Classification | Classifications |
| Set Additional Field | Using Additional Fields in InterAction Windows Client |
| Clear Additional Field | Using Additional Fields in InterAction Windows Client |
| Add Sponsor | Using Marketing Lists in the Windows Client |
| Remove Sponsor | Using Marketing Lists in the Windows Client |
| Promote | Promoting Contacts |
| Set Flags | Flagging Contacts |
| Clear Flags | Flagging Contacts |
If you have any contacts marked when you link, move, print or export contacts, InterAction provides the option of performing the actions on the marked contacts.
Several of the features on the data quality menu also support the marked contacts feature. For example, if you mark several contacts and then choose the Multi-Contact Duplicate Merge feature, only the marked contacts are opened in the Multi-Contact Duplicate Merge dialog box.
Is There an Easy Way to Mark Several Contacts at Once?
InterAction provides the following shortcuts for marking contacts:
- To mark all contacts in a folder, choose Mark > Mark All.
- To unmark contacts, choose Mark > Unmark All
- To mark all unmarked contacts in a folder and unmark all marked contacts, choose Mark > Reverse Mark
- To mark a series of contacts, click and drag in the mark column.
Flagging Contacts
Use flagging to “mark” contacts in a way in which InterAction will “remember” the setting after closing the folder. A contact in a folder can be flagged with one of several available colors. The meaning of each different color can be configured for the folder.
For example, in a folder for a marketing event, you could define one flag color as “invitation not yet sent” and a different flag color as “not attending.” In a different folder, the same colors can have completely different meanings.
Flagging can also be useful for marketing and data quality issues. For example, you may choose to flag a contact that recently had a contact type applied to it to ensure the contact is profiled appropriately. Note that flags do appear in the Web Client for contact type, marketing list, and working list folders. Flags also can be used in folders for matters, opportunities, and engagements.
To flag a contact, select the contact and choose Contact > Set Flag > <Name of Flag>. The names of the flags shown in the menu are configurable for the folder. By default, they are the names of the colors.
To unflag a contact, choose Contact > Set Flags > Clear Flag.
You can set or clear flags for multiple contacts at once by marking the contacts and choosing Mark > Set Flags > <Name of Flag>. All marked contacts are assigned the flag you choose.
To see the meaning of a flag in a folder, pause the mouse pointer on the status flag column. InterAction displays a ToolTip with a description of the flag meaning.
For flagging to be used in a folder, you must turn on flagging for the folder. When you allow flagging for a folder, you can define the meaning for each colored flag. You can also designate a color to be automatically set when a contact is added to a folder. For more information about configuring flagging for a folder, see the Configuring InterAction guide. For information about creating a marketing list that allows flagging, see Create a Marketing List.