Section Topics
Monitoring Your Contacts for Alerts
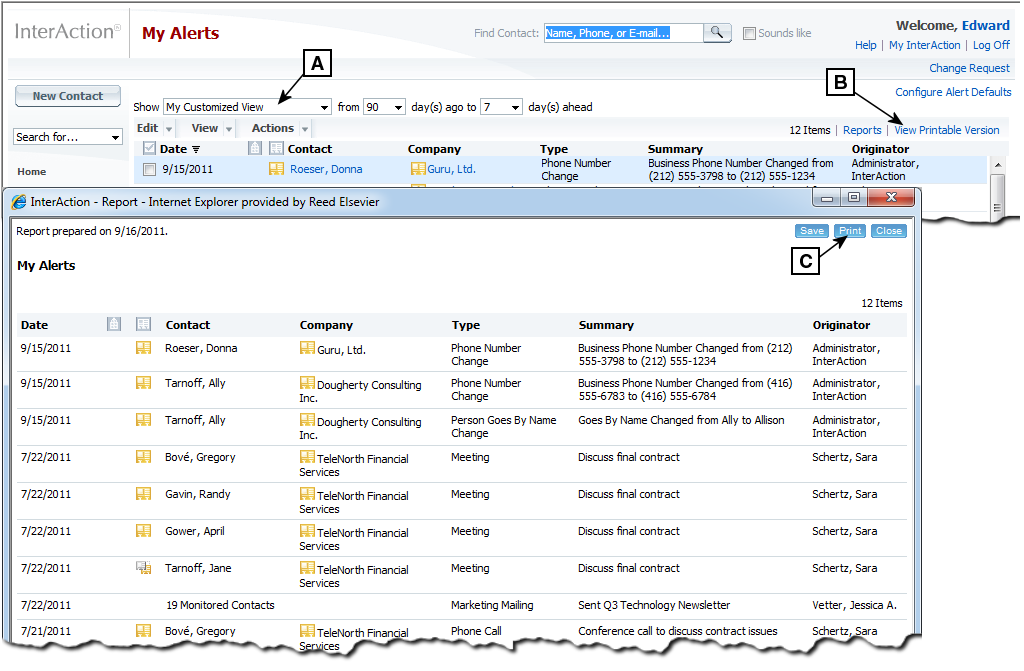
To see your alerts, choose the My Alerts link from the left-hand menu. The Alerts page highlights activities and appointments for a designated set of contacts. This lets you monitor contacts that are important to you. You can choose the type of activities and the set of contacts you want to monitor.
Note: Your organization can change the term used for “alerts,” so the term you see may be different.
The activities displayed include both those created by you and others in your organization, and activities generated automatically to record changes to the data, such as a changed phone number or address.
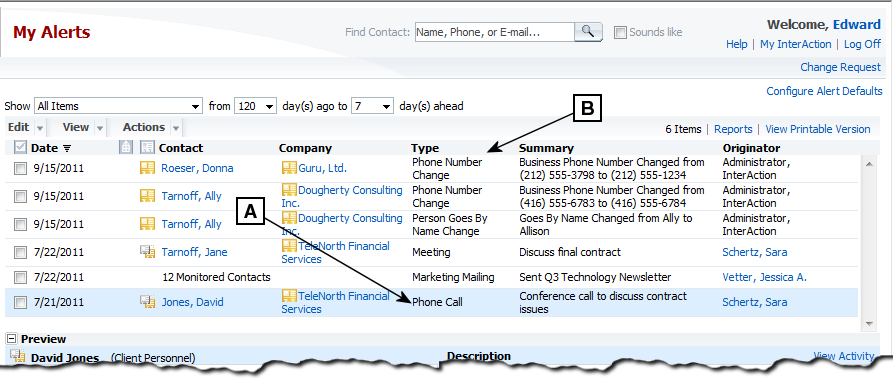
My Alerts Page
[A] This activity was entered manually to record a phone call.
[B] InterAction generated this activity automatically when users updated the contacts involved.
You can configure how the My Alerts page displays to suit your needs:
- You can sort the activities displayed in the My Alerts page by any column. Click the column header to change the sort order.
- You can quickly filter the set of activities and appointments by group and time frame. See Filter Your Alerts by Type or Time Frame.
- You can choose both the contacts and the types of activities and appointments you want to monitor. See Choose the Contacts and Items to Monitor and Create a Custom List of Contacts to Monitor.
You can also print your alerts, or use the list of contacts shown in the My Alerts page in reports. See the following:
- Print Your Alerts
- What is the Difference Between the View Printable Version and Reports Links on the My Alerts Page?
Filter Your Alerts by Type or Time Frame
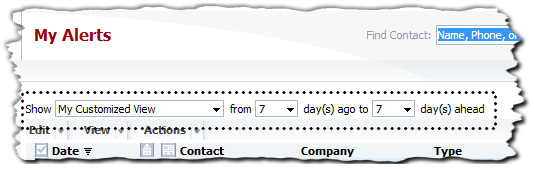
To quickly filter your alerts, use the drop-down lists at the top of the page:
- Use the Show drop-down list to filter by activity type. The list organizes the types into groups. For example, choose Communication to view Email, Fax, Letter, Meeting, and Phone Call activities.
- Use the From X day(s) ago to Y day(s) ahead drop-down lists to specify a date range for the activities and appointments to include.
Choose the Contacts and Items to Monitor
-
From the My Alerts page, choose the Configure Alert Defaults link.
The Configure Alerts page is divided into two pages:
-
Filter Alerts – displays the types of activities and appointments that you may want to monitor.
-
Select Contacts to Monitor – displays the types of contacts that you may want to monitor.
-
-
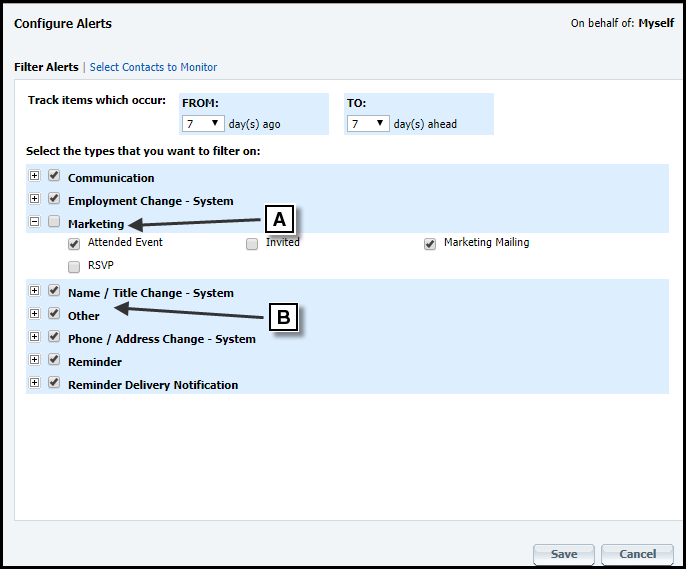
To change the date range of activities, select the number of days in the From and To drop-down lists.
-
Under Select the types that you want to filter on, select the types of activities and appointments you want to include in the My Alerts page.
The types are shown by group. You can select an entire group at once. Alternatively, use the plus and minus indicators next to a group to expand and collapse the groups.
-
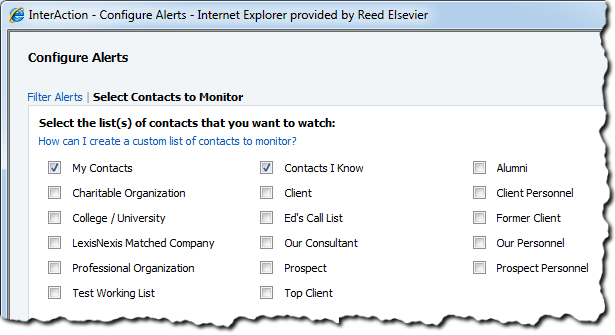
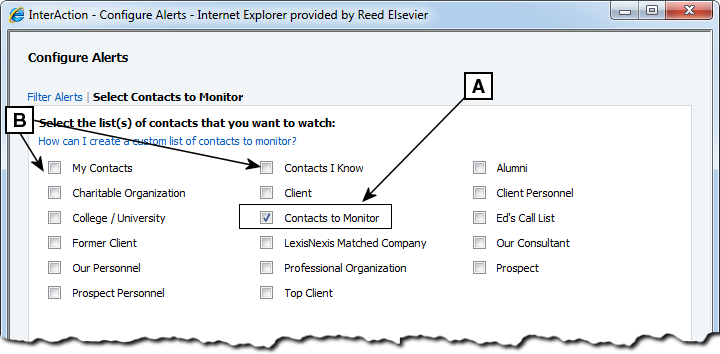
Choose the Select Contacts to Monitor link.
-
Select each list of contacts that you want to monitor by selecting the check box next to the name. The available lists usually include contact types, your frequently used working lists, and other lists your organization has made available on this page.
You can precisely control the exact contacts to monitor by creating a custom working list and selecting to monitor just that list. See Create a Custom List of Contacts to Monitor.
-
Choose Save.
Filtering Your Alerts
[A] Only two of the activity types within this group are selected.
[B] The other groups are collapsed, and all the activity types within them will be monitored.
Selecting Contacts to Monitor
Create a Custom List of Contacts to Monitor
By default, InterAction generates alerts for all contacts in My Contacts and contacts you know. This setting may make your My Alerts page show too many alerts and you might find it difficult to find the important updates to your contacts.
Create a custom list of contacts to monitor by adding only those contacts to a working list. For example, you may only be concerned with a few contacts associated with each of your major accounts or contacts on a matter in which you are currently involved.
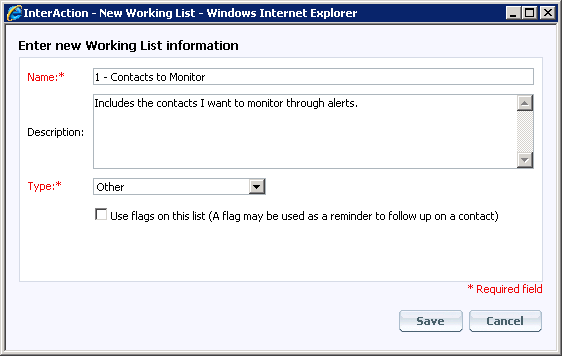
Create the Working List: Contacts to Monitor
Create a new working list as described in Create a Working List. For the name, enter Contacts to Monitor.
Alternately, you can name the list 1 - Contacts to Monitor to make sure it appears at the top when viewing a list of working lists.
Add Contacts to the Working List
Next, add contacts to the Contacts to Monitor working list. See Add Contacts to a List.
There are several ways to add a contact to a Working List in the Web Client. The steps below illustrate how to add contacts from My Contacts. You can also use the same procedure to add contacts from other lists. Or you can search for contacts individually and add them that way.
To add your contacts to the list:
-
Choose My Contacts in the left navigation menu.
To add contacts from a different list, open the list.
-
Select the contacts to add.
-
Choose Actions > Add to Working Lists.
-
Select the Contacts to Monitor list you created in Create the Working List: Contacts to Monitor.
-
Choose Save.
Monitor the Working List
Next, configure InterAction to show alerts for contacts in the Contacts to Monitor list.
-
In the Web Client, navigate to the My Alerts page. You can choose My Alerts from the left-hand menu.
-
Choose the Configure Alert Defaults link.
-
Choose the Select Contacts to Monitor link.
-
Select the check box for the Contacts to Monitor list you created in Create the Working List: Contacts to Monitor.
-
Clear the check boxes for all other contact lists on the page.
-
Choose Save.
Selecting to Monitor a Custom Working List
[A] Select the check box for the working list you created.
[B] Clear all of the other check boxes.
Print Your Alerts
You can print out the information shown on the My Alerts page.
Note: This prints all the information shown in the Alerts grid. You cannot limit the report to a sub-set of items by selecting the check boxes.
-
From the left-hand menu, choose the My Alerts link to navigate to the My Alerts page.
-
If necessary, filter the alerts to display the information you want to print.
You can specify the time frame, type of activities (and appointments) to include, and the contacts to monitor. See Filter Your Alerts by Type or Time Frame and Choose the Contacts and Items to Monitor.
-
Choose the View Printable Version link to open a printer-friendly view of the Alerts page.
-
To print the list, choose Print.
Printing Your Alerts as they are displayed on the page
[A] Adjust the filters to display the information you want included.
[B] Choose View Printable Version.
[C] Choose Print.
What is the Difference Between the View Printable Version and Reports Links on the My Alerts Page?
The My Alerts page includes two links for printing information:
- Reports
-
View Printable Version

These links provide different types of printable information and are useful in different situations.
The View Printable Version link produces a report showing the exact same information you see on the page, with the same columns. See Print Your Alerts. Also note that this prints all the information shown in the Alerts grid. You cannot limit the report to a sub-set of items by selecting the check boxes.
In contrast, the Reports link opens the Report Chooser for printing a contact report for the contacts shown on the My Alerts page. You can select to view or print any available contact report, just as you could from any other list of contacts in the Web Client.
Also, when you choose the Reports link, the Report Chooser indicates the number of contacts that will be included in the report. Note that this number may not match the number of alerts you see on the page. This is because a single contact may be displayed on the page in multiple alerts. Each contact is only included in the contact report once. For example, My Alerts might display 7 activities, but only 3 different contacts. In this case, only the three contacts are included in the report.
For details about printing contact reports, see Viewing and Printing Reports for Contacts.