Section Topics
Managing Your Contacts
To manage your contacts, choose the My Contacts link in the left-hand menu. The My Contacts page initially displays all contacts in your contact list.
Note: The page is called My Contacts if you are working on behalf of yourself. If you are working as a proxy on behalf of another user, InterAction displays the name of the user for whom you are working (for example, Bob Smith’s Contacts).
The top of the page lists common Actions section you can perform on your contacts:
- New Contact - Opens the New Contact wizard.
- New Category - Opens the New Category dialog box.
- Manage Categories - Opens the Manage Categories dialog box.
- Search My Contact List - Opens the My Contact List search in the Contact Search page.
- Show My Contacts Not in This Category - Opens the Show My Contacts Not in This Category dialog (available when viewing the contacts in a specific category.)
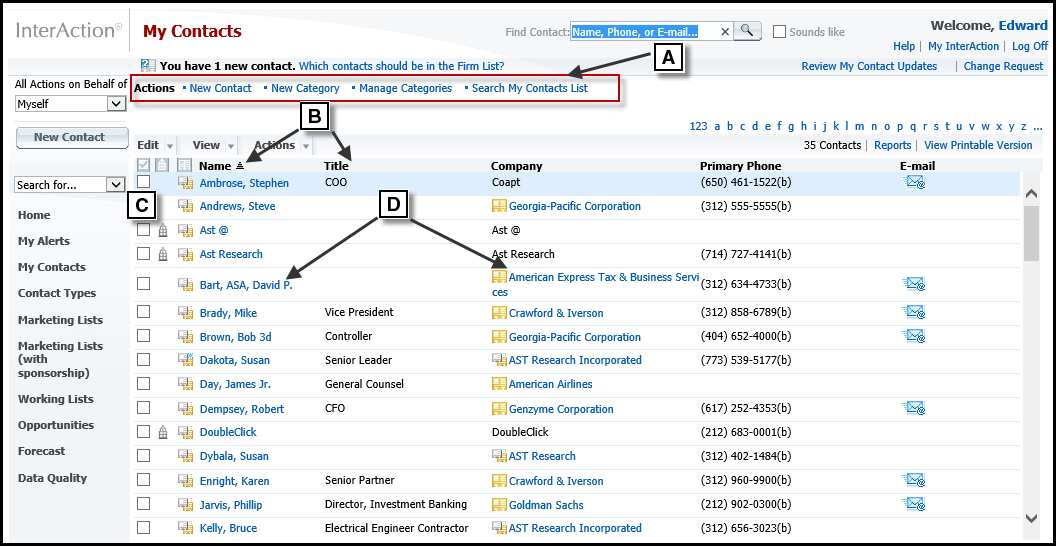
[A] Use the Actions links to create new contacts, manage your categories, and search your contact list.
[B] This indicates the column used to sort the list. Click the column headings to change the sorting.
[C] Choose this icon to view the contact’s phones and addresses.
[D] Use the person name or company name links to view the contact’s overview page.
You can print reports right from your contact list as well; choose View > Reports. For details, see Viewing and Printing Reports for Contacts.
Adding Contacts to Your List
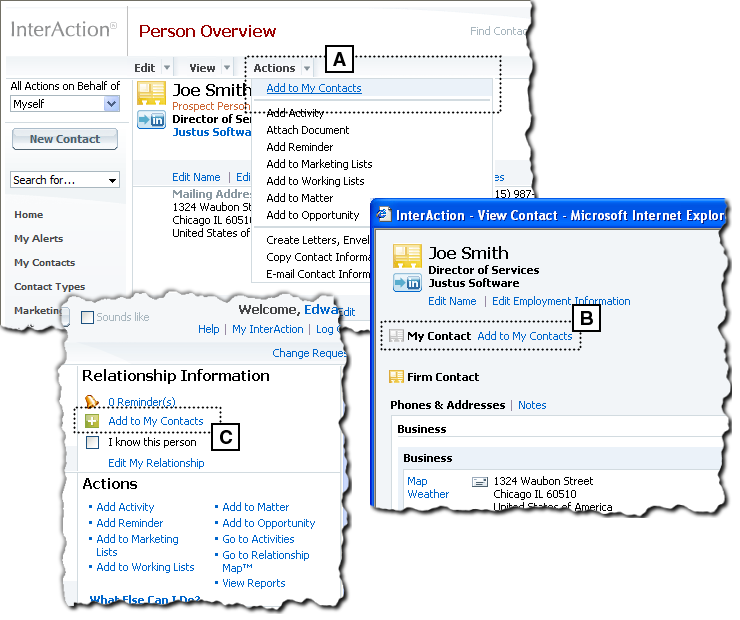
You can add existing InterAction contacts to your list from anywhere in the Web Client. Choose Actions > Add to My Contacts. You can choose this from:
- Any list of contacts (for example, a contact type list or the results of a search)
- A contact overview page
Links to add a contact to your list are also available in multiple locations:
- From a contact overview page, choose the Add to My Contacts link in the Relationship Information section of the page in the upper-right corner. See Using the Contact Overview Pages for more about using these pages.
- When viewing the phones and addresses for a contact, choose the Add to My Contacts link.
You can also right-click a contact in a list and choose Add to My Contacts.
Any time a new contact is added or edited, InterAction verifies that the contact meets the required fields established by the firm [and configured in Data Minder].
You can add contacts to your list when you create them as well. For details about creating new contacts, see Creating Contacts.
Some Ways to Add Contacts to Your List
[A] Actions menu (available from an overview page and from any list of contacts)
[B] Add to My Contacts link on the Contact Details dialog box.
[C] Add to My Contacts link on the overview page.
Removing Contacts from Your List
You can remove a contact from your list from anywhere in the Web Client. Choose Actions > Delete from My Contacts. You can choose this from:
- Any list of contacts (for example, a contact type list or the results of a search)
- A contact overview page
You can also right-click a contact in a list and choose Delete from My Contacts.
If the contact is also in the firm list, removing it only removes it from your list. This does not change the firm version of the contact.
Making a Contact Confidential
A contact that is in your list only can be made confidential. This means that only you can see the contact; a proxy working on your behalf cannot see these contacts.
Making an Existing Contact Confidential
-
Find the contact in your contact list.
-
Select the contact in the list and choose View > Contact. Alternatively, from the contact overview page for the contact, you can choose View > Contact.
-
In the lower-right corner of the View Contact dialog box, choose the Do not allow My Proxy to see this Contact link.
If the contact is in both your list and the firm’s list, you must break the connection between your version of the contact and the firm’s version. Choose the Keep My Contact Personal link, then choose Yes when prompted. You can then choose Do not allow My Proxy to see this Contact.
-
When prompted to continue, choose Yes.
-
Choose Close to close the View Contact dialog box.
Making a Contact Confidential when You Create the Contact
-
Create a new contact as described in Creating Contacts.
-
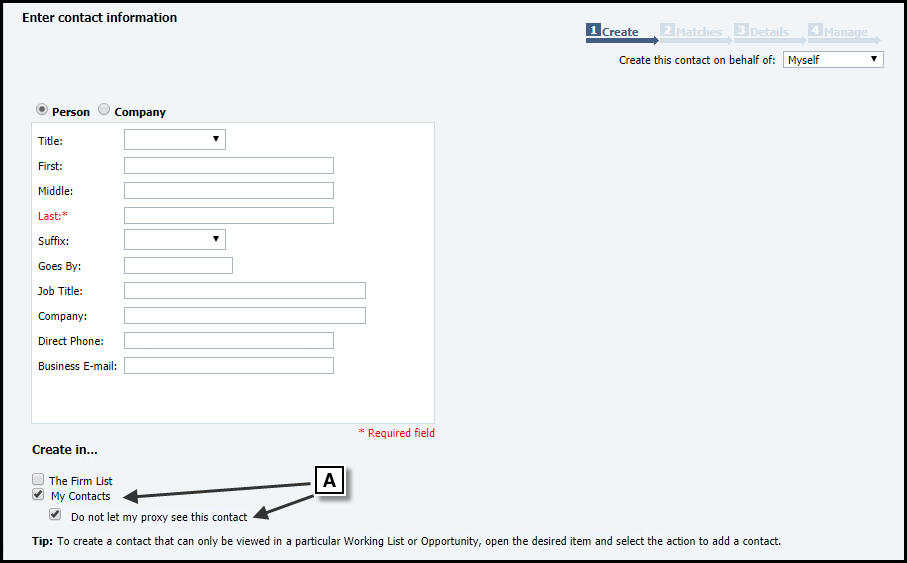
On the first panel of the new contact wizard, clear the Firm List check box.
-
Select both the My Contacts and Do not let my proxy see this contact check boxes.
-
Continue creating the contact as you normally would.
Creating a Confidential Contact
[A] Clear the Firm List check box, and select both of these check boxes to create a contact in your list and make it confidential.
In this case, your proxy won’t be able to see the contact.