Section Topics
New Activity/Appointment Report
IMPORTANT To create an activity/appointment report, you must be a report manager. See Who is a Report Manager?.
NOTE Appointment reports are available only if you have appointments turned on. For more information, see the InterAction for Personal Information Managers (PIMs) guide.
Activity/appointment reports can only be run from a list of activities or appointments in the Web Client, such as an activity search result page or the full-page view of appointments for a contact.
Do not confuse activity/appointment reports with contact reports that contain activities or appointments. Contact reports are run by selecting contacts and running a report on those contacts. For more information about contact reports that contain activities or appointments, see Activities/Appointments (on Contact Reports).
Although activity/appointment reports are run on a list of activities or appointments only, these reports do let you print the names of contacts that are involved with the activities or appointments you are reporting on. See Contact Options for Activity/Appointment Reports.
Note that all activity/appointment reports can run against both activities or appointments. If a report is specifically designed to work with one or the other, use the word Activities or Appointments in the report name.
Some examples of InterAction out-of-the-box activity/appointment reports include:
- Activity/Appointments by Date - A list of activities and appointments sorted by date.
- Activities by Originator - A list of activities grouped by team member. Includes counts by team member.
- Appointments by Type - A list of appointments grouped by activity type. Includes counts by type.
NOTE Crystal Reports is not supported as a design tool for creating activity/appointment reports. This is because activity/appointment reports can only be run in the Web Client, and Crystal Reports is only valid for the Windows Client.
See the following for more information:
- Create a New Activity/Appointment Report
- Activity/Appointment Report Data Fields
- Contact Options for Activity/Appointment Reports
Create a New Activity/Appointment Report
TIP If there is an existing report that's close to what you want to build, it is recommended to begin with the existing report and choose Save As New. See Saving a Report as New for details.
An activity/appointment report can be run from any list of activities or appointments in the Web Client. This includes:
- The results of a search for activities or appointments
- The full page view of activities or appointments for a contact
- The activities or appointment nugget on the Contact and Matters, Opportunities, and Engagements overview page
Although you cannot run activity/appointment reports in the Windows Client, you can run a contact report that includes activities and/or appointments. See New Contact Report.
To create an activity/appointment report:
-
In the Windows Client, open the Manage Report List dialog box by choosing Tools > Reports.
-
Choose Manage.
-
On the Manage Report List dialog box, change the selection in the View reports for drop-down list to Activities/Appointments.
-
Choose New.
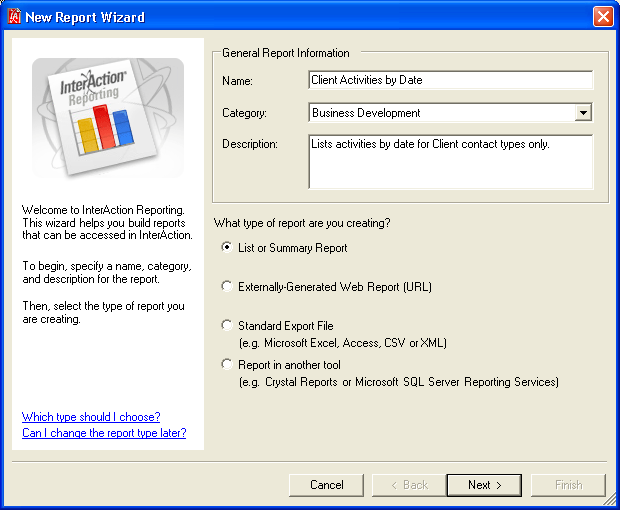
The New Report Wizard dialog box displays.

New Activity/Appointment Report - General Information
The New Report Wizard takes you through five steps to create a new activity/appointment report. Choose the Next button to move through each step the wizard. When you reach the end of the wizard, choose Finish to create the report.
The process to create a new activity report is identical to creating a new contact report - only the data field options are different.
| Step # | Step |
|---|---|
| 1 | Enter general information like report name and description. |
| 2 | Select the InterAction data fields included in the report. |
| 3 | Specify how to sort the report. |
| 4 | Select the format of the report and design the layout. |
| 5 | Set who can access the report and from where. |
Activity/Appointment Report Data Fields
When creating a new activity/appointment report, you are prompted for the data fields to include in the report. The fields that are available depend on which items are enabled or what items you have permission to view. For example, your organization may not use appointments. Therefore, the appointment fields are not available when creating reports.
NOTE When creating activity reports that contain appointments, the data field Appointment Indicator is available to add to the report layout. This field indicates if an item is an appointment and is only added to a report if you have appointments enabled.
Following is the list of all available activity/appointment data fields.
| Data Field | Description |
|---|---|
| Summary | Activity/appointment summary |
| Description | Activity/appointment description |
| Date/Start Date | Date of the activity/appointment |
| Time/Start Time | For appointments, the start time displays. For activities, the date of the activity also displays. |
| End Date |
Appointment field only. Displays the appointment end date. |
| End Time |
Appointment field only. Displays the appointment end time. |
| Location |
Appointment field only. Displays the location of the appointment. |
| Type | Activity/appointment type |
| Type Group | Activity/appointment type group |
| Originator Name | Name of the InterAction user who entered the activity/appointment, or was set as the originator |
| Originator Job Title | Job title of the originator |
| Originator Department |
Department for the originator Note: This is the actual Department field, not an additional field. |
| Originator Contact IDs | InterAction contact ID for the originator |
| Regarding Name | Shows the name of the folder or list that the activity is regarding. Specific to Matters, Opportunities, or Engagements activities. For more information, see the InterAction Matters, InterAction Opportunities, or InterAction Engagements guides. |
| Module Name | Specific to Matters, Opportunities, or Engagements activities. For more information, see the InterAction Matters, InterAction Opportunities, or InterAction Engagements guides. |
| Appointment Indicator | Only include on reports if you have appointments enabled. Indicates if an item is an appointment. Add this field to reports that include both activities and appointments. |
| Share With Clients | Indicates if the activity/appointment is available to external contacts. (The Make available to field is configured in InterAction Administrator. For more information, see the Configuring InterAction guide.) |
| Contacts | Lets you specify which contacts are included on the report. See Contact Options for Activity/Appointment Reports. |
Contact Options for Activity/Appointment Reports
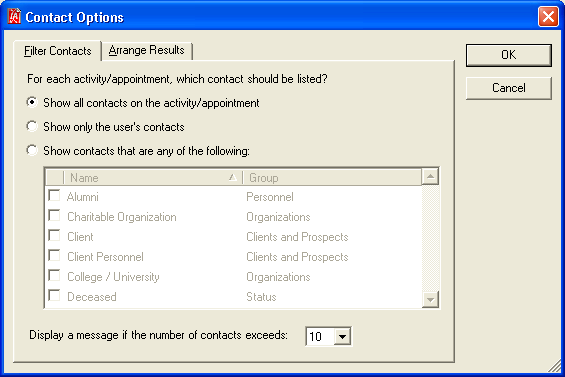
If you include the contacts on each activity as a part of the report, choose which contacts you want to show for each activity. You have three options:
- Show all contacts on the activity/appointment
- Show only the user’s contacts - limits the report to only display contacts that are in the user’s contact list
- Show contacts that are any of the following - limits the report to only display contacts of specified contact types.
For example, you may choose to only show contacts on activities that are Clients, Client Personnel, Prospects, or Prospect Personnel. If you choose this option, select the contact types to include.

Contact Options Dialog Box - Filter Contacts Tab
InterAction sets a limit for the number of contacts that can be shown for each activity. Because activities can have hundreds of contacts associated with them, it is not reasonable to always show every contact associated with an activity. By default, the contact limit is 10, but you can change this limit by choosing a different number from the Display a message if the number of contacts exceeds drop-down list. After the activity exceeds the specified limit, a message displays in the place of the contact names.
Selecting the Information to Display for Each Contact
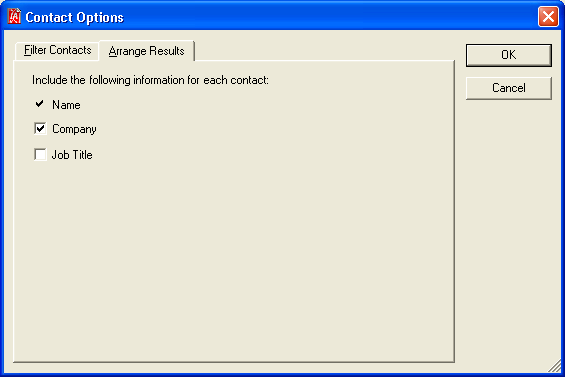
For each contact on the activity/appointment report, you can choose to include the contact’s company name or job title by selecting options in the Arrange Results tab (contact is displayed automatically).

Contact Options Dialog Box - Arrange Results Tab
Grouping Activity Reports
Group almost all activity reports that include contacts by Activity ID (called ID) when designing the report. The contacts on the activity create repeating rows which duplicate the activity if you do not group by activity ID.
The three exceptions where you do not need to group by ID are:
- You want to group by contact
- You aren’t including activities
- You want the activities duplicated
For more information on grouping in the InterAction Report Designer, see Grouping Information.
