Section Topics
Categorizing Your Contacts
You can assign Categories to your contacts. A category is a keyword or phrase that helps you easily find, sort, filter, or group contacts. You can use them to define “personal lists” of contacts.
For example, suppose you want to invite a subset of your contacts to your annual golf event. You can create category called Golf Event Attendee, and then apply that category to the appropriate contacts.
See the following topics:
- Creating a New Category
- Editing or Deleting a Category
- Using Categories with a PDA that Allows One Category Per Contact
- Adding Contacts to Categories
- Editing the Categories Assigned to an Individual Contact
You can use your contact categories to find contacts in your contact list. See Filtering and Searching Your Contacts.
Creating a New Category
-
Choose the New Category link from the My Contacts Actions area.
Alternatively, choose the Manage Categories link from the Actions area to see all categories, then choose New Category.
-
Enter the Category Name of the category.
-
The category name can be a maximum of 254 characters.
-
You must enter at least one character to save the category.
-
Category names must be unique.
-
-
Choose the Save button.
Since categories also synchronize with Microsoft Outlook categories, the same rules apply when bringing categories over from one of those products. Category names entered from your PIM or InterAction must be unique.
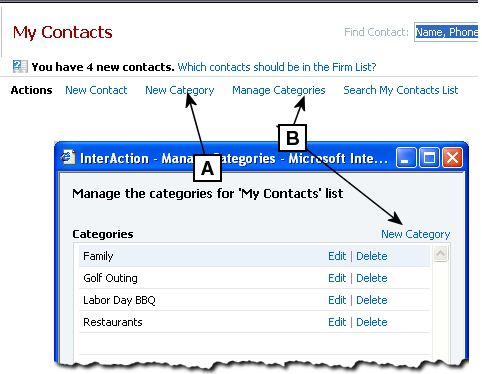
Creating or Managing Categories
[A] Choose New Category from the Actions area.
[B] Alternatively, choose Manage Categories to see the list of all categories you have defined. Then, choose New Category.
Editing or Deleting a Category
You edit and delete categories from the Manage Categories dialog box. Links for editing and deleting categories appear to the right of each category name.
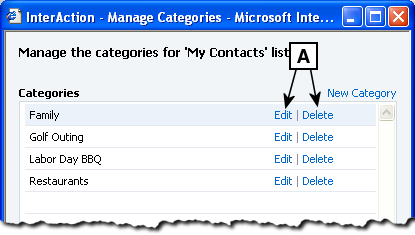
Manage Categories - Edit & Delete Links
[A] Edit and Delete links appear next to each category. Use Edit to change the name of the category; use Delete to remove the category completely.
Edit a Category
-
Choose the Manage Categories action link from My Contacts.
-
Find the category to edit and choose the Edit link to the right of the category name. InterAction displays the Edit Category dialog box.
-
Make any changes to the name of the category and choose Save.
-
Choose Close to close the Manage Categories dialog box.
Delete a Category
-
Choose the Manage Categories action link from My Contacts.
-
Find the category to delete and choose the Delete link to the right of the category name.
-
When prompted to confirm the delete, choose Yes.
-
InterAction removes the category from all contacts currently assigned the category.
-
Choose the Close button to close the Manage Categories dialog box.
Using Categories with a PDA that Allows One Category Per Contact
Some hand-held Contact Management software programs allow each contact to be assigned to only one category. InterAction allows any number of categories for each contact, as does Microsoft Outlook.
If you are using a PDA with a single-category limit, you need to know how your conduit handles contacts with multiple categories when synchronizing your device with your PIM. Some utilities for synchronizing these applications always synchronize the contact's first category with the PDA and ignore any others. In this case, you can choose the category you want to synchronize with the PDA by making it first in the list of categories assigned to the contact.
By default, InterAction assigns categories to a contact in alphabetical order. InterAction provides the “PDA Category” option that lets you override this and specifically choose the category that will be “first in the list” and, therefore, synchronized with your PDA. You need to select whether or not you want to use this option in your contacts.
- At the bottom of the Manage Categories dialog box, choose the link read this at the end of the message “If you synchronize your contacts with a PDA that supports one category, read this.”
- Decide if you want to update your settings to control the first category in a list.
- At the bottom of this window, select Yes to choose the first category in the list for a specific contact on the Add and Edit Contact Categories pages. For more details, see Adding Contacts to Categories and Editing the Categories Assigned to an Individual Contact.
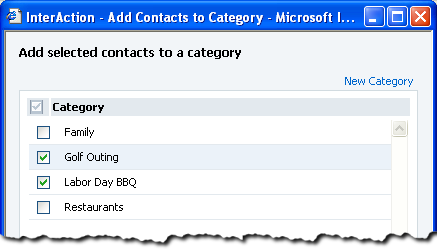
Adding Contacts to Categories
You can add multiple contacts to a category at the same time.
-
Select one or more contacts from My Contacts. To select multiple contacts, use the check boxes to the left of the name.
-
Choose Actions > Add to Category. InterAction displays the Add to Category dialog box.
-
Select the boxes to the left of the category names that you wish to apply.
-
The categories displayed include all of the available categories that you have previously added.
-
If you have entered a category from another contact manager that synchronizes with InterAction and that category has been applied to at least one contact, then InterAction displays that category when adding categories to other contacts.
-
The categories are displayed alphabetically in ascending order.
-
-
Choose the Save button.
Editing the Categories Assigned to an Individual Contact
-
From the My Contacts page, select the contact and choose Edit > Edit Contact Categories.
Alternatively, you can right-click on the contact and choose Edit Contact Categories.
-
Edit the set of categories for the contact by selecting and clearing check boxes to the left of the category names.
-
If you chose to indicate the use of your first category, then you can select the radio button to the right of the category that you wish to synchronize correctly with your PDA. See Using Categories with a PDA that Allows One Category Per Contact for more details.
-
Choose the Save button when finished with edits.
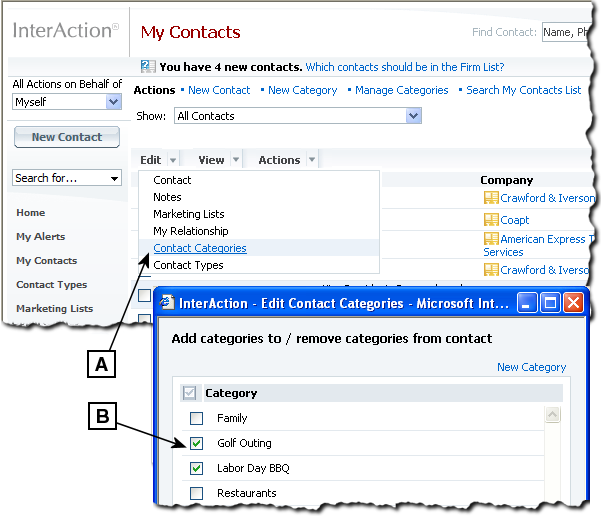
Editing the Categories for a Contact
[A] Select the contact and choose Edit > Contact Categories. You can also choose this option by right-clicking on the contact.
[B] Select or clear the check boxes next to the category names to change the categories that apply to the contact.