Section Topics
Supplied Export Extensions
Several export extensions are included with Automated Export. The export extensions included with Automated Export are described below with instructions on how to use each.
The following Export Extensions are provided with InterAction Automated Export:
- Blank Field Filler
- CSV Copier
- CSV to Word Table Export
- If/Then/Else Extension
- Multi Value Field Expander
- Salutation Generator
- Sponsor List Maker
- State Field Expander
- Upper Case Extension
- VFAFE Field Splitter
Blank Field Filler
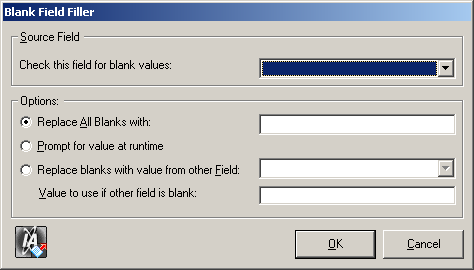
The Blank Field Filler finds blank values in a field you specify and enters a value to fill that field.
You are given three options of how you want to fill the blank field:
- You can enter standard text with which Automated Export will fill all of the blank fields. For example, assume you are creating a mail merge including name, phone number and email address data. You can configure the Blank Field Filler export extension to find any record without an email address and fill the email address field for that contact with the text Not Available.
- You can choose to enter a value when the export is running. For example, you can configure the Blank Field Filler export extension to find any contact without an email address and prompt for a value to enter at runtime. When you run the mail merge, the extension will search for blanks in the email address field and displays a dialog box where you can enter Not Available.
- You can choose to get the data from another field being exported. As a backup, you can enter a standard line of text to fill the blank field if your other field is also blank. For example, you can configure the Blank Field Filler export extension to find any record without a home phone number and fill the home phone number field with the business phone number for that contact. If for some reason the contact has a blank in the business phone number field, you can set the Blank Field Filler to fill the phone number field with set text such as Not Available.
NOTE If you choose to fill a blank field with data from another field, make sure that both fields are being exported.
Use the Blank Field Filler Extension
-
Select a form and choose Edit.
-
Choose Add to view the Export Extension Selection dialog box.
-
Select Blank Field Filler (IAEE.FillBlank) and choose Add.
-
On the Blank Field Filler dialog box, select the field you would like to check for blank values.
-
Select how you would like to fill that field and do one of the following:
-
If you choose Replace all Blanks With, enter the text to replace blank fields with.
-
If you choose Replace blanks with Value from other field, select the other field to take values from and enter the text to replace blank fields with if the other field is also blank.
-
-
Choose OK to return to add the Blank Field Filler Extension to the Configured Export Extensions list.
CSV Copier
Automated Export requires the CSV file used as the data source to be located in the Data directory on the user’s workstation. You may want this file to be located in another directory on the workstation. To also copy the CSV file to another location, use this export extension.
Use the CSV Copier Export Extension
-
Select a form and choose Edit.
-
Choose Add to view the Export Extension Selection dialog box.
-
Select CSV Copier and choose Add.
-
Navigate to the destination of the file and choose OK.
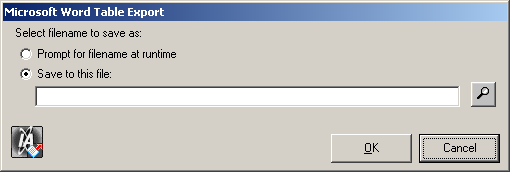
CSV to Word Table Export
The CSV to Word Table extension exports the data from the CSV file to a Microsoft Word table. Because this extension will export all data in the export data file to a table, it should be configured to occur after all other extensions. This will ensure that any changes made to the data by another export extension will be included in the table.
You may want to use this extension if you would like to keep a record of the contacts to which you sent a letter. Simply run this extension after the other extensions and a Word table will be produced containing all of the exported data.
CAUTION This extension will automatically overwrite anything currently in the document and save it. Do not use a document containing important information when using this extension!
Use the CSV to Word Table Export Extension
-
Select a form and choose Edit.
-
Choose Add to view the Export Extension Selection dialog box.
-
Select CSV to Word Table Export (IAEE.WordExp) and choose Add.
-
Do one of the following:
-
To export the table into a new Word document that you can save and name after the export, select Prompt for filename at runtime.
-
To export the table into an existing Word document, select Save to this File and enter the file name.
You must enter the full path and filename or choose the Lookup button (
 ) to browse for the file.
 -
-
Choose OK to add the CSV to Word Table Export Extension to the Configured Export Extensions list.
If/Then/Else Extension
The If/Then/Else extension is a versatile extension you can use to accomplish many functions. You can specify criteria to search for in the If section, specify actions to take in the Then section, and specify what to do with data that did not meet the If criteria in the Else section. You can do any of the following with the If/Then/Else extensions:
- Delete a record from the export - For example, you can delete a record if no mailing address is defined.
NOTE “Deleting” records refers only to removing records from the export. You cannot delete contact data from InterAction using Automated Export.
- Create a new field and set a value to it - For example, if you have exported both User Salutations and Default Salutations for users, you can create a new field called Salutation and you can set it to include a salutation.
- Set a value to an existing field - For example, if you have already created a salutation field, you can populate it with data from another field, such as Default Salutation.
- Replace a value in an existing field - For example, you can replace the name in the Name field with the information from the Salutation field.
- Prefix a field with a value - For example, you can add a title such as “Mr. or Mrs.” before the name in the Name field.
- Suffix a field with a value - For example, you can add “and family” to each contact’s name.
When you use the If/Then/Else export extension, define what you want to do in terms of an If/Then/Else statement. For example, you could state if the Primary Sponsor is Linda Jones then leave the record alone. If it is not Linda Jones, delete the record. You will need to have clearly defined if, then, and else actions.
Selecting the “If” Data
The If statement you create determines the conditions that exist to make a change in the record. For example, assume again that you want to export contacts that have Linda Jones as a primary sponsor. The If in your If/Then/Else statement determines that you want to find the contacts that have Linda Jones as a sponsor, but does not determine what you want to do with those contacts.

If Tab
[A] Select the field on which you want to base your If statement. This field must be included in the export instructions.
[B] Select whether you want to compare the field to a specific value (text or number) or another exported field. If it is a specific value, such as a user name, enter the name. If it is another field being exported, select the field from the list.
[C] Select the comparison part of your If statement. Numeric comparisons only work with Numeric fields. Is Blank works with both Numeric and Text fields.
Selecting the “Then” Data
After you have selected what conditions you are looking for in the If section, you must select what you want to do with the contacts in the Then section. To continue with the example, your then statement will determine what to do with the contacts that have Linda Jones as a sponsor. In this case, you will choose to leave those records as is. This instructs Automated Export to export all contacts that have Linda Jones as a sponsor, but it does not determine what is done with all contacts that do not have Linda Jones as a sponsor.
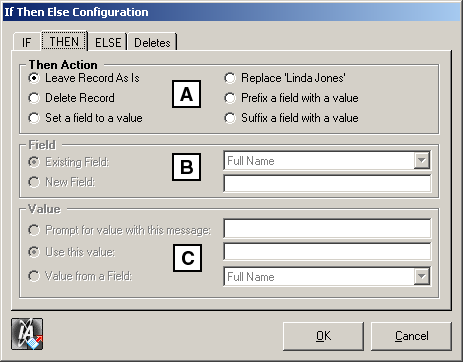
Then Tab
[A] Select the Then Action to perform based on your If statement. If you select to leave the record as is or to delete the record, you do not need to alter the other sections of this tab.
[B] Select the field on which to perform the action. Note that this does not have to be the same field you chose in the If section of the extension.
[C] Select what value to use with your Then Action. You can be prompted when you run the export, enter a value, or select another exported field from which to get the value.
Selecting the “Else” Data
After you have selected what to do based on the conditions you entered in the If section, you have to decide what to do with the rest of the contacts. The Else tab defaults to Leave Record As Is because you may not need to specify any changes to the other contacts. In the example, you need to define an Else section because you do not want contacts that do not have Linda Jones as a sponsor to be exported. In this case, your else action would be Delete records.
The Then and Else tabs are identical in design.
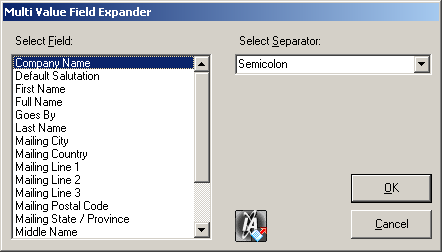
Multi Value Field Expander
The Multi Value Field Expander will read a field with multiple entries and create several records based on the number of entries in the multiple-value field.
For example, assume you want to create a merge document that includes the committees each member of your firm serves. You would export the group of contacts, including the multiple-value field Firm Committees. A contact with three committees would be separated out as shown below:

Multiple Value Fields Divided Using the Multi Value Field Expander
All entries in multiple-value fields must be separated by a semi-colon, comma, tab, line feed, or space. In InterAction, all multiple-value fields default to being separated by semi-colons.
Use the Multi Value Field Expander Extension
NOTE Make sure that the field with multiple values is included in your export instructions.
-
Select a form and choose Edit.
-
Choose Add to view the Export Extension Selection dialog box.
-
Select Multi Value Field eXpander [MVFX] (IAEE.MVFX) from the list of available export extensions and choose Add.
-
In the Multi Value Field Expander dialog box, select the field to expand, and select the value separator.
-
Choose OK to add the Multi-Value Field Expander Extension to the Export Extensions list.
Salutation Generator
The Salutation Generator can create customized salutations on form letters when you run mail merges.
NOTE To use the Salutation Generator Export Extension with the salutations, you must export the Salutations as Additional Fields.
The Salutation Generator requires the following fields to be exported:
- Default Salutation - You must export the Default Salutation additional field. You cannot use the export Salutation functionality built in to InterAction
- User Salutation - You must export the User Salutation additional field. You cannot use the export Salutation functionality built in to InterAction.
- Primary Sponsor (optional)
- Title
- First Name
- Last Name
NOTE The Salutation Generator Export Extension allows you to include either a user salutation or default salutation. If you want to include both on a report, you can use InterAction reports. See Salutations for more information.
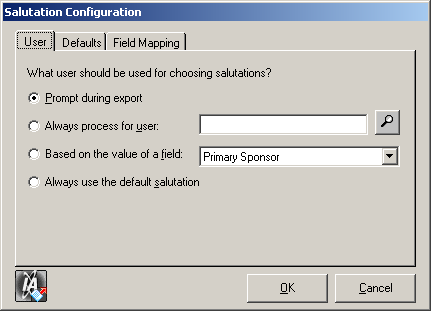
Selecting the User
When exporting salutations, you choose if you would like to export the user salutation or default salutation.
The user salutation is determined by the name of the user in InterAction that created the user salutation. There are three ways you can choose a user for processing salutations:
- Prompt for a user during export. A dialog box asks you to enter the user choosing the salutations during the export.
- Always process for a specific user. You enter the name of a specific user to always choose the salutations during an export.
- Based on a value from another field. You select another field in the export, such as primary sponsor, to determine which users choose the salutations.
Use the Salutation Generator
-
Select a form and choose Edit.
-
Choose Add to view the Export Extension Selection dialog box.
-
Select Salutation Generator (IAEE.Salutation) from the Forms list and choose Add.
-
If you are exporting user salutations, choose your options on the User tab of the Salutation Configuration dialog box. Select what user should be used for choosing salutations.
-
If you are exporting default salutations, choose your options on the Defaults tab of the Salutation Configuration dialog box. Select the default layout for the salutation if you do not have a name entered in the Default Salutation field. If you use the Default Salutation additional field provided with InterAction, you will always have a default salutation defined in the Default Salutation field.
-
On the Field Mapping tab, select the fields to associate with each name used in the Salutation Generator. You must define all name and salutation fields.
-
Choose OK to add the Salutation Generator to the Configured Export Extensions list.
Sponsor List Maker
NOTE This feature is already built into export. When adding Selected or Current Marketing List/Working List fields to your export instructions, you can choose Edit to specify how sponsors should display in the export. For more information, see Including Sponsorship Information on a Current List.
The Sponsor List Maker is an extended version of the Multi Value Field Expander. First, it expands the multiple value field Other Sponsor, then it combines the Primary Sponsor and Other Sponsor field into one Sponsor Field.
For example, assume you wanted to create a spreadsheet that tracks the number of contacts for which each InterAction user is the sponsor. Because the Other Sponsor field is a multiple value field and sponsor information is also stored in the Primary Sponsor field, it would be very difficult to use the information directly from InterAction. However, if you use the Sponsor list maker, each user listed in the Other Sponsor field is listed separately and the Primary Sponsor is added to a new field called Sponsor.
Use the Sponsor List Maker
-
Select a form and choose Edit.
-
Choose Add to view the Export Extension Selection dialog box.
-
Select Sponsor List Maker (IAEE.Sponsor) from the list of available export extensions and choose Add.
-
In the Sponsor Field Configuration dialog box, select which export fields are primary and optional sponsor fields, and select the value separator.
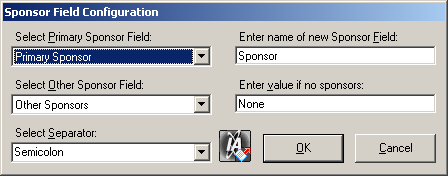
-
Enter the name of the new sponsor field and what to enter in the field if a contact has no sponsors.
-
Choose OK to add the Sponsor List Maker to the Export Extensions list.
State Field Expander
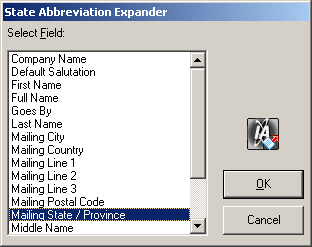
The State Field Expander is a simple extension that changes the two-letter abbreviation for a state into the full name. For example, it would change IL to Illinois.
When you use the state field expander, you must export each field of the address separately. When you create your export instructions, select each field of the address instead of the inclusive “mailing address.” If you do not, the State Field Expander will not work correctly.
TIP The State Field expander will only recognize the 50 states of the United States of America.
Use the State Field Expander
NOTE This feature is already built into export. When you add state fields to your export instructions, you have the choice of adding state abbreviations or the full state name.
-
Select a form and choose Edit.
-
Choose Add to view the Export Extension Selection dialog box.
-
Select State Field Expander (IAEE.StEXP) from the Forms list and choose Add.
-
In the State Field Expander dialog box, select Mailing State/Province from the field list and choose OK to add the State Field Expander Extension to the Configured Export Extensions list.
Upper Case Extension
When creating labels, you may want to have all fields be upper case in order to meet postal addressing standards. The Convert Field to Upper Case export extension allows you to automatically convert a field to upper case when performing an advanced report or automated export.
IMPORTANT If you choose to use the Convert Field to Upper Case export extension on individual address fields and export them separately, you cannot use InterAction’s international mailing rules.
When configuring your export extension, ensure that the field you want converted to upper case is not grouped with other fields. For example, if you only want the City of an address converted to upper case, you should export each address item separately instead of as a part of the address field group.
Use Convert Field to Upper Case Extension
-
Select a form and choose Edit.
-
Choose Add to view the Export Extension Selection dialog box.
-
When you configure export extensions, choose Upper Case Extension (IAEE.UCASE) and choose Add.

-
Select the field you want to make upper case and choose OK.
-
Finish configuring the automated export or advanced report.
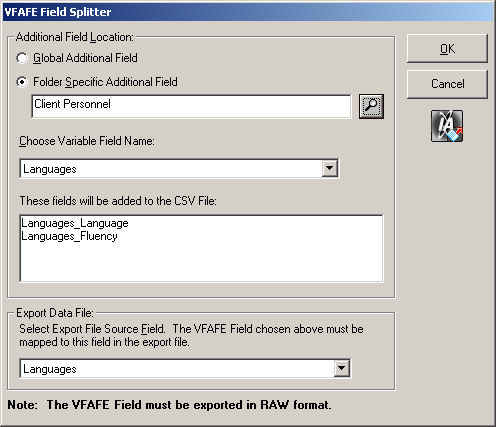
VFAFE Field Splitter
The VFAFE Field Splitter export extension can be used to split out the fields exported in an additional field that uses the variable field additional field extension. This is very useful in creating reports and exports where you want to group by a value in the additional field or where you want to format the values in the additional field in a different manner.
For example, assume you want to create a report that groups all firm personnel by the college or university they attended. Your firm maintains this information in an additional field that uses the variable field AFE. If you just exported the additional field, you would have to write special formulas to read just the school’s name and none of the other fields that are included in the additional field.
The export extension reads the additional field and splits the sub-fields out into separate fields in the export file. Therefore, an additional field that exported like the following:
Last Name,First Name,Language
Roberts,Edward,~^1English~^Expert~^
Would change to the following after it is altered by the export extension:
Last Name,First Name,Language_Language,Language_Fluency
Roberts,Edward,English,Expert
NOTE The Full “Language” additional field would still be located in the file. In the example, the actual fields would be Last Name, First Name, Language_Language and Language_Fluency.
The sub-fields of the additional field that used the variable field AFE are renamed to the name of the original additional field, an underscore (_) and the name of the sub-section. When you create your report or mail merge, you would use these field names instead of the name of the actual additional field that uses the VFAFE.
Use Variable Field Additional Field Extension Splitter
-
Select a form and choose Edit.
-
Choose Add to view the Export Extension Selection dialog box.
-
When you configure export extensions, choose VFAFE Field Splitter (IAEE.vfafeEXP) and choose Add.
-
Select the Additional Field Location in InterAction.
Use the Browse button to find a different folder.
-
Select the Variable Field Name and review the fields that will be added to the export data file (*.csv).
-
If the additional field was renamed in the export data file, select the correct name.
-
When finished, choose OK.
-
Finish configuring the automated export or advanced report.
Multiple-Value Additional Fields that use the Variable Field Additional Field Expander
When using this export extension with a multiple-value additional field, you must do the following:
- Do not include the Secondary Field. The information included in the Relationship Field is already included in the raw data string. Including the Relationship Field only adds the same information to the string twice, once raw and once in parentheses.
- Expand the multiple values in the export instructions. The VFAFE Field Splitter only splits the first value exported. You must configure the Multi-Value field expander to run before the VFAFE splitter.