Section Topics
Setting the Page Size and Layout
See the following topics:
- Defining the Page Size and Paper Orientation
- Changing the Width and Height of Report Sections
- Growing and Shrinking Sections to Fit Data
- Configuring a Report to Use Columns
- Adding Page Numbers to a Report
- Managing Page Breaks
- Managing Blank Spaces and No Data
Defining the Page Size and Paper Orientation
When you create a new report, the default margins are one inch all around. The default paper size and orientation are based on the printer default. You can change the margins, paper size and orientation.
-
Choose File > Page Setup.
-
In the Page Setup view of the Report Settings dialog box, set the margins you want to use. Margins are measured in inches.
-
In the Printer Settings view of the Report Settings dialog box, set the Paper Size and Orientation.
Paper size is measured in inches, however the Paper Size drop-down list shows measurements in millimeters for certain papers such as A4.
IMPORTANT Settings can vary from printer to printer. Always test your report on the printer from which it will most often be printed to ensure it prints correctly.
Changing the Width and Height of Report Sections
You can change the width and height of the sections in your report or Overview report section. The height of each section can be modified individually. However, you cannot change the width of individual sections; you can only change the width of the entire report. Changing the report width does not change the margins or page size of the report (change these settings by choosing File > Page Setup).
-
To change the width of the sections, place the pointer at the right edge of the section (you may have to scroll horizontally to reach the right edge of the section). Click and drag the pointer left or right to expand or shrink the width of the sections.
-
To change the height of a section, do any of the following:
-
Place the pointer at the bottom edge of the section. Click and drag the pointer up or down to expand or shrink the height of the section.
-
Use the vertical ruler thumb
 and drag it up or down to adjust the height.
 -
Double-click on the section thumb to quickly set the section height to precisely fit its contents.
-
Growing and Shrinking Sections to Fit Data
When you design your report, set each section to the size needed to contain the fields and controls you add to the report. Initially, the report detail section of a new report is large. If you only add three fields to the section, your report includes a large amount of white space. Instead of having so much extra white space, reduce the size of the detail section to fit the fields you have included.
While you set the section to fit the size of the field, remember that contacts can have varying amounts of data. A good example of this is the Contact List - All Phones and Addresses report. One contact may have ten phone numbers while another contact has only three. Similarly, one contact on this report may have an address that contains five lines while another contact's address may only contain three lines.
To accommodate the growing and shrinking of fields within a section, you can set the whole section to grow and shrink as needed. Initially, all sections are automatically set to grow with contents, but they are not set to automatically shrink to fit the contents of the section.
To remove extra space from a section when fields are reduced in size, do the following:
In the properties area for the section, set CanShrink to True.
NOTE Setting CanShrink to True does not remove the space placed between controls. That space cannot be automatically removed.
To expand the space for a section when fields in the section are expanded in size, do the following:
In the properties for the section, set CanGrow to True.
Another InterAction out-of-the-box report that uses CanShrink and CanGrow is the Relationship List report. The relationship description field grows and shrinks according to the amount of data it contains.
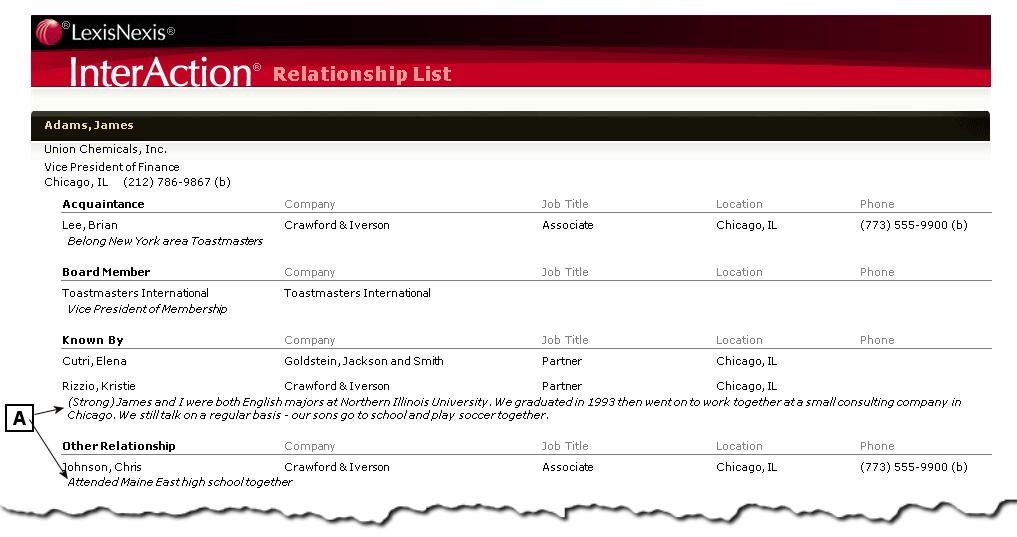
Relationship List Report
[A] The relationship description field grows and shrinks according to the amount of data in the field.
InterAction Reports that Use CanGrow or CanShrink
Most InterAction out-of-the-box reports contain fields that are set to CanGrow and/or CanShrink. Following are a few examples.
| Report | Field Set to Grow or Shrink |
|---|---|
| Contact List - Firm Phones and Addresses | Most fields |
| Key Relationships | Relationship Description |
Configuring a Report to Use Columns
Some reports look best when displayed in newsletter-style columns. Information in newsletter-style columns flows from one column to the next on the same page. An example provided with InterAction is the out-of-the-box Contact list (3 column) - Primary Phones and Addresses report.

Contact List (3 column): Primary Phones and Addresses Report
To create a columnar report:
-
Select the detail section of the report layout.
-
In the properties area for the detail section, enter the number of columns you want to display in ColumnCount property under Data.
-
Set ColumnDirection in Behavior to DownAcross or Across Down.
If the report includes one or more groups, also consider the group headers and footers when setting the number of columns displayed. The following controls are available when viewing the properties for either the group header or group footer:
- ColumnLayout - This determines if the header or footer follows the same column layout as you have defined for the detail section. If this is set to True, it follows the same layout. If this is set to False, it results in only one column per page for each detail section.
- ColumnGroupKeepTogether - This determines if the group is split across columns as needed, if the first detail of the group is kept with the header, or if the entire group is kept in the same column.
- NewColumn - This determines if a group is always started at the top of a column or if it begins directly after the previous group.
These settings are similar to the page break settings available for reports. For additional details about page breaks, see Managing Page Breaks.
Adding Page Numbers to a Report
TIP It is easier to copy page numbers from another report and paste them into your report. See Copying Controls or Fields from Other Reports.
The following procedure adds page numbers to the report in the “Page 4 of 15” format. All InterAction out-of-the-box reports use the page format “Page 4/15.”
There are four components to this type of page number format: two labels, and two formatted textboxes.
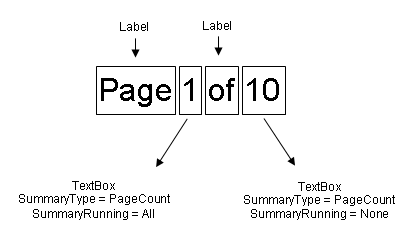
Page Number Design
In the InterAction Report Designer, add the page numbers to the PageFooter section of the report so that they appear on every page of the report.
-
Add a Label to the PageFooter section of the report.
For details on adding and sizing labels, see Adding Labels to a Report and Moving and Sizing Controls.
-
In the properties area for the label, enter Page in the Text property under Data.
-
Add a TextBox control to the right of the label you added in the PageFooter section of the report.
-
In the properties for the textbox, select the following under Summary:
-
PageCount in the SummaryType property
-
All in the SummaryRunning property
-
-
Add another Label to the right of the textbox in the PageFooter section of the report.
-
In the properties for the label, enter of or / in the Text property under Data.
-
Add another TextBox to the right of the label you added in the PageFooter section of the report.
-
In the properties for the textbox, select the following under Summary:
-
PageCount in the SummaryType property
-
None in the SummaryRunning property
-
Managing Page Breaks
When a page of a report is filled with information, InterAction automatically inserts a page break and start a new page. To force a page break at a specific location, insert a manual page break.
You set pagination options to control where automatic page breaks occur. For example, you can prevent a page break from occurring within a group or a page break from falling between a heading and the detail for a group.
Prevent Data From Splitting Across Pages
Typically, a long section splits across two or more pages as needed based on the paper size and orientation you have defined for the report. You can use the KeepTogether property for a section to specify that the section prints in its entirety on the same page.
You have two options to control how data is split across pages in a section:
- True - the section prints on the same page without any page breaks. If the section is too large for the current page, or to fit fully on the next page, the KeepTogether property is ignored.
- False - the section splits across two or more pages.
If you want to keep an entire group together, including the group header, detail, and footer, see “Prevent a Group from Splitting Across Pages,” later.
Set a section to Keep Together:
-
Select the section in the report design.
-
In the properties area for the section, select True in the KeepTogether property under Behavior.
Prevent a Group from Splitting Across Pages
A group encompasses the group header, the group footer, the detail section, and any subgroups within that group. Unlike KeepTogether, which only affects the currently selected section, the GroupKeepTogether property can be used to keep all of the sections of a group together.
You have three options when determining how a group displays:
- None - the group is split across pages as needed for the paper size and orientation selected.
- All - the entire group is included on the same page. If the complete group does not fit on a single page, it splits across two or more pages.
- FirstDetail - this option prevents any widowed group header sections. The group header always prints with at least one detail section.
Set a group to Keep Together:
-
Select the GroupHeader section heading in the report layout.
-
In the properties area, choose one of the following in the GroupKeepTogether property under Behavior:
-
None
-
All
-
FirstDetail
-
Set a Page Break Before or After a Group
You may choose to always break before the beginning of a group or always break after the end of a group. A good example of always breaking after a group is the Contacts by Sponsors report.
You can define page breaks either before or after the group header or group footer.
Add a page break before a group:
-
Select the GroupHeader section heading in the report design.
-
In the properties area for the group header, select Before in the NewPage property under Data.
Add a page break after a group:
- Select the GroupFooter in the report design.
- In the properties area for the group footer, select After in the NewPage property under Behavior.
Insert a manual page break:
- From the toolbox, choose PageBreak.
- Move the mouse pointer to the section where you want to add the page break; the mouse pointer changes to a cross hair.
- Click and drag the mouse to size the rubber band to the width of the area you want to break.
Managing Blank Spaces and No Data
It is inevitable when you run a report that at least one contact has no data in one or more fields. The way to handle this situation varies depending on the overall layout and purpose of the report. Look at the following two out-of-the-box reports provided with InterAction:
- Contact List - All Phones and Addresses - when an address, phone, or electronic address is not found, the space for that field is completely removed from the report. This improves the overall appearance of the report because the user is not presented with several labels without data.
- Key Relationships - when a contact has no key relationships, “No key relationships found” displays instead of displaying just a blank section. This improves the report because it reassures the user that nothing has been accidentally cut off the report.
All controls and sections can automatically grow or shrink to fit the information you include in the report. For details on growing and shrinking controls and fields, see Growing and Shrinking Sections to Fit Data.
In addition to hiding fields if they are blank, you can also either display a message if there is no data, or you can remove a label if a field is blank.
Display a Message if There is No Data
For some reports, like the Key Relationships report, you can display a message instead of leaving fields blank if a contact has no data. You can define any message you want to display.
Create a calculated field like the following example (see Calculated Fields). Then select the calculated field in the DataField property under the Data section.
=Relationship is System.String ? Relationship : "No key relationships found" ;
This statement says that if the field Relationship has a value, then use it. If it does not have a value, then display the message No key relationships found.
In your use, replace Relationship with the name of the field you want to use. Replace No key relationships found with the text you want to display.
NOTE Because the System.String script item can only be used on text fields, this formula cannot be used on a numeric field.
TIP An easier way to display a message if no data is found is to create a calculated field and use the DefaultValue and Formula fields. For details, see Using Calculated Fields to Display a Message if a Field Has No Value.
Removing a Label if a Field is Blank
For some reports, like the Contact Activities report, hide the label for a field if the field is blank.
Create a calculated field like the following example (see Calculated Fields). In the properties for the label, select the calculated field in the DataField property under the Data section.
= Type is System.String ? "| " + Originator_Name + " " + Originator_Job_Title + " " + Originator_Primary_Phone : null;
This statement says that if the Type field has data, then include the originator name, job title, and primary phone in the secondary line of the report. Otherwise replace the label with a blank space.
In your use, replace Type with the field you want to check for a value and replace the remaining fields with the name of the label you want to set as blank.