Section Topics
Label and Envelope Report Layouts
The report layout specifies what InterAction data appears on a label or envelope and how that information is formatted. Commonly-used report layouts have already been defined for you in InterAction.
Report Layouts Included with InterAction
InterAction ships with sample label and envelope report layouts. These can be used as is, or customized.
Label Report Layouts
Choose Tools > Labels to access label report layouts. Each out-of-the-box report layout uses an out-of-the-box page style (for example, the Address Labels report layout uses the Avery Label 5662 page style).
- Address Labels uses Avery® Label 5662 or compatible and prints Name, Company, and Mailing Address on each label.
- Business Card uses Avery® Label 5371 or compatible and includes Name, Position, Company, and Business Addresses, Phones and Electronic Addresses.
- File Folder - Name and Company uses Avery® Label 5366 or compatible and contains Name and Company information.
- Return Address Labels - Full Sheet uses Avery® 5267 or compatible and prints a full sheet of Return Address labels for each contact.
- Rotary Card uses Avery® Label 5385 or compatible and prints Name, Position, Company, and Business Addresses, Phones, and Electronic Addresses.
- Shipping Labels uses Avery® Label 5663 or compatible and prints Name, Company, and Mailing Address for each contact.
- Shipping Labels with Return Address uses Avery® Label 5663 or compatible and prints your company’s Return Address along with your contact’s Name, Company, and Mailing Address for each contact.
Envelope Report Layouts
Choose Tools > Envelopes to access envelope report layouts.
TIP Any sample reports that include “your company’s return address” need to be updated to replace the “dummy” address with your company’s actual return address.
- Company Envelope prints Name, Company, and Default Address for each contact on a Standard Size 10 Envelope.
- Company Envelope with Return Address prints Name, Company, and Mailing Address for each contact on a Standard Size 10 Envelope. Your company’s return address is printed in the upper left-hand corner of the envelope.
- Confidential Company Envelope prints Name, Company, and Mailing Address for each contact on a Standard Size 10 Envelope. “Confidential” appears in bold letters in the lower left-hand corner of the envelope.
- Confidential Company Envelope with Return Address prints Name, Company, and Mailing Address for each contact on a Standard Size 10 Envelope. Your company’s return address is printed in the upper left-hand corner and “Confidential” appears in bold letters in the lower left-hand corner of the envelope.
Creating Label and Envelope Report Layouts
Report layouts determine the content of your envelope or label. When creating a report layout, you are selecting data from InterAction and formatting it accordingly. For example, for a shipping label you may want to include Name, Company, and Mailing address.
Create a Label Report Layout
NOTE When creating a label report layout, you are prompted for a label style. Label styles are created by your system administrator in InterAction Administrator. For more information, see Label Page Styles.
-
If you are creating a report layout that will be distributed throughout the organization (a system report), log on to the InterAction Windows Client as the System Administrator User.
-
Choose Tools > Labels to open the Print Report dialog box.
-
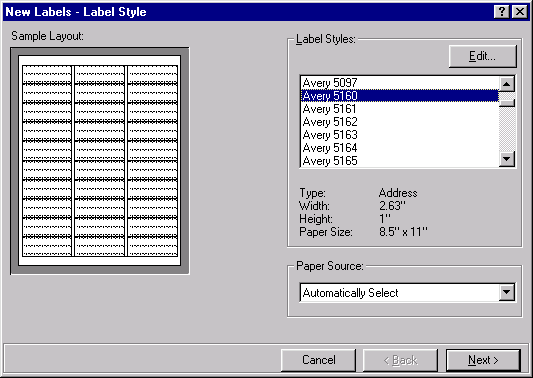
Choose the New button to open the New Labels - Label Style dialog box.
-
If you are creating a system report, select the System Report check box, then choose Next. This check box only appears if you are logged onto InterAction as the System Administrator User.
-
Select the Label Style (paper style). To create a custom label style, select Custom and choose Edit.
-
Select the Paper Source and choose Next. The paper source options are determined by the current default application printer.
-
Complete the New Labels - Contents dialog box.
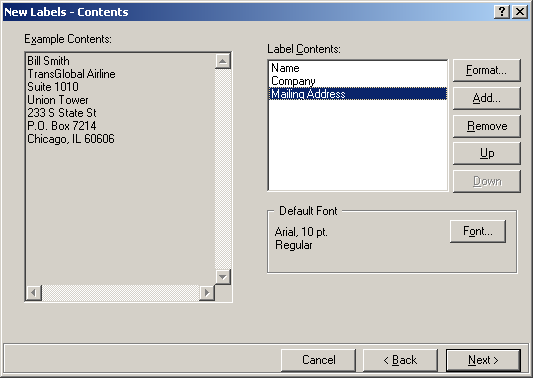
NOTE Refer to Adding and Formatting Contents for information on formatting the fields on your report layout.
Choose Add to select the fields you want to add to the label report and choose OK. Once you add a field, you may select it and choose any of the following buttons:
- Format - allows you to choose how the field should look in the report
- Up / Down - changes the order of the fields in the report
- Remove - removes the field from the report
Choose Font to change the font of the label’s contents. Choose Next when you have finished designing the contents.
-
Complete the New Labels - Options dialog box.
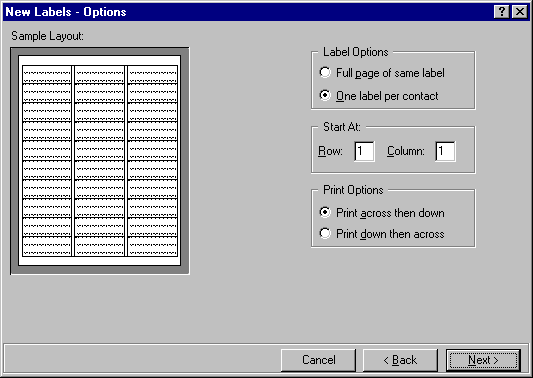
Choose Next when done.
-
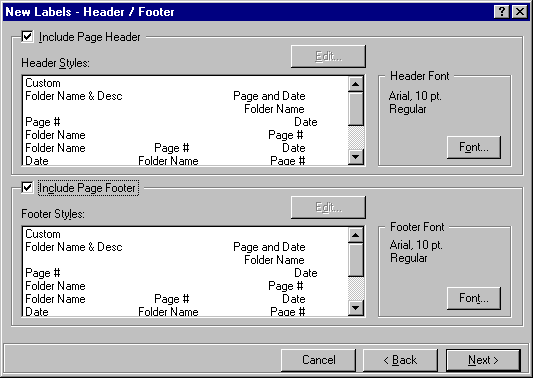
Complete the New Labels - Header / Footer dialog box.
-
If you want a page header, select the Include Page Header check box and select the header from the Header Styles.
-
If you want a page footer, select the Include Page Footer check box and select the footer from the Footer Styles.
-
To edit a header or footer, select the header or footer and choose Edit.
Choose Next when finished.
-
-
Complete the New Labels - Finish dialog box to indicate what you want InterAction to do when you choose Finish.
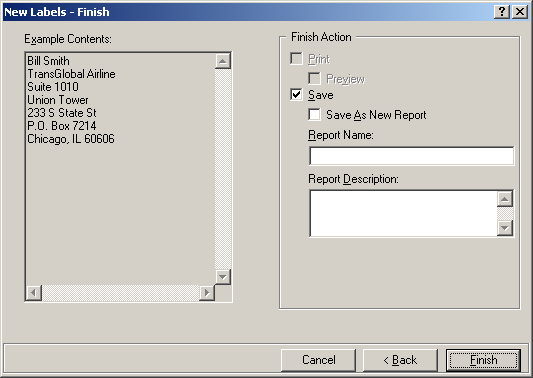
TIP It is usually a good idea to save a report layout even if you do not think you are going to use it again. If the print or preview does not look the way you want, you can edit the saved report layout rather than creating it again from scratch. You can always delete unwanted report layouts later.
If you select the Print check box, you can also select Preview to view the label report before it prints. If you choose Save, you can provide the report Name and Description. Choose Finish when done.
-
The updated IFR file is saved to the SysData directory on your network, not in the database.
If you edited a non-system report and saved it as a system report (System Administrator user only), you are notified that the report file has moved to the SysData directory.
Create an Envelope Report Layout
IMPORTANT When creating an envelope report layout, you are prompted for an envelope style. Envelope styles are created by your system administrator in InterAction Administrator. For more information, see Envelope Page Styles.
-
If you are creating a report layout that will be distributed throughout the organization (a system report), log on to the InterAction Windows Client as the System Administrator User.
-
Choose Tools > Envelopes to open the Print Report dialog box.
-
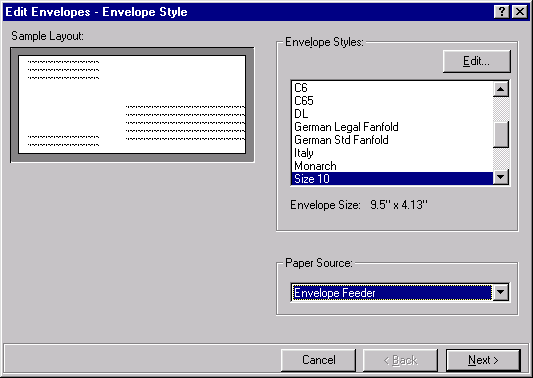
Choose the New button to open the New Envelopes - Envelope Style dialog box.
-
If you are creating a system report, select the System Report check box, then choose Next. This check box only appears if you are logged onto InterAction as the System Administrator User. Add wizard screens when time permits
-
Select the Envelope Style (paper style). To create a custom envelope style, select Custom and choose Edit.
-
Select the Paper Source and choose Next. The paper source options are determined by the current default application printer.
-
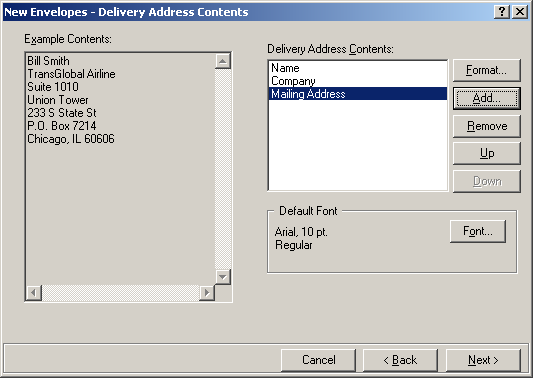
Complete the New Envelopes - Delivery Address Contents dialog box.
NOTE Refer to Adding and Formatting Contents for information on formatting the fields on your report layout.
Choose Add to select the fields you want to add to the envelope and choose OK. Once you add a field, you may select it and choose any of the following buttons:
- Format - allows you to choose how the field should look in the envelope
- Up / Down - changes the order of the fields in the envelope
- Remove - removes the field from the envelope
Choose Font to change the font of the envelope’s delivery address. Choose Next when you have finished designing the contents.
-
Complete the New Envelopes - Return Address / Envelope Note Contents dialog box.
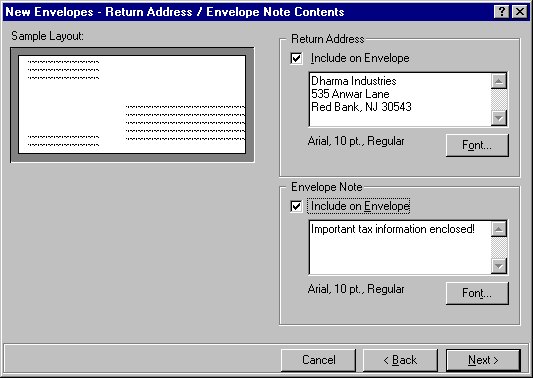
If you want to print a return address on the envelope, select the appropriate Include on Envelope check box and type the return address. If you want to print a note in the bottom left corner of the envelope, select the appropriate Include on Envelope check box and type the note. Choose Next when done.
-
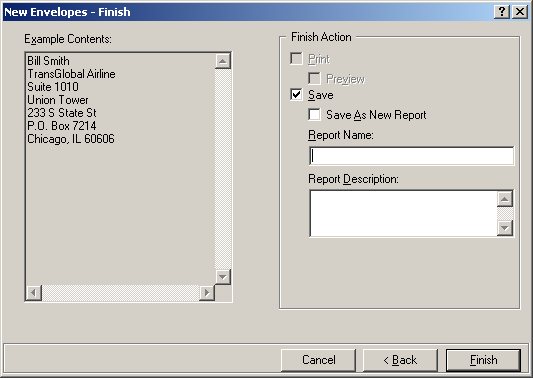
Complete the New Envelopes - Finish dialog box to indicate what you want InterAction to do when you choose Finish.
IMPORTANT It is usually a good idea to save a report even if you do not think you are going to use it again. If the print or preview does not look the way you want, you can edit the saved report rather than creating it again from scratch. You can always delete unwanted personal reports later.
If you select the Print check box, you can also select Preview to view the envelope report before it prints. If you choose Save, you can provide the report Name and Description. Choose Finish when done.
-
The updated IFR file is saved to the SysData directory on your network, not in the database.
If you edited a non-system report and saved it as a system report (System Administrator user only), you are notified that the report file has moved to the SysData directory.
Distributing Report Layouts for Labels or Envelopes
To distribute a report layout for labels or envelopes, locate the IFR file created for the report. This should be saved in the SysData directory for your workstation.
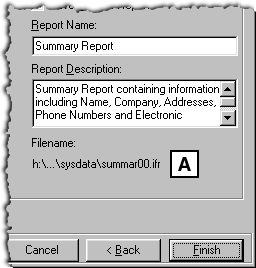
To determine the filename, select it from the Print Report dialog box, choose Edit, and step through all of the steps to the final panel of the wizard. The filename appears below the Report Description field.
Locating the Report Layout File
[A] InterAction automatically names the report filenames with the first six characters in the long Report Name (without spaces), followed by a two digit number. The numbers start at 00 and increment if you have multiple reports with the same initial characters.
Maintaining Label and Envelope Report Layouts
After you save a report layout you can later modify it or delete it.
You can edit a system report without logging into InterAction as the System Administrator User. If you do this, you will create a personal version of the report that is saved in the Data directory of your workstation.
Edit a Saved Report Layout
-
If you are editing a system report, log on to the InterAction Windows Client as the System Administrator User.
-
Choose Tools > Envelopes or Tools > Labels.
-
Select the report you want to edit and choose Edit.
-
Make changes to the dialog boxes as desired. Use the Next and Back buttons to move between dialog boxes. When you get to the Finish dialog box, make sure you check Save if you want to save the changes. Choose the Finish button when you are done.
-
If you are editing a system report, locate the IFR file created for the report. This should be saved in the SysData directory for your workstation.
Delete a Report Layout
-
Choose Tools > Envelopes or Tools > Labels.
-
Select the report you want to delete and choose Delete. (If the Delete button is inactive, then the selected report was created by your system administrator and cannot be deleted.)
-
Choose Yes to confirm that you want to delete the report.
