Section Topics
Including List Names on a Report (Reporting on Selected Lists)
You may want to display a list of the marketing lists, working lists, or folders that a contact is linked to. For example, if a professional wants to see all the marketing lists that a contact is on, you would add the Marketing Lists - Selected Lists data field to the report and choose to include all marketing lists. The same goes for working lists and folders - use the Selected Lists or Selected Folders option to retrieve names of folders or lists that the contact is linked to.
You can display list or folder names in one column (separated by a comma for example), or you can create a new row for each list or folder that contact is on (a good option when you are grouping by list or folder).
When displaying lists for a contact, you can also include folder-specific additional fields.
See the following topics for more information:
- Determining the Working Lists Included
- Determining the Marketing Lists Included
- Including Additional Fields from Selected Lists/Folders
- Including Folder Names on a Report (Reporting on Selected Folders)
Determining the Working Lists Included
Including selected working list data lets you view the working lists that a contact is linked to. You can display all the contact’s working lists or only selected working lists.
Select from one of the three options:
- Include all Working Lists for each contact
- Only include Working Lists that are of the type - Lets you select working lists by type (includes all lists of that type)
- Only include the selected Working Lists - Lets you select individual working lists
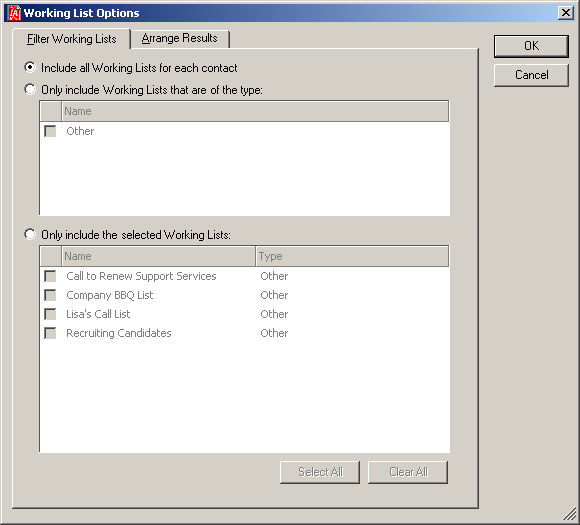
Selected Working List Options
Some contacts may be linked to multiple working lists. Therefore you may want to specify how to display those working lists on your report. To do this, choose the Arrange Results tab.
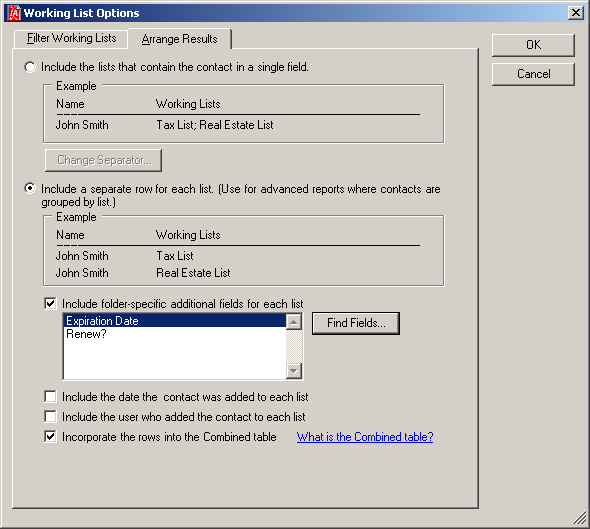
Selected Working List Options - Arrange Results
You have two options:
- Include the lists that contain the contact in a single field - This option is useful if you just want to see the values in a list. The values display together in one column. Initially, working lists are separated with semicolons (;). Choose Change Separator to select a different separator between each value (comma, line feed, etc.).
-
Include a separate row for each list - Use this option when you are creating reports that group by working list. A separate row displays for the contact for each working list. When this option is selected, you have several more options:
-
Include folder-specific additional fields for each list - Lets you add additional fields to the report. See Including Additional Fields from Selected Lists/Folders for more information.
-
Include the date the contact was added to each working list - Lets you add a column with the date and time the contact was added to each working list.
-
Include the user who added the contact to each working list - Lets you add a column with the InterAction user who added the contact to each working list.
-
Incorporate the rows into the Combined table - Lets you include the rows of data in the Combined table. If this option is not selected, the rows output to a separate table. See What is the Combined Table? for more information on the Combined table.
-
Determining the Marketing Lists Included
Including selected marketing list data lets you view the marketing lists that the contact is linked to. You can display all the contact’s marketing lists or only selected marketing lists.
Select from one of the three options, then select the marketing lists to include:
- Include all Marketing Lists for each contact
- Only include Marketing Lists that are of the type - Lets you select marketing lists by type (includes all lists of that type)
- Only include the selected Marketing Lists - Lets you select individual marketing lists

Selected Marketing List Options
Some contacts may be in multiple marketing lists. Therefore you may want to specify how to display those marketing lists on your report. To do this, choose the Arrange Results tab.
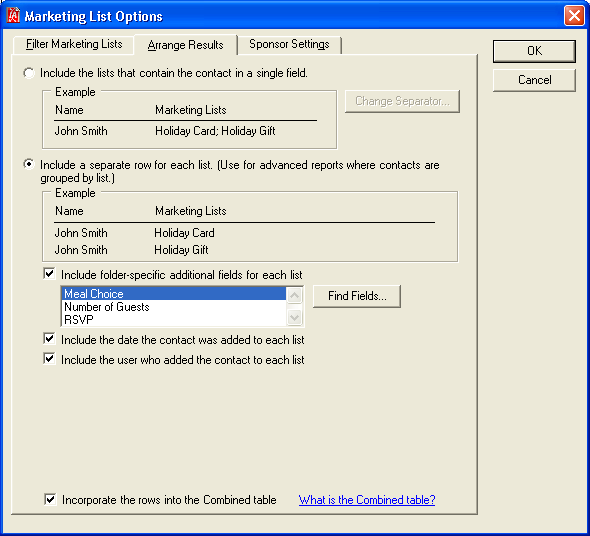
Selected Marketing List Options - Arrange Results
You have two options:
- Include the lists that contain the contact in a single field - This option is useful if you just want to see the values in a list. The values are displayed together in one column. Initially, marketing lists are separated with semicolons (;). Choose Change Separator to select a different separator between each value (comma, line feed, etc.).
-
Include a separate row for each list - Use this option when you are creating reports that group by marketing list. A separate row displays for the contact for each marketing list. When this option is selected, you have several more options:
-
Include folder-specific additional fields for each list - Lets you add additional fields to the report. See Including Additional Fields from Selected Lists/Folders for more information.
-
Include the date the contact was added to each list - Lets you add a column with the date and time the contact was added to each marketing list.
-
Include the user who added the contact to each list - Lets you add a column with the InterAction user who added the contact to each marketing list.
-
Incorporate the rows into the Combined table - Lets you include the rows of data in the Combined table. If this option is not selected, the rows output to a separate table. See What is the Combined Table? for more information on the Combined table.
-
Including Sponsorship Information on a Selected List
When reporting on a Selected Marketing List, you can only include sponsorship information when choosing Include a separate row for each list data option. This is because if you include all the lists that contain a contact in one field, there would be no logical way to list the sponsors for each of those lists.
To include sponsorship information on the report, choose the Sponsor Settings tab.
NOTE If you include sponsor information, the sponsor column(s) always display, even if the marketing list you run the report against does not include sponsorship.
| Option | Description |
|---|---|
| Do not include sponsorship information | No sponsorship information is included on the report. |
| Include only Primary Sponsor |
Adds a Primary Sponsor column next to every marketing list column exported that supports sponsorship. See Including Only the Primary Sponsor on a Selected Marketing List for details. |
| Include All Sponsors |
Adds a Sponsors column next to every marketing list column exported that supports sponsorship. See Including All Sponsors on a Selected Marketing List for details. |
Including Only the Primary Sponsor on a Selected Marketing List
To only include information for the primary sponsor on the report, choose Include only Primary Sponsor in the drop-down list.
By default, the report only includes the primary sponsor’s name (Full Name). To include additional information on the primary sponsor, choose Select.
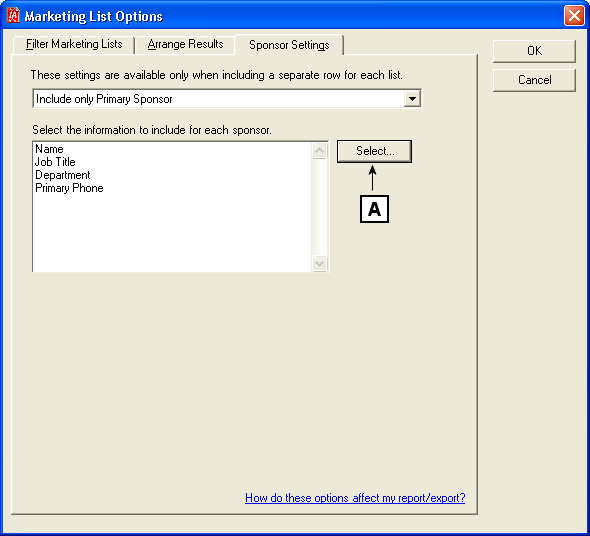
Including Only the Primary Sponsor on the Report
[A] To choose the data to include on the primary sponsor, choose Select.
After choosing Select, the Report Contact Options dialog box displays with all the data fields available to include for the sponsors. Select data fields to include on the report and choose OK. See Adding and Removing Data Fields for steps on adding data fields to the report.
For each contact you are reporting on, information is output into separate rows for each primary sponsor. For example, John Harris is on three marketing lists: Tax Event, Environmental Newsletter, and Holiday Card. He has a primary sponsor for each list. You want to include the Full Name, Job Title, Department, and Primary Phone for each primary sponsor. Your report outputs three rows for John, each listing the primary sponsor and the sponsor information in separate columns.
Including All Sponsors on a Selected Marketing List
To include all sponsors on the report, choose Include All Sponsors in drop-down list.
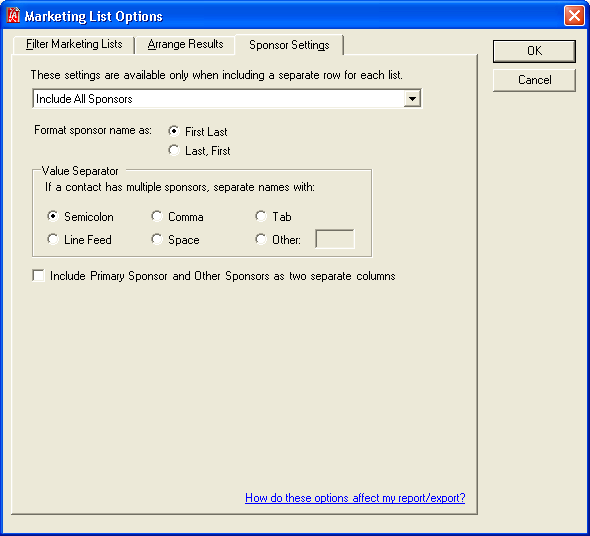
Including All Sponsors on a Selected Marketing List
When including all sponsors in a report, all sponsor names are output into a single column. Or you can select Include Primary Sponsor and Other Sponsors as two separate columns to distinguish the primary sponsor from other sponsors.
Options for formatting data in the report include:
-
Format sponsor name as - Controls the name display
-
First Last displays sponsors as Jane Tarnoff
-
Last, First displays sponsors as Tarnoff, Jane
IMPORTANT If you format the sponsor name Last, First, it is recommended to use a value separator other than Comma to make the report more readable.
-
- Value Separator - Item used to separate sponsor names
Including Additional Fields from Selected Lists/Folders
You can include additional fields on your report from selected marketing lists. For example, assume you want to print a report that lists contacts’ RSVP responses and meal choices for two marketing events you have scheduled next month. To do this, first select the two event folders to include in the report. Then select the additional fields to include in the report. Each additional field is available to add to your report as a separate column.
-
Add the Selected Marketing Lists InterAction data field (choose Selected Working Lists if you are reporting on working lists or Selected Folders if you are reporting on folders) to the list of Report Fields then choose Edit.
-
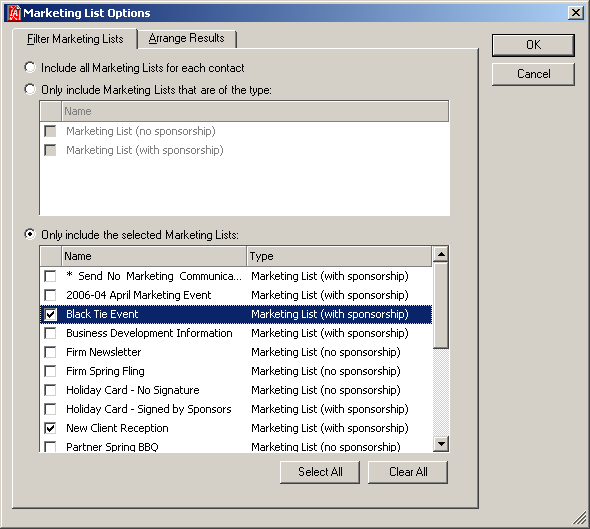
Select the folders to include in your report.
For example, to see the RSVP and meal choice selections for the Black Tie Event and New Client Reception folders, choose these folders.
-
Choose the Arrange Results tab.
-
Choose Include a separate row for each list then select Include folder-specific additional fields for this list.
-
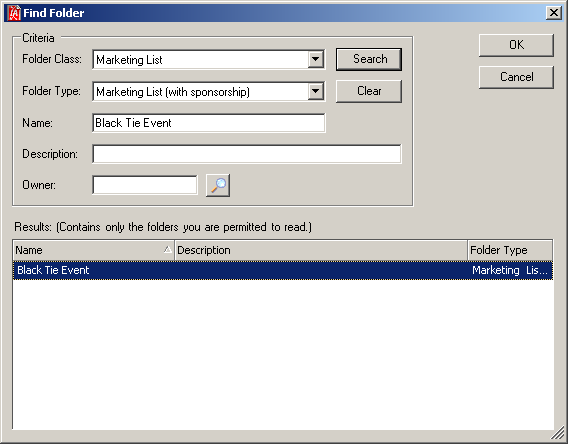
Choose Find Fields to locate the additional fields to include in the report. In this example, you would search for a folder that contains the RSVP and Meal Choice additional fields. You don’t have to select a folder you are including in your report - you can select any folder that contains the additional fields that you want to include in your report.
IMPORTANT If the user running the report does not have access to the folder from which additional fields are taken, the field column headers display in the report, but no data displays for those fields. Consider the users who will be running the report - choose a folder they have access to.
-
When you choose OK, you are returned to the Marketing List Options dialog box and the additional fields defined for that folder are displayed in the list of fields. Choose OK.
-
In the report design, design your report as normal, adding the additional fields to the report.
Any folders that are included in the report that have the same additional fields defined will have values output for the report. In this example, the Black Tie Event and the New Client Reception are included in the report. However, if you later decide to add the May Marketing Event folder, you could add that folder to the report as well. If that folder contains the RSVP and Meal Choice additional fields, those values will output for that folder. If that folder only contains the RSVP additional field for example, the values will display for the RSVP folder and the Meal Choice column will be blank.
Keep in mind that InterAction reporting only reports on contacts in the current view. For example, if I run the RSVP and Meal Choice report with my Send No Marketing Communications folder in the current view, the contact names will display in the report, but since they are not on any of the marketing lists included in the report, the fields will be blank.
Maintaining Reports That Use Additional Fields
When you are building a report that uses any of the Selected Marketing Lists, Folders, Matters, Opportunities, or Engagements options, remember that InterAction is taking the additional field information from the folder you selected on the Find Folder dialog box. This means that:
- If you add an additional field to the specified folder, that field is available to add to your report layout. Remember that the data included for that field in the report comes from the folders that you have chosen to include in the report. If the field is not also included in these folders, no data displays for that field.
- If you remove an additional field from the specified folder and that field is included in your report layout, no data displays for that field. Remove the field from your report layout.
- If the folder is deleted, the additional fields are deleted as well. If any of those fields are included in your report layout, no data displays for those fields. Remove those fields from your report layout or choose a different folder from which the additional field definitions are taken.
