Section Topics
Managing the List of Scheduled Processes
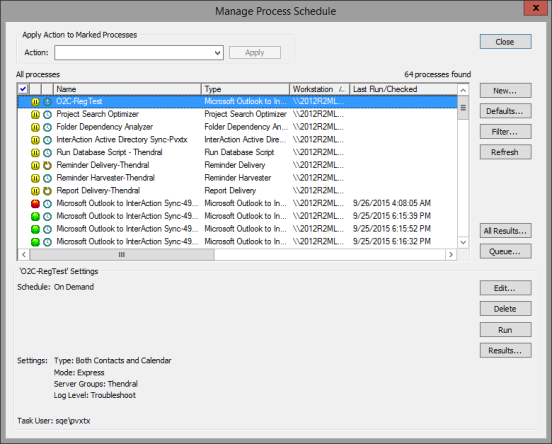
You can view the list of all scheduled processes for your InterAction environment on any workstation with InterAction Administrator installed. This list displays:
- The workstation on which the process runs
- The name of the process that is being run
- The schedule for the process
- Summary of settings
- A note if the process could not be saved to the task scheduler on the selected workstation
Tip: After a process has run, you can review the logs for the process to check for any errors or warnings encountered. For more information, see Reviewing the Results for a Process.
To view the list of scheduled processes, log on to InterAction Administrator and double-click Process - Schedule and Results in the main entity list.

Viewing the List of Scheduled Processes in the Process Schedule Dialog Box
From this dialog box, you can perform a number of important tasks:
- Updating Settings for Multiple Processes at Once
- Running a Process on Demand
- Deleting a Scheduled Process
- Updating the Windows Task Scheduler
Updating Settings for Multiple Process at Once
From the Manage Process Schedule dialog box, you can mark processes and do any of the following:
- Delete the selected processes
- Disable the selected processes (if currently enabled)
- Enable the selected processes (if currently disabled)
- Refresh Windows Task Scheduler for the workstations on which the selected processes run (scheduled processes only)
- Update email notification settings for the selected processes
- Update Task User Account for the selected processes (scheduled processes only)
These actions are only performed on the processes you have marked. If the currently selected process is not marked, the action is not performed on that process.
Running a Process on Demand
You can run any process on demand by choosing either the Run (scheduled processes) or the Start (continuous processes) button on the Manage Process Schedule dialog box. When you choose Run, the Process Manager application on the specified workstation adds the specified process to its schedule of processes. If no other processes are currently waiting to run, the process runs immediately. When you choose Start, the Process Manager location immediately launches the continuous process if it is currently a specified run time.
Deleting a Scheduled Process
You can delete a scheduled process that is no longer in use.
When deleting a scheduled process, InterAction attempts to update the workstation on which the process was configured. If the process is now being run on a different machine, you can either delete the process and create a new one, or change the workstation name for the process (see How Do I Change the Workstation on Which to Run a Process?).
To delete a process:
- From the main entity list in InterAction Administrator, double-click Processes - Schedule and Results.
- On the Manage Process Schedule dialog box, mark the processes to delete.
-
From the Action drop-down list, choose Delete and choose Apply.
-
When finished, choose Close.
Tip: You can also delete a process by selecting (highlighting) it, then choosing the Delete button in the lower right corner of the dialog box.
How Do I Change the Workstation on Which to Run a Process?
If a process now runs on a different machine, you can change the name of the workstation on which to run the process rather than create a new process. This is useful if a machine is no longer available and you want to specify a new workstation on which to run the process.
To change the name of the workstation on which to run a process:
- Highlight the process in the Manage Process Schedule dialog box, then choose Edit. The Edit Scheduled Process dialog box displays.
- Choose Select on the Edit Scheduled Process dialog box.
- You are notified that the workstation is not available. Choose OK.
-
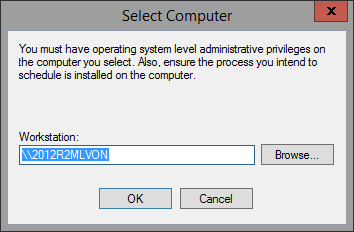
Type or browse for the new workstation, then choose OK.

Updating the Windows Task Scheduler
When you are troubleshooting a scheduled process or restoring your environment after a disaster, always update the Windows Task Scheduler on affected workstations to resynchronize the process schedule with Windows Task Scheduler. This is an important step to ensuring that the scheduled processes are initiated and run at the correct times.
Note: You do not need to update the Windows Task Scheduler for continuous processes.
To update the Windows Task Scheduler:
-
From the main entity list in InterAction Administrator, double-click Process - Schedule and Results.
-
On the Manage Process Schedule dialog box, mark the processes whose workstations need to be updated. You can sort the list of processes by workstation by clicking the Workstation column heading.
-
From the Action drop-down list, select Refresh Windows Task Scheduler and choose Apply.
-
When finished, choose Close.
