Section Topics
Configuring Active Directory Synchronization
You must run the Active Directory Sync wizard to configure and enable the Active Directory Sync options. Until the wizard is run, you cannot access the InterAction Snap-in for Active Directory or schedule the Active Directory Sync process.
Note: Prior to running the Active Directory Sync wizard, you must run the InterAction Active Directory Sync Configuration utility. For details, see the Installation Reference guide.
Use caution if using Circular Group Nesting.
Matching InterAction Users with Active Directory Users
If you already have users in InterAction (this is especially true for users that are upgraded from a previous version of InterAction), the Active Directory Sync wizard attempts to match the InterAction users with users in Active Directory based on account name. The majority of these users should be matched up automatically. InterAction users that cannot be matched by the wizard can be matched manually in the wizard through the Review Unmatched User Accounts dialog box.
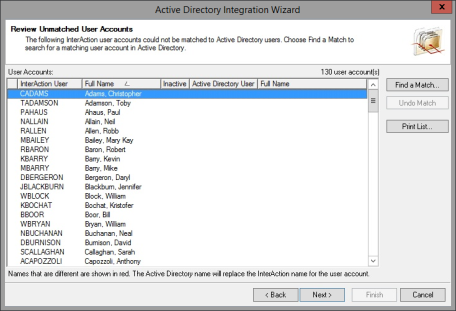
Review Unmatched User Accounts Dialog Box
Matching InterAction Groups with Active Directory Groups
Unlike user accounts, which are automatically matched up by the Active Directory Sync wizard, groups are not matched up automatically. However, during the configuration process, you are given the opportunity to match your existing InterAction groups with groups in Active Directory manually. This process is performed in the Find Active Directory Group dialog box.
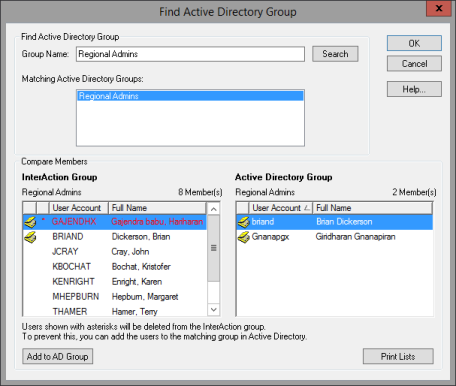
Find Activity Directory Group
The Group Name specifies the name of the InterAction group for which you are trying to find an Active Directory match. When you choose the Search button, all Active Directory groups that meet the search criteria are displayed in the Matching Active Directory Groups field.
In the Compare Members section of the dialog box, the left column shows the members of the applicable InterAction group and the right column shows the members of the highlighted Active Directory group. Members in the left column that appear in red with an asterisk are members that are in the InterAction group but not in the Active Directory group. By default, these members are deleted from the group when the groups are matched. To sort on these members, select the column with the asterisk.
If you wish to add a user account to the Active Directory group, highlight the user account and choose the Add to AD Group button.
Should I Add All User Accounts from the InterAction Group that Are Not in Active Directory?
Not necessarily. You need to consider the fact that by selecting the Add to AD Group button, you are automatically granting this user all rights that you have assigned to the group for all other systems that use Active Directory. Review each user account individually to determine what additional rights will be granted by adding the user to the group.
Adding InterAction Groups to Active Directory
During the configuration process, you are given the opportunity to add your existing InterAction groups to Active Directory. This is done by choosing the Add to AD button from the Groups dialog box.
If the group does not exist in Active Directory, the group is added to Active Directory and all members of the InterAction group that are configured for Active Directory Sync are added to the Active Directory group. If there are members in the InterAction group that are not configured for synchronization, they are not added to Active Directory. However, they do remain in the InterAction group.
If the group does exist in Active Directory, the Active Directory Group Exists dialog box displays.
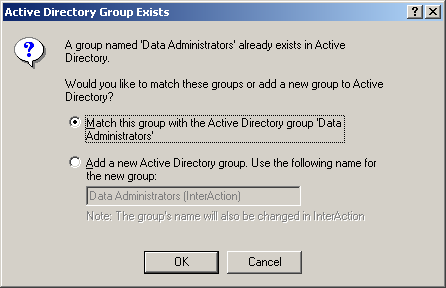
Active Directory Group Exists Dialog Box
This dialog box gives you two options:
- Match this group with the Active Directory group
- Add a new Active Directory group
If you decide to match the two groups, you are taken to the Find Active Directory dialog box. See Matching InterAction Groups with Active Directory Groups for details.
If you decide to add a new group to Active Directory, you must change the name of the group. This also changes the name in InterAction.
Setting up Active Directory Synchronization
Perform the following steps to configure Active Directory Synch:
-
From within InterAction Administrator, double-click Active Directory Sync Wizard from the entity list.
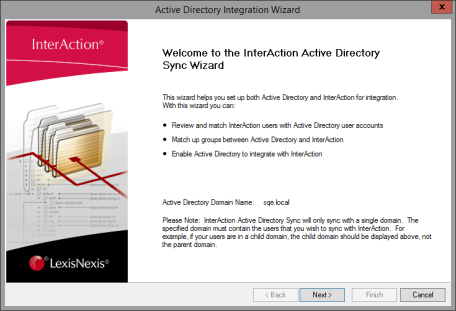
The wizard displays the Welcome dialog box.
-
On the Welcome dialog box, specify your domain name in the Active Directory Domain Name field, then choose Next.
If there are user accounts already in InterAction, the wizard attempts to match the users with user accounts in Active Directory. A process dialog box appears, indicating how many InterAction users are present and how many have been searched for in Active Directory.
Note: If there are no user accounts in InterAction, the wizard skips to the Review Groups dialog box (step 4).
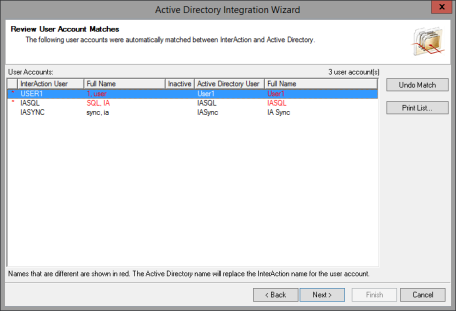
Once the process is complete, the wizard displays the Review User Account Matches dialog box.
The Review User Account Matches dialog box displays all the user accounts that are matched by account name between InterAction and Active Directory. The matches that appear in red with an asterisk for sorting indicate that there is a match based on user account, but the names are not exactly the same. Synchronization occurs between these accounts, however, the Active Directory version of the name replaces the InterAction version.
-
If the wizard matches any user accounts that should not be matched, highlight the applicable row and choose Undo Match. This only applies to those names that do not match exactly. Choose Next to access the Review Unmatched User Accounts dialog box.
The Review Unmatched User Accounts dialog box lets you manually match user accounts that could not be automatically matched.
-
Choose the Find a Match button to access the Find Active Directory User dialog box. From there you can search for potential Active Directory user account matches. The Undo Match button is used to undo any matches made from this dialog box. Choose Next to access the Review Groups dialog box.
Note: You do not have to match InterAction user accounts that are not automatically matched with Active Directory accounts. There may be valid business reasons for only having a particular user account in InterAction, for example, temporary accounts or accounts of users that have left the organization.
The Review Groups dialog box lets you manually match InterAction groups with Active Directory groups and add InterAction groups to Active Directory if appropriate. For more information see Matching InterAction Groups with Active Directory Groups and Adding InterAction Groups to Active Directory.

-
Undo any matches made on this dialog box by choosing the Undo Match button. Choose Next once you have completed your groups work.
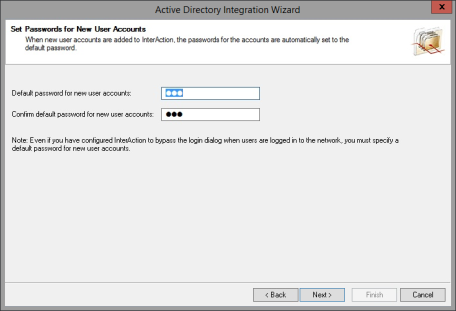
The wizard displays the New User Account Password dialog box.
-
Specify and confirm the default password to be used for all new user accounts created through Active Directory Sync. Choose Next and the wizard displays the Completing dialog box.
The default password is a security measure so there are not active accounts with no passwords. If you are using NTLM to login into InterAction, this password does not need to be known by the user. Individual passwords can be updated in InterAction at a later time.
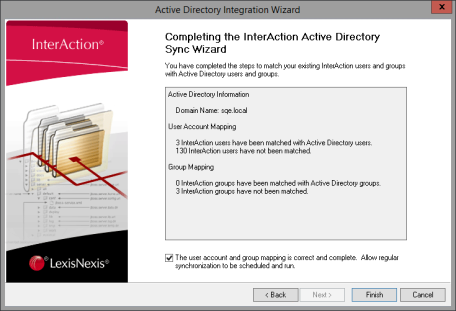
-
Select the Allow the InterAction Active Directory Integration features... check box.
Choose Finish to complete the configuration. The wizard displays the Active Directory Sync Wizard Results dialog box. This dialog box lets you view the IAADLog.txt file if any errors occurred during the configuration.