Section Topics
Creating an Envelope with an InterAction Contact
Microsoft Word provides an option for creating and printing an envelope. To make this more useful, you can look up an InterAction contact and create the envelope with the contact’s address.
You can search any of the following lists:
- My Contacts (i.e., your contact list) and the contact lists of anyone for whom you are a proxy
- The Firm List
- Marketing Lists
- Working Lists
If your organization has licensed any InterAction Related Modules – InterAction Matters, InterAction Opportunities, or InterAction Engagements, you can search contacts in these lists as well.

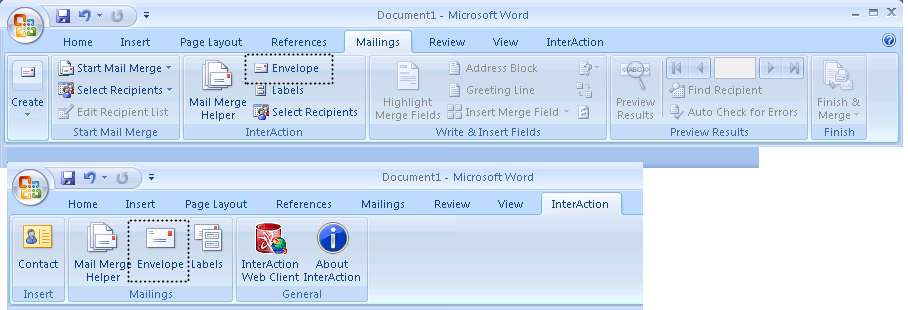
Envelope Button - Word
The Envelope button is available from both the Mailings tab and the InterAction tab.
Create an Envelope From an InterAction Contact
-
In Word, choose the Envelope button. This is available from the InterAction group on the Mailings tab.
InterAction displays the Find Contact dialog box.
-
If you are working on behalf of another user, select that user’s name from the Search on behalf of list.
If you select to work on behalf of another user, the lists you can search reflect that user. For example, searching My Contacts will search the contact list of the other user rather than your own contacts.
-
Choose the tab for the list(s) you want to search for the contact.
You can choose from the following:
- My Contacts
- Firm List
- Marketing Lists
- Working Lists
-
Any licensed InterAction Related Modules (such as Matters)
-
If you want to change the version of data to insert (your version or the firm’s version), choose Actions > Preferences and select the appropriate radio button.
For more details, see Selecting the Contact Data to Use. Note that the language-specific option does not apply when creating an envelope.
-
Enter search criteria for the contact and choose Search.
There are different options available depending on the tab you chose in the previous step. For example, when searching My Contacts, you can select a specific category, whereas when searching the Firm List you can select a contact type. For details, see Entering Search Criteria in the Find Contact Dialog Box.
-
Select the contact for whom you want to create the envelope in the Contacts list. The contact’s addresses are displayed in the box on the right.
-
Select the address you want to use and choose OK.
You can set an option to determine which addresses are displayed in the dialog box. For details, see Selecting the Contact Data to Use.
-
Review and make any changes to the Return Address and Send To address, then choose OK.
The Return Address is based on the address for the contact that represents you or the person for whom you are a proxy. If you have multiple addresses, you can select a different one from the drop-down list.
-
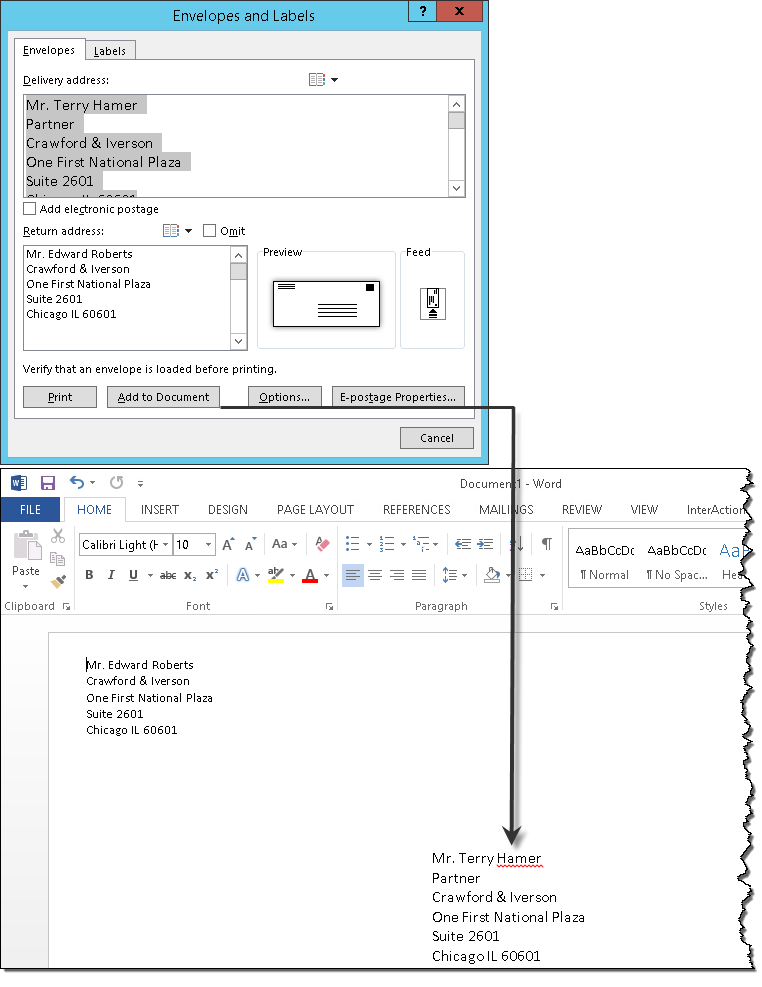
Preview the envelope in Microsoft Word’s Envelopes and Labels dialog box.
You can change any of the normal Word options, such as the envelope size or fonts used for the text. See Microsoft Word Help for details about creating envelopes.

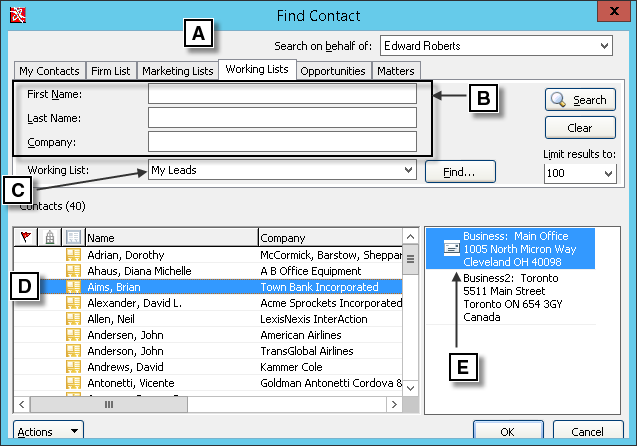
Finding the Contact and Address for an Envelope or Label
[A] Choose the type of list to search.
[B] The name fields are the same for the four main tabs.
[C] This varies depending on the list you are searching.
[D] Results of the search appear here in a grid. Select the contact in the list.
[E] This displays the contact’s addresses. Select the address you want to use on the envelope, then choose OK.

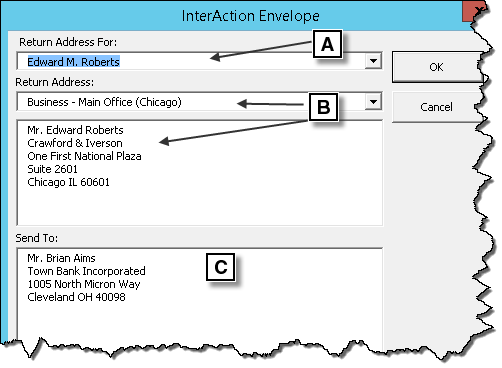
Entering Return Address Information
[A] Select the person for whom you are a proxy (if applicable).
[B] Select the return address you want to use from this list. You can also edit the text in the box directly.
[C] If necessary, edit the address for the contact.

Completing the Envelope in Word
