Section Topics
Create a Merge Template to Use with the Web Client
When launching mail merge from the Web Client, you can choose to use a pre-designed template provided by your organization. Alternatively, you can create and use your own template. You should have some familiarity with creating mail merge documents in Microsoft Word.
When you create your own template, you create the create the main document for the merge. This document contains both any static text you want for all recipients and placeholders representing the data in the data source.
The easiest way to create this document and use the placeholders representing InterAction information is to create all the static text first, then perform the mail merge from the Web Client and add the placeholders. Running the merge from the Web Client automatically connects your main document with the InterAction data.
-
Create your main document in Microsoft Word and include any static text. Save the document in a place you will remember.
-
In the Web Client, select the contacts you want to use and choose Actions > Create Letters, Envelopes, or Labels.
-
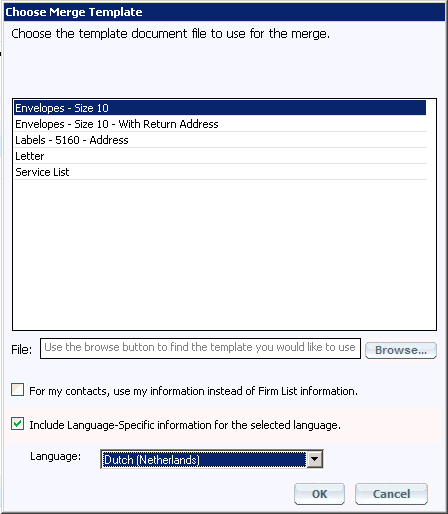
Choose the Browse button.
-
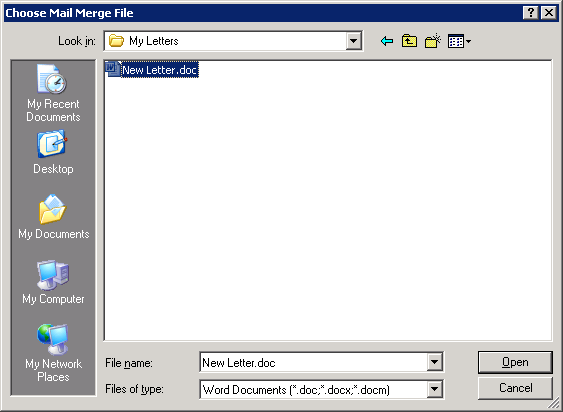
Select the file you saved in step 1 and choose Open. This places the path to the selected file in the Choose Merge Template dialog box.
-
If applicable, select the Include Language-Specific information for the selected language check box and then select the language from the drop-down list.
This option is available if your organization has configured InterAction for International Correspondence. Selecting this option exports language-specific information into merge fields you can use in your merge. See Using Language-Specific Fields in Your Custom Mail Merge Template for more details.
-
Choose OK. The Web Client opens your selected file and performs the merge. Since you haven’t added any InterAction fields yet, the resulting document contains just the static text.
-
In Word, switch to the main document file (not the merge results).
-
Use Word’s normal mail merge functionality to insert the InterAction fields you want to use.
-
Save the Word document, then complete the merge using Word’s normal merge options.

Selecting a Custom Mail Merge File
Once you’ve completed the merge document, you can use it with the Web Client without needing to do all of these steps. Launch a mail merge from the Web Client as described in Create Letters, Envelopes, or Labels from a List of Contacts, and select the saved template in step 3.
Using Language-Specific Fields in Your Custom Mail Merge Template
If your organization has configured InterAction for International Correspondence, then the language-specific fields configured for your environment are available for use in your merge template. These use the following naming convention:
<Language Name>_<Field Name>
For example, the Language-Specific Job Title field for Dutch (Netherlands) would become a merge field named:
<nl_NL_JobTitle>
Insert the language-specific fields for the particular language appropriate for your mailing to use the values stored in these fields. The specific fields available depend on how your organization configured International Correspondence in InterAction.
Note that these merge fields are only available for your document if you select to include language-specific information when choosing your template.

Selecting the Language to Use in the Merge
If you select Include Language-Specific information for the selected language, the merge fields for the selected language are available to add to the Word document.
For example, suppose your organization supports both German and Dutch languages. When you do your merge, you select to include Dutch-specific information. When building your main document in Word, fields for Dutch are available as merge fields; fields for German are not available. If you want to use German data, you need to redo the merge and select to include German-specific information instead.
Note that the values of the language-specific fields are entered using the Windows Client. You cannot enter or edit these values in the Web Client or in the Word integration.
Also note that the field names shown cannot show special characters. Any such characters are converted to “X” in the field name. The data within the fields is available and can show the characters; this limitation only applies to the merge field names.
Set the Merge Type for a Document
Microsoft Word can support different types of merges. For example, when creating letters, each contact starts a new page so that there is a separate letter for each. In contrast, a directory or catalog merge keeps the contacts on the same page and is used for lists.
To ensure that the right type of merge always takes place, add the custom property IAMergeType to the document. Make this a Number field and set its value to one of these numbers:
| Merge Type | Property Value |
|---|---|
| Letters | 0 |
| Labels | 1 |
| Envelopes | 2 |
| Directory or Catalog | 3 |
| 4 |
This step is important if you are creating a directory or catalog merge. It is not required for the other merge types.
Microsoft Word
To set a custom property:
-
If not already done, open the document.
-
Choose the File tab. From the left-hand sidebar, choose Info.
-
On the right side of the screen, choose the Properties drop-down and select Advanced Properties.
-
In the document properties dialog, select the Custom tab.
-
For the Name, enter IAMergeType. From the Type drop-down list, select Number, then enter the number representing the type of merge you want to perform in the Value edit box.
-
Choose Add to add the new property to the list.
-
Choose OK, then save the document.
